Generative AI with LangChain
Build production-ready LLM applications and advanced agents using Python, LangChain, and LangGraph
Generative AI with LangChain
Second Edition
Build production-ready LLM applications and advanced agents using Python, LangChain, and LangGraph
Ben Auffarth Leonid Kuligin
Copyright © 2025 Packt Publishing
All rights reserved. No part of this book may be reproduced, stored in a retrieval system, or transmitted in any form or by any means, without the prior written permission of the publisher, except in the case of brief quotations embedded in critical articles or reviews.
Every effort has been made in the preparation of this book to ensure the accuracy of the information presented. However, the information contained in this book is sold without warranty, either express or implied. Neither the authors, nor Packt Publishing or its dealers and distributors, will be held liable for any damages caused or alleged to have been caused directly or indirectly by this book.
Packt Publishing has endeavored to provide trademark information about all of the companies and products mentioned in this book by the appropriate use of capitals. However, Packt Publishing cannot guarantee the accuracy of this information.
Portfolio Director: Gebin George Relationship Lead: Ali Abidi Project Manager: Prajakta Naik Content Engineer: Tanya D’cruz Technical Editor: Irfa Ansari Copy Editor: Safis Editing Indexer: Manju Arasan Proofreader: Tanya D’cruz Production Designer: Ajay Patule Growth Lead: Nimisha Dua
First published: December 2023 Second edition: May 2025
Production reference: 1190525
Published by Packt Publishing Ltd. Grosvenor House
11 St Paul’s Square
Birmingham
B3 1RB, UK.
ISBN 978-1-83702-201-4
To the mentors who guided me throughout my life—especially Tony Lindeberg, whose personal integrity and perseverance are a tremendous source of inspiration—and to my son, Nicholas, and my partner, Diane.
—Ben Auffarth
To my wife, Ksenia, whose unwavering love and optimism have been my constant support over all these years; to my mother-in-law, Tatyana, whose belief in me—even in my craziest endeavors—has been an incredible source of strength; and to my kids, Matvey and Milena: I hope you’ll read it one day.
—Leonid Kuligin
Contributors
About the reviewers
Max Tschochohei advises enterprise customers on how to realize their AI and ML ambitions on Google Cloud. As an engineering manager in Google Cloud Consulting, he leads teams of AI engineers on mission-critical customer projects. While his work spans the full range of AI products and solutions in the Google Cloud portfolio, he is particularly interested in agentic systems, machine learning operations, and healthcare applications of AI. Before joining Google in Munich, Max spent several years as a consultant, first with KPMG and later with the Boston Consulting Group. He also led the digital transformation of NTUC Enterprise, a Singapore government organization. Max holds a PhD in Economics from Coventry University.
Rany ElHousieny is an AI Solutions Architect and AI Engineering Manager with over two decades of experience in AI, NLP, and ML. Throughout his career, he has focused on the development and deployment of AI models, authoring multiple articles on AI systems architecture and ethical AI deployment. He has led groundbreaking projects at companies like Microsoft, where he spearheaded advancements in NLP and the Language Understanding Intelligent Service (LUIS). Currently, he plays a pivotal role at Clearwater Analytics, driving innovation in generative AI and AI-driven financial and investment management solutions.
Nicolas Bievre is a Machine Learning Engineer at Meta with extensive experience in AI, recommender systems, LLMs, and generative AI, applied to advertising and healthcare. He has held key AI leadership roles at Meta and PayPal, designing and implementing large-scale recommender systems used to personalize content for hundreds of millions of users. He graduated from Stanford University, where he published peer-reviewed research in leading AI and bioinformatics journals. Internationally recognized for his contributions, Nicolas has received awards such as the “Core Ads Growth Privacy” Award and the “Outre-Mer Outstanding Talent” Award. He also serves as an AI consultant to the French government and as a reviewer for top AI organizations.
Join our communities on Discord and Reddit
Have questions about the book or want to contribute to discussions on Generative AI and LLMs? Join our Discord server at https://packt.link/4Bbd9 and our Reddit channel at https://packt. link/wcYOQ to connect, share, and collaborate with like-minded AI professionals.
Discord QR Reddit QR


Preface
With Large Language Models (LLMs) now powering everything from customer service chatbots to sophisticated code generation systems, generative AI has rapidly transformed from a research lab curiosity to a production workhorse. Yet a significant gap exists between experimental prototypes and production-ready AI applications. According to industry research, while enthusiasm for generative AI is high, over 30% of projects fail to move beyond proof of concept due to reliability issues, evaluation complexity, and integration challenges. The LangChain framework has emerged as an essential bridge across this divide, providing developers with the tools to build robust, scalable, and practical LLM applications.
This book is designed to help you close that gap. It’s your practical guide to building LLM applications that actually work in production environments. We focus on real-world problems that derail most generative AI projects: inconsistent outputs, difficult debugging, fragile tool integrations, and scaling bottlenecks. Through hands-on examples and tested patterns using LangChain, LangGraph, and other tools in the growing generative AI ecosystem, you’ll learn to build systems that your organization can confidently deploy and maintain to solve real problems.
Who this book is for
This book is primarily written for software developers with basic Python knowledge who want to build production-ready applications using LLMs. You don’t need extensive machine learning expertise, but some familiarity with AI concepts will help you move more quickly through the material. By the end of the book, you’ll be confidently implementing advanced LLM architectures that would otherwise require specialized AI knowledge.
If you’re a data scientist transitioning into LLM application development, you’ll find the practical implementation patterns especially valuable, as they bridge the gap between experimental notebooks and deployable systems. The book’s structured approach to RAG implementation, evaluation frameworks, and observability practices addresses the common frustrations you’ve likely encountered when trying to scale promising prototypes into reliable services.
For technical decision-makers evaluating LLM technologies within their organizations, this book offers strategic insight into successful LLM project implementations. You’ll understand the architectural patterns that differentiate experimental systems from production-ready ones, learn to identify high-value use cases, and discover how to avoid the integration and scaling issues that cause most projects to fail. The book provides clear criteria for evaluating implementation approaches and making informed technology decisions.
What this book covers
Chapter 1, The Rise of Generative AI, From Language Models to Agents, introduces the modern LLM landscape and positions LangChain as the framework for building production-ready AI applications. You’ll learn about the practical limitations of basic LLMs and how frameworks like LangChain help with standardization and overcoming these challenges. This foundation will help you make informed decisions about which agent technologies to implement for your specific use cases.
Chapter 2, First Steps with LangChain, gets you building immediately with practical, hands-on examples. You’ll set up a proper development environment, understand LangChain’s core components (model interfaces, prompts, templates, and LCEL), and create simple chains. The chapter shows you how to run both cloud-based and local models, giving you options to balance cost, privacy, and performance based on your project needs. You’ll also explore simple multimodal applications that combine text with visual understanding. These fundamentals provide the building blocks for increasingly sophisticated AI applications.
Chapter 3, Building Workflows with LangGraph, dives into creating complex workflows with LangChain and LangGraph. You’ll learn to build workflows with nodes and edges, including conditional edges for branching based on state. The chapter covers output parsing, error handling, prompt engineering techniques (zero-shot and dynamic few-shot prompting), and working with long contexts using Map-Reduce patterns. You’ll also implement memory mechanisms for managing chat history. These skills address why many LLM applications fail in real-world conditions and give you the tools to build systems that perform reliably.
Chapter 4, Building Intelligent RAG Systems, addresses the “hallucination problem” by grounding LLMs in reliable external knowledge. You’ll master vector stores, document processing, and retrieval strategies that improve response accuracy. The chapter’s corporate documentation chatbot project demonstrates how to implement enterprise-grade RAG pipelines that maintain consistency and compliance—a capability that directly addresses data quality concerns cited in industry surveys. The troubleshooting section covers seven common RAG failure points and provides practical solutions for each.
Chapter 5, Building Intelligent Agents, tackles tool use fragility—identified as a core bottleneck in agent autonomy. You’ll implement the ReACT pattern to improve agent reasoning and decision-making, develop robust custom tools, and build error-resilient tool calling processes. Through practical examples like generating structured outputs and building a research agent, you’ll understand what agents are and implement your first plan-and-solve agent with LangGraph, setting the stage for more advanced agent architectures.
Chapter 6, Advanced Applications and Multi-Agent Systems, covers architectural patterns for agentic AI applications. You’ll explore multi-agent architectures and ways to organize communication between agents, implementing an advanced agent with self-reflection that uses tools to answer complex questions. The chapter also covers LangGraph streaming, advanced control flows, adaptive systems with humans in the loop, and the Tree-of-Thoughts pattern. You’ll learn about memory mechanisms in LangChain and LangGraph, including caches and stores, equipping you to create systems capable of tackling problems too complex for single-agent approaches—a key capability of production-ready systems.
Chapter 7, Software Development and Data Analysis Agents, demonstrates how natural language has become a powerful interface for programming and data analysis. You’ll implement LLM-based solutions for code generation, code retrieval with RAG, and documentation search. These examples show how to integrate LLM agents into existing development and data workflows, illustrating how they complement rather than replace traditional programming skills.
Chapter 8, Evaluation and Testing, outlines methodologies for assessing LLM applications before production deployment. You’ll learn about system-level evaluation, evaluation-driven design, and both offline and online methods. The chapter provides practical examples for implementing correctness evaluation using exact matches and LLM-as-a-judge approaches and demonstrates tools like LangSmith for comprehensive testing and monitoring. These techniques directly increase reliability and help justify the business value of your LLM applications.
Chapter 9, Observability and Production Deployment, provides guidelines for deploying LLM applications into production, focusing on system design, scaling strategies, monitoring, and ensuring high availability. The chapter covers logging, API design, cost optimization, and redundancy strategies specific to LLMs. You’ll explore the Model Context Protocol (MCP) and learn how to implement observability practices that address the unique challenges of deploying generative AI systems. The practical deployment patterns in this chapter help you avoid common pitfalls that prevent many LLM projects from reaching production.
Chapter 10, The Future of LLM Applications, looks ahead to emerging trends, evolving architectures, and ethical considerations in generative AI. The chapter explores new technologies, market developments, potential societal impacts, and guidelines for responsible development. You’ll gain insight into how the field is likely to evolve and how to position your skills and applications for future advancements, completing your journey from basic LLM understanding to building and deploying production-ready, future-proof AI systems.
To get the most out of this book
Before diving in, it’s helpful to ensure you have a few things in place to make the most of your learning experience. This book is designed to be hands-on and practical, so having the right environment, tools, and mindset will help you follow along smoothly and get the full value from each chapter. Here’s what we recommend:
- Environment requirements: Set up a development environment with Python 3.10+ on any major operating system (Windows, macOS, or Linux). All code examples are cross-platform compatible and thoroughly tested.
- API access (optional but recommended): While we demonstrate using open-source models that can run locally, having access to commercial API providers like OpenAI, Anthropic, or other LLM providers will allow you to work with more powerful models. Many examples include both local and API-based approaches, so you can choose based on your budget and performance needs.
- Learning approach: We recommend typing the code yourself rather than copying and pasting. This hands-on practice reinforces learning and encourages experimentation. Each chapter builds on concepts introduced earlier, so working through them sequentially will give you the strongest foundation.
- Background knowledge: Basic Python proficiency is required, but no prior experience with machine learning or LLMs is necessary. We explain key concepts as they arise. If you’re already familiar with LLMs, you can focus on the implementation patterns and production-readiness aspects that distinguish this book.
| Software/Hardware covered in the book | |
|---|---|
| Python 3.10+ | |
| LangChain 0.3.1+ | |
| LangGraph 0.2.10+ | |
| Various LLM providers (Anthropic, Google, OpenAI, local models) |
You’ll find detailed guidance on environment setup in Chapter 1, along with clear explanations and step-by-step instructions to help you get started. We strongly recommend following these setup steps as outlined—given the fast-moving nature of LangChain, LangGraph and the broader ecosystem, skipping them might lead to avoidable issues down the line.
Download the example code files
The code bundle for the book is hosted on GitHub at https://github.com/benman1/generative\_ ai\_with\_langchain. We recommend typing the code yourself or using the repository as you progress through the chapters. If there’s an update to the code, it will be updated in the GitHub repository.
We also have other code bundles from our rich catalog of books and videos available at https:// github.com/PacktPublishing. Check them out!
Download the color images
We also provide a PDF file that has color images of the screenshots/diagrams used in this book. You can download it here: https://packt.link/gbp/9781837022014.
Conventions used
There are a number of text conventions used throughout this book.
CodeInText: Indicates code words in text, database table names, folder names, filenames, file extensions, pathnames, dummy URLs, user input, and Twitter handles. For example: “Let’s also restore from the initial checkpoint for thread-a. We’ll see that we start with an empty history:”
A block of code is set as follows:
checkpoint_id = checkpoints[-1].config["configurable"]["checkpoint_id"]
_ = graph.invoke(
 [HumanMessage(content="test")],
 config={"configurable": {"thread_id": "thread-a", "checkpoint_id":
checkpoint_id}})
Any command-line input or output is written as follows:
$ pip install langchain langchain-openaiBold: Indicates a new term, an important word, or words that you see on the screen. For instance, words in menus or dialog boxes appear in the text like this. For example: ” The Google Research team introduced the Chain-of-Thought (CoT) technique early in 2022.”

Warnings or important notes appear like this.

Tips and tricks appear like this.
Get in touch
Subscribe to AI_Distilled, the go-to newsletter for AI professionals, researchers, and innovators,

Feedback from our readers is always welcome.
If you find any errors or have suggestions, please report them preferably through issues on GitHub, the discord chat, or the errata submission form on the Packt website.
For issues on GitHub, see https://github.com/benman1/generative\_ai\_with\_langchain/ issues.
If you have questions about the book’s content, or bespoke projects, feel free to contact us at ben@ chelseaai.co.uk.
General feedback: Email feedback@packtpub.com and mention the book’s title in the subject of your message. If you have questions about any aspect of this book, please email us at questions@ packtpub.com.
Errata: Although we have taken every care to ensure the accuracy of our content, mistakes do happen. If you have found a mistake in this book, we would be grateful if you reported this to us. Please visit http://www.packtpub.com/submit-errata, click Submit Errata, and fill in the form.
Piracy: If you come across any illegal copies of our works in any form on the internet, we would be grateful if you would provide us with the location address or website name. Please contact us at copyright@packtpub.com with a link to the material.
If you are interested in becoming an author: If there is a topic that you have expertise in and you are interested in either writing or contributing to a book, please visit http://authors.packtpub. com/.
Download a free PDF copy of this book
Thanks for purchasing this book!
Do you like to read on the go but are unable to carry your print books everywhere?
Is your eBook purchase not compatible with the device of your choice?
Don’t worry, now with every Packt book you get a DRM-free PDF version of that book at no cost.
Read anywhere, any place, on any device. Search, copy, and paste code from your favorite technical books directly into your application.
The perks don’t stop there, you can get exclusive access to discounts, newsletters, and great free content in your inbox daily.
Follow these simple steps to get the benefits:
- Scan the QR code or visit the link below:

https://packt.link/free-ebook/9781837022014
- Submit your proof of purchase.
- That’s it! We’ll send your free PDF and other benefits to your email directly.
Chapter 1: The Rise of Generative AI: From Language Models to Agents
The gap between experimental and production-ready agents is stark. According to LangChain’s State of Agents report, performance quality is the #1 concern among 51% of companies using agents, yet only 39.8% have implemented proper evaluation systems. Our book bridges this gap on two fronts: first, by demonstrating how LangChain and LangSmith provide robust testing and observability solutions; second, by showing how LangGraph’s state management enables complex, reliable multi-agent systems. You’ll find production-tested code patterns that leverage each tool’s strengths for enterprise-scale implementation and extend basic RAG into robust knowledge systems.
LangChain accelerates time-to-market with readily available building blocks, unified vendor APIs, and detailed tutorials. Furthermore, LangChain and LangSmith debugging and tracing functionalities simplify the analysis of complex agent behavior. Finally, LangGraph has excelled in executing its philosophy behind agentic AI – it allows a developer to give a large language model (LLM) partial control flow over the workflow (and to manage the level of how much control an LLM should have), while still making agentic workflows reliable and well-performant.
In this chapter, we’ll explore how LLMs have evolved into the foundation for agentic AI systems and how frameworks like LangChain and LangGraph transform these models into production-ready applications. We’ll also examine the modern LLM landscape, understand the limitations of raw LLMs, and introduce the core concepts of agentic applications that form the basis for the hands-on development we’ll tackle throughout this book.
In a nutshell, the following topics will be covered in this book:
- The modern LLM landscape
- From models to agentic applications
- Introducing LangChain
The modern LLM landscape
Artificial intelligence (AI) has long been a subject of fascination and research, but recent advancements in generative AI have propelled it into mainstream adoption. Unlike traditional AI systems that classify data or make predictions, generative AI can create new content—text, images, code, and more—by leveraging vast amounts of training data.
The generative AI revolution was catalyzed by the 2017 introduction of the transformer architecture, which enabled models to process text with unprecedented understanding of context and relationships. As researchers scaled these models from millions to billions of parameters, they discovered something remarkable: larger models didn’t just perform incrementally better—they exhibited entirely new emergent capabilities like few-shot learning, complex reasoning, and creative generation that weren’t explicitly programmed. Eventually, the release of ChatGPT in 2022 marked a turning point, demonstrating these capabilities to the public and sparking widespread adoption.
The landscape shifted again with the open-source revolution led by models like Llama and Mistral, democratizing access to powerful AI beyond the major tech companies. However, these advanced capabilities came with significant limitations—models couldn’t reliably use tools, reason through complex problems, or maintain context across interactions. This gap between raw model power and practical utility created the need for specialized frameworks like LangChain that transform these models from impressive text generators into functional, production-ready agents capable of solving real-world problems.
Key terminologies
Tools: External utilities or functions that AI models can use to interact with the world. Tools allow agents to perform actions like searching the web, calculating values, or accessing databases to overcome LLMs’ inherent limitations.
Memory: Systems that allow AI applications to store and retrieve information across interactions. Memory enables contextual awareness in conversations and complex workflows by tracking previous inputs, outputs, and important information.
Reinforcement learning from human feedback (RLHF): A training technique where AI models learn from direct human feedback, optimizing their performance to align with human preferences. RLHF helps create models that are more helpful, safe, and aligned with human values.
Agents: AI systems that can perceive their environment, make decisions, and take actions to accomplish goals. In LangChain, agents use LLMs to interpret tasks, choose appropriate tools, and execute multi-step processes with minimal human intervention.
| Year | Development | Key Features |
|---|---|---|
| 1990s | IBM Alignment Models | Statistical machine translation |
| 2000s | Web-scale datasets | Large-scale statistical models |
| 2009 | Statistical models dominate | Large-scale text ingestion |
| 2012 | Deep learning gains traction | Neural networks outperform statistical models |
| 2016 | Neural Machine Translation (NMT) |
Seq2seq deep LSTMs replace statistical methods |
| 2017 | Transformer architecture | Self-attention revolutionizes NLP |
| 2018 | BERT and GPT-1 | Transformer-based language understanding and generation |
| 2019 | GPT-2 | Large-scale text generation, public awareness increases |
| 2020 | GPT-3 | API-based access, state-of-the-art performance |
| 2022 | ChatGPT | Mainstream adoption of LLMs |
| 2023 | Large Multimodal Models (LMMs) |
AI models process text, images, and audio |
| 2024 | OpenAI o1 | Stronger reasoning capabilities |
| —— | ————- | ———————————– |
| 2025 | DeepSeek R1 | Open-weight, large-scale AI model |
Table 1.1: A timeline of major developments in language models
The field of LLMs is rapidly evolving, with multiple models competing in terms of performance, capabilities, and accessibility. Each provider brings distinct advantages, from OpenAI’s advanced general-purpose AI to Mistral’s open-weight, high-efficiency models. Understanding the differences between these models helps practitioners make informed decisions when integrating LLMs into their applications.
Model comparison
The following points outline key factors to consider when comparing different LLMs, focusing on their accessibility, size, capabilities, and specialization:
- Open-source vs. closed-source models: Open-source models like Mistral and LLaMA provide transparency and the ability to run locally, while closed-source models like GPT-4 and Claude are accessible through APIs. Open-source LLMs can be downloaded and modified, enabling developers and researchers to investigate and build upon their architectures, though specific usage terms may apply.
- Size and capabilities: Larger models generally offer better performance but require more computational resources. This makes smaller models great for use on devices with limited computing power or memory, and can be significantly cheaper to use. Small language models (SLMs) have a relatively small number of parameters, typically using millions to a few billion parameters, as opposed to LLMs, which can have hundreds of billions or even trillions of parameters.
- Specialized models: Some LLMs are optimized for specific tasks, such as code generation (for example, Codex) or mathematical reasoning (e.g., Minerva).
The increase in the scale of language models has been a major driving force behind their impressive performance gains. However, recently there has been a shift in architecture and training methods that has led to better parameter efficiency in terms of performance.
Model scaling laws
Empirically derived scaling laws predict the performance of LLMs based on the given training budget, dataset size, and the number of parameters. If true, this means that highly powerful systems will be concentrated in the hands of Big Tech, however, we have seen a significant shift over recent months.
The KM scaling law, proposed by Kaplan et al., derived through empirical analysis and fitting of model performance with varied data sizes, model sizes, and training compute, presents power-law relationships, indicating a strong codependence between model performance and factors such as model size, dataset size, and training compute.
The Chinchilla scaling law, proposed by the Google DeepMind team, involved experiments with a wider range of model sizes and data sizes. It suggests an optimal allocation of compute budget to model size and data size, which can be determined by optimizing a specific loss function under a constraint.

However, future progress may depend more on model architecture, data cleansing, and model algorithmic innovation rather than sheer size. For example, models such as phi, first presented in Textbooks Are All You Need (2023, Gunasekar et al.), with about 1 billion parameters, showed that models can – despite a smaller scale – achieve high accuracy on evaluation benchmarks. The authors suggest that improving data quality can dramatically change the shape of scaling laws.
Further, there is a body of work on simplified model architectures, which have substantially fewer parameters and only modestly drop accuracy (for example, One Wide Feedforward is All You Need, Pessoa Pires et al., 2023). Additionally, techniques such as fine-tuning, quantization, distillation, and prompting techniques can enable smaller models to leverage the capabilities of large foundations without replicating their costs. To compensate for model limitations, tools like search engines and calculators have been incorporated into agents, and multi-step reasoning strategies, plugins, and extensions may be increasingly used to expand capabilities.
The future could see the co-existence of massive, general models with smaller and more accessible models that provide faster and cheaper training, maintenance, and inference.
Let’s now discuss a comparative overview of various LLMs, highlighting their key characteristics and differentiating factors. We’ll delve into aspects such as open-source vs. closed-source models, model size and capabilities, and specialized models. By understanding these distinctions, you can select the most suitable LLM for your specific needs and applications.
LLM provider landscape
You can access LLMs from major providers like OpenAI, Google, and Anthropic, along with a growing number of others, through their websites or APIs. As the demand for LLMs grows, numerous providers have entered the space, each offering models with unique capabilities and trade-offs. Developers need to understand the various access options available for integrating these powerful models into their applications. The choice of provider will significantly impact development experience, performance characteristics, and operational costs.
Provider Notable models Key features and strengths OpenAI GPT-4o, GPT-4.5; o1; o3-mini Strong general performance, proprietary models, advanced reasoning; multimodal reasoning across text, audio, vision, and video in real time Anthropic Claude 3.7 Sonnet; Claude 3.5 Haiku Toggle between real-time responses and extended “thinking” phases; outperforms OpenAI’s o1 in coding benchmarks Google Gemini 2.5, 2.0 (flash and pro), Gemini 1.5 Low latency and costs, large context window (up to 2M tokens), multimodal inputs and outputs, reasoning capabilities Cohere Command R, Command R Plus Retrieval-augmented generation, enterprise AI solutions Mistral AI Mistral Large; Mistral 7B Open weights, efficient inference, multilingual support AWS Titan Enterprise-scale AI models, optimized for the AWS cloud
The table below provides a comparative overview of leading LLM providers and examples of the models they offer:
| DeepSeek | R1 | Maths-first: solves Olympiad-level problems; cost effective, optimized for multilingual and programming tasks |
|---|---|---|
| Together AI |
Infrastructure for running open models |
Competitive pricing; growing marketplace of models |
Table 1.2: Comparative overview of major LLM providers and their flagship models for LangChain implementation
Other organizations develop LLMs but do not necessarily provide them through application programming interfaces (APIs) to developers. For example, Meta AI develops the very influential Llama model series, which has strong reasoning, code-generation capabilities, and is released under an open-source license.
There is a whole zoo of open-source models that you can access through Hugging Face or through other providers. You can even download these open-source models, fine-tune them, or fully train them. We’ll try this out practically starting in Chapter 2.
Once you’ve selected an appropriate model, the next crucial step is understanding how to control its behavior to suit your specific application needs. While accessing a model gives you computational capability, it’s the choice of generation parameters that transforms raw model power into tailored output for different use cases within your applications.
Now that we’ve covered the LLM provider landscape, let’s discuss another critical aspect of LLM implementation: licensing considerations. The licensing terms of different models significantly impact how you can use them in your applications.
Licensing
LLMs are available under different licensing models that impact how they can be used in practice. Open-source models like Mixtral and BERT can be freely used, modified, and integrated into applications. These models allow developers to run them locally, investigate their behavior, and build upon them for both research and commercial purposes.
In contrast, proprietary models like GPT-4 and Claude are accessible only through APIs, with their internal workings kept private. While this ensures consistent performance and regular updates, it means depending on external services and typically incurring usage costs.
Some models like Llama 2 take a middle ground, offering permissive licenses for both research and commercial use while maintaining certain usage conditions. For detailed information about specific model licenses and their implications, refer to the documentation of each model or consult the model openness framework: https://isitopen.ai/.
The model openness framework (MOF) evaluates language models based on criteria such as access to model architecture details, training methodology and hyperparameters, data sourcing and processing information, documentation around development decisions, ability to evaluate model workings, biases, and limitations, code modularity, published model card, availability of servable model, option to run locally, source code availability, and redistribution rights.
In general, open-source licenses promote wide adoption, collaboration, and innovation around the models, benefiting both research and commercial development. Proprietary licenses typically give companies exclusive control but may limit academic research progress. Non-commercial licenses often restrict commercial use while enabling research.
By making knowledge and knowledge work more accessible and adaptable, generative AI models have the potential to level the playing field and create new opportunities for people from all walks of life.
The evolution of AI has brought us to a pivotal moment where AI systems can not only process information but also take autonomous action. The next section explores the transformation from basic language models to more complex, and finally, fully agentic applications.

The information provided about AI model licensing is for educational purposes only and does not constitute legal advice. Licensing terms vary significantly and evolve rapidly. Organizations should consult qualified legal counsel regarding specific licensing decisions for their AI implementations.
From models to agentic applications
As discussed so far, LLMs have been demonstrating remarkable fluency in natural language processing. However, as impressive as they are, they remain fundamentally reactive rather than proactive. They lack the ability to take independent actions, interact meaningfully with external systems, or autonomously achieve complex objectives.
To unlock the next phase of AI capabilities, we need to move beyond passive text generation and toward agentic AI—systems that can plan, reason, and take action to accomplish tasks with minimal human intervention. Before exploring the potential of agentic AI, it’s important to first understand the core limitations of LLMs that necessitate this evolution.
Limitations of traditional LLMs
Despite their advanced language capabilities, LLMs have inherent constraints that limit their effectiveness in real-world applications:
- Lack of true understanding: LLMs generate human-like text by predicting the next most likely word based on statistical patterns in training data. However, they do not understand meaning in the way humans do. This leads to hallucinations—confidently stating false information as fact—and generating plausible but incorrect, misleading, or nonsensical outputs. As Bender et al. (2021) describe, LLMs function as “stochastic parrots”—repeating patterns without genuine comprehension.
- Struggles with complex reasoning and problem-solving: While LLMs excel at retrieving and reformatting knowledge, they struggle with multi-step reasoning, logical puzzles, and mathematical problem-solving. They often fail to break down problems into sub-tasks or synthesize information across different contexts. Without explicit prompting techniques like chain-of-thought reasoning, their ability to deduce or infer remains unreliable.
- Outdated knowledge and limited external access: LLMs are trained on static datasets and do not have real-time access to current events, dynamic databases, or live information sources. This makes them unsuitable for tasks requiring up-to-date knowledge, such as financial analysis, breaking news summaries, or scientific research requiring the latest findings.
- No native tool use or action-taking abilities: LLMs operate in isolation—they cannot interact with APIs, retrieve live data, execute code, or modify external systems. This lack of tool integration makes them less effective in scenarios that require real-world actions, such as conducting web searches, automating workflows, or controlling software systems.
- Bias, ethical concerns, and reliability issues: Because LLMs learn from large datasets that may contain biases, they can unintentionally reinforce ideological, social, or cultural biases. Importantly, even with open-source models, accessing and auditing the complete training data to identify and mitigate these biases remains challenging for most practitioners. Additionally, they can generate misleading or harmful information without understanding the ethical implications of their outputs.
- Computational costs and efficiency challenges: Deploying and running LLMs at scale requires significant computational resources, making them costly and energy-intensive. Larger models can also introduce latency, slowing response times in real-time applications.
To overcome these limitations, AI systems must evolve from passive text generators into active agents that can plan, reason, and interact with their environment. This is where agentic AI comes in—integrating LLMs with tool use, decision-making mechanisms, and autonomous execution capabilities to enhance their functionality.
While frameworks like LangChain provide comprehensive solutions to LLM limitations, understanding fundamental prompt engineering techniques remains valuable. Approaches like few-shot learning, chain-of-thought, and structured prompting can significantly enhance model performance for specific tasks. Chapter 3 will cover these techniques in detail, showing how LangChain helps standardize and optimize prompting patterns while minimizing the need for custom prompt engineering in every application.
The next section explores how agentic AI extends the capabilities of traditional LLMs and unlocks new possibilities for automation, problem-solving, and intelligent decision-making.
Understanding LLM applications
LLM applications represent the bridge between raw model capability and practical business value. While LLMs possess impressive language processing abilities, they require thoughtful integration to deliver real-world solutions. These applications broadly fall into two categories: complex integrated applications and autonomous agents.
Complex integrated applications enhance human workflows by integrating LLMs into existing processes, including:
- Decision support systems that provide analysis and recommendations
- Content generation pipelines with human review
- Interactive tools that augment human capabilities
- Workflow automation with human oversight
Autonomous agents operate with minimal human intervention, further augmenting workflows through LLM integration. Examples include:
- Task automation agents that execute defined workflows
- Information gathering and analysis systems
- Multi-agent systems for complex task coordination
LangChain provides frameworks for both integrated applications and autonomous agents, offering flexible components that support various architectural choices. This book will explore both approaches, demonstrating how to build reliable, production-ready systems that match your specific requirements.
Autonomous systems of agents are potentially very powerful, and it’s therefore worthwhile exploring them a bit more.
Understanding AI agents
It is sometimes joked that AI is just a fancy word for ML, or AI is ML in a suit, as illustrated in this image; however, there’s more to it, as we’ll see.

Figure 1.1: ML in a suit. Generated by a model on replicate.com, Diffusers Stable Diffusion v2.1
An AI agent represents the bridge between raw cognitive capability and practical action. While an LLM possesses vast knowledge and processing ability, it remains fundamentally reactive without agency. AI agents transform this passive capability into active utility through structured workflows that parse requirements, analyze options, and execute actions.
Agentic AI enables autonomous systems to make decisions and act independently, with minimal human intervention. Unlike deterministic systems that follow fixed rules, agentic AI relies on patterns and likelihoods to make informed choices. It functions through a network of autonomous software components called agents, which learn from user behavior and large datasets to improve over time.
Agency in AI refers to a system’s ability to act independently to achieve goals. True agency means an AI system can perceive its environment, make decisions, act, and adapt over time by learning from interactions and feedback. The distinction between raw AI and agents parallels the difference between knowledge and expertise. Consider a brilliant researcher who understands complex theories but struggles with practical application. An agent system adds the crucial element of purposeful action, turning abstract capability into concrete results.
In the context of LLMs, agentic AI involves developing systems that act autonomously, understand context, adapt to new information, and collaborate with humans to solve complex challenges. These AI agents leverage LLMs to process information, generate responses, and execute tasks based on defined objectives.
Particularly, AI agents extend the capabilities of LLMs by integrating memory, tool use, and decision-making frameworks. These agents can:
- Retain and recall information across interactions.
- Utilize external tools, APIs, and databases.
- Plan and execute multi-step workflows.
The value of agency lies in reducing the need for constant human oversight. Instead of manually prompting an LLM for every request, an agent can proactively execute tasks, react to new data, and integrate with real-world applications.
AI agents are systems designed to act on behalf of users, leveraging LLMs alongside external tools, memory, and decision-making frameworks. The hope behind AI agents is that they can automate complex workflows, reducing human effort while increasing efficiency and accuracy. By allowing systems to act autonomously, agents promise to unlock new levels of automation in AI-driven applications. But are the hopes justified?
Despite their potential, AI agents face significant challenges:
- Reliability: Ensuring agents make correct, context-aware decisions without supervision is difficult.
- Generalization: Many agents work well in narrow domains but struggle with open-ended, multi-domain tasks.
- Lack of trust: Users must trust that agents will act responsibly, avoid unintended actions, and respect privacy constraints.
- Coordination complexity: Multi-agent systems often suffer from inefficiencies and miscommunication when executing tasks collaboratively.
Production-ready agent systems must address not just theoretical challenges but practical implementation hurdles like:
- Rate limitations and API quotas
- Token context overflow errors
- Hallucination management
- Cost optimization
LangChain and LangSmith provide robust solutions for these challenges, which we’ll explore in depth in Chapter 8 and Chapter 9. These chapters will cover how to build reliable, observable AI systems that can operate at an enterprise scale.
When developing agent-based systems, therefore, several key factors require careful consideration:
- Value generation: Agents must provide a clear utility that outweighs their costs in terms of setup, maintenance, and necessary human oversight. This often means starting with well-defined, high-value tasks where automation can demonstrably improve outcomes.
- Trust and safety: As agents take on more responsibility, establishing and maintaining user trust becomes crucial. This encompasses both technical reliability and transparent operation that allows users to understand and predict agent behavior.
- Standardization: As the agent ecosystem grows, standardized interfaces and protocols become essential for interoperability. This parallels the development of web standards that enabled the growth of internet applications.
While early AI systems focused on pattern matching and predefined templates, modern AI agents demonstrate emergent capabilities such as reasoning, problem-solving, and long-term planning. Today’s AI agents integrate LLMs with interactive environments, enabling them to function autonomously in complex domains.
The development of agent-based AI is a natural progression from statistical models to deep learning and now to reasoning-based systems. Modern AI agents leverage multimodal capabilities, reinforcement learning, and memory-augmented architectures to adapt to diverse tasks. This evolution marks a shift from predictive models to truly autonomous systems capable of dynamic decision-making.
Looking ahead, AI agents will continue to refine their ability to reason, plan, and act within structured and unstructured environments. The rise of open-weight models, combined with advances in agent-based AI, will likely drive the next wave of innovations in AI, expanding its applications across science, engineering, and everyday life.
With frameworks like LangChain, developers can build complex and agentic structured systems that overcome the limitations of raw LLMs. It offers built-in solutions for memory management, tool integration, and multi-step reasoning that align with the ecosystem model presented here. In the next section we will explore how LangChain facilitates the development of production-ready AI agents.
Introducing LangChain
LangChain exists as both an open-source framework and a venture-backed company. The framework, introduced in 2022 by Harrison Chase, streamlines the development of LLM-powered applications with support for multiple programming languages including Python, JavaScript/ TypeScript, Go, Rust, and Ruby.
The company behind the framework, LangChain, Inc., is based in San Francisco and has secured significant venture funding through multiple rounds, including a Series A in February 2024. With 11-50 employees, the company maintains and expands the framework while offering enterprise solutions for LLM application development.
While the core framework remains open source, the company provides additional enterprise features and support for commercial users. Both share the same mission: accelerating LLM application development by providing robust tools and infrastructure.
Modern LLMs are undeniably powerful, but their practical utility in production applications is constrained by several inherent limitations. Understanding these challenges is essential for appreciating why frameworks like LangChain have become indispensable tools for AI developers.
Challenges with raw LLMs
Despite their impressive capabilities, LLMs face fundamental constraints that create significant hurdles for developers building real-world applications:
- Context window limitations: LLMs process text as tokens (subword units), not complete words. For example, “LangChain” might be processed as two tokens: “Lang” and “Chain.” Every LLM has a fixed context window—the maximum number of tokens it can process at once—typically ranging from 2,000 to 128,000 tokens. This creates several practical challenges:
- Document processing: Long documents must be chunked effectively to fit within context limits
- Conversation history: Maintaining information across extended conversations requires careful memory management
- Cost management: Most providers charge based on token count, making efficient token use a business imperative
These constraints directly impact application architecture, making techniques like RAG (which we’ll explore in Chapter 4) essential for production systems.
- Limited tool orchestration: While many modern LLMs offer native tool-calling capabilities, they lack the infrastructure to discover appropriate tools, execute complex workflows, and manage tool interactions across multiple turns. Without this orchestration layer, developers must build custom solutions for each integration.
- Task coordination challenges: Managing multi-step workflows with LLMs requires structured control mechanisms. Without them, complex processes involving sequential reasoning or decision-making become difficult to implement reliably.
Tools in this context refer to functional capabilities that extend an LLM’s reach: web browsers for searching the internet, calculators for precise mathematics, coding environments for executing programs, or APIs for accessing external services and databases. Without these tools, LLMs remain confined to operating within their training knowledge, unable to perform real-world actions or access current information.
These fundamental limitations create three key challenges for developers working with raw LLM APIs, as demonstrated in the following table.
| Challenge | Description | Impact |
|---|---|---|
| Reliability | Detecting hallucinations and validating outputs |
Inconsistent results that may require human verification |
| Resource | Handling context windows and | Implementation complexity and |
| Management | rate limits | potential cost overruns |
| Integration | Building connections to external | Extended development time and |
| Complexity | tools and data sources | maintenance burden |
Table 1.3: Three key developer challenges
LangChain addresses these challenges by providing a structured framework with tested solutions, simplifying AI application development and enabling more sophisticated use cases.
How LangChain enables agent development
LangChain provides the foundational infrastructure for building sophisticated AI applications through its modular architecture and composable patterns. With the evolution to version 0.3, LangChain has refined its approach to creating intelligent systems:
- Composable workflows: The LangChain Expression Language (LCEL) allows developers to break down complex tasks into modular components that can be assembled and reconfigured. This composability enables systematic reasoning through the orchestration of multiple processing steps.
- Integration ecosystem: LangChain offers battle-tested abstract interfaces for all generative AI components (LLMs, embeddings, vector databases, document loaders, search engines). This lets you build applications that can easily switch between providers without rewriting core logic.
- Unified model access: The framework provides consistent interfaces to diverse language and embedding models, allowing seamless switching between providers while maintaining application logic.
While earlier versions of LangChain handled memory management directly, version 0.3 takes a more specialized approach to application development:
- Memory and state management: For applications requiring persistent context across interactions, LangGraph now serves as the recommended solution. LangGraph maintains conversation history and application state with purpose-built persistence mechanisms.
- Agent architecture: Though LangChain contains agent implementations, LangGraph has become the preferred framework for building sophisticated agents. It provides:
- Graph-based workflow definition for complex decision paths
- Persistent state management across multiple interactions
- Streaming support for real-time feedback during processing
- Human-in-the-loop capabilities for validation and corrections
Together, LangChain and its companion projects like LangGraph and LangSmith form a comprehensive ecosystem that transforms LLMs from simple text generators into systems capable of sophisticated real-world tasks, combining strong abstractions with practical implementation patterns optimized for production use.
Exploring the LangChain architecture
LangChain’s philosophy centers on composability and modularity. Rather than treating LLMs as standalone services, LangChain views them as components that can be combined with other tools and services to create more capable systems. This approach is built on several principles:
- Modular architecture: Every component is designed to be reusable and interchangeable, allowing developers to integrate LLMs seamlessly into various applications. This modularity extends beyond LLMs to include numerous building blocks for developing complex generative AI applications.
- Support for agentic workflows: LangChain offers best-in-class APIs that allow you to develop sophisticated agents quickly. These agents can make decisions, use tools, and solve problems with minimal development overhead.
- Production readiness: The framework provides built-in capabilities for tracing, evaluation, and deployment of generative AI applications, including robust building blocks for managing memory and persistence across interactions.
- Broad vendor ecosystem: LangChain offers battle-tested abstract interfaces for all generative AI components (LLMs, embeddings, vector databases, document loaders, search engines, etc.). Vendors develop their own integrations that comply with these interfaces, allowing you to build applications on top of any third-party provider and easily switch between them.
It’s worth noting that there’ve been major changes since LangChain version 0.1 when the first edition of this book was written. While early versions attempted to handle everything, LangChain version 0.3 focuses on excelling at specific functions with companion projects handling specialized needs. LangChain manages model integration and workflows, while LangGraph handles stateful agents and LangSmith provides observability.
LangChain’s memory management, too, has gone through major changes. Memory mechanisms within the base LangChain library have been deprecated in favor of LangGraph for persistence, and while agents are present, LangGraph is the recommended approach for their creation in version 0.3. However, models and tools continue to be fundamental to LangChain’s functionality. In Chapter 3, we’ll explore LangChain and LangGraph’s memory mechanisms.
To translate model design principles into practical tools, LangChain has developed a comprehensive ecosystem of libraries, services, and applications. This ecosystem provides developers with everything they need to build, deploy, and maintain sophisticated AI applications. Let’s examine the components that make up this thriving environment and how they’ve gained adoption across the industry.
Ecosystem
LangChain has achieved impressive ecosystem metrics, demonstrating strong market adoption with over 20 million monthly downloads and powering more than 100,000 applications. Its open-source community is thriving, evidenced by 100,000+ GitHub stars and contributions from over 4,000 developers. This scale of adoption positions LangChain as a leading framework in the AI application development space, particularly for building reasoning-focused LLM applications. The framework’s modular architecture (with components like LangGraph for agent workflows and LangSmith for monitoring) has clearly resonated with developers building production AI systems across various industries.
Core libraries
- LangChain (Python): Reusable components for building LLM applications
- LangChain.js: JavaScript/TypeScript implementation of the framework
- LangGraph (Python): Tools for building LLM agents as orchestrated graphs
- LangGraph.js: JavaScript implementation for agent workflows
Platform services
- LangSmith: Platform for debugging, testing, evaluating, and monitoring LLM applications
- LangGraph: Infrastructure for deploying and scaling LangGraph agents
Applications and extensions
- ChatLangChain: Documentation assistant for answering questions about the framework
- Open Canvas: Document and chat-based UX for writing code/markdown (TypeScript)
- OpenGPTs: Open source implementation of OpenAI’s GPTs API
- Email assistant: AI tool for email management (Python)
- Social media agent: Agent for content curation and scheduling (TypeScript)
The ecosystem provides a complete solution for building reasoning-focused AI applications: from core building blocks to deployment platforms to reference implementations. This architecture allows developers to use components independently or stack them for fuller and more complete solutions.
From customer testimonials and company partnerships, LangChain is being adopted by enterprises like Rakuten, Elastic, Ally, and Adyen. Organizations report using LangChain and LangSmith to identify optimal approaches for LLM implementation, improve developer productivity, and accelerate development workflows.
LangChain also offers a full stack for AI application development:
- Build: with the composable framework
- Run: deploy with LangGraph Platform
- Manage: debug, test, and monitor with LangSmith
Based on our experience building with LangChain, here are some of its benefits we’ve found especially helpful:
- Accelerated development cycles: LangChain dramatically speeds up time-to-market with ready-made building blocks and unified APIs, eliminating weeks of integration work.
- Superior observability: The combination of LangChain and LangSmith provides unparalleled visibility into complex agent behavior, making trade-offs between cost, latency, and quality more transparent.
- Controlled agency balance: LangGraph’s approach to agentic AI is particularly powerful allowing developers to give LLMs partial control flow over workflows while maintaining reliability and performance.
- Production-ready patterns: Our implementation experience has proven that LangChain’s architecture delivers enterprise-grade solutions that effectively reduce hallucinations and improve system reliability.
- Future-proof flexibility: The framework’s vendor-agnostic design creates applications that can adapt as the LLM landscape evolves, preventing technological lock-in.
These advantages stem directly from LangChain’s architectural decisions, which prioritize modularity, observability, and deployment flexibility for real-world applications.
Modular design and dependency management
LangChain evolves rapidly, with approximately 10-40 pull requests merged daily. This fast-paced development, combined with the framework’s extensive integration ecosystem, presents unique challenges. Different integrations often require specific third-party Python packages, which can lead to dependency conflicts.
LangChain’s package architecture evolved as a direct response to scaling challenges. As the framework rapidly expanded to support hundreds of integrations, the original monolithic structure became unsustainable—forcing users to install unnecessary dependencies, creating maintenance bottlenecks, and hindering contribution accessibility. By dividing into specialized packages with lazy loading of dependencies, LangChain elegantly solved these issues while preserving a cohesive ecosystem. This architecture allows developers to import only what they need, reduces version conflicts, enables independent release cycles for stable versus experimental features, and dramatically simplifies the contribution path for community developers working on specific integrations.
The LangChain codebase follows a well-organized structure that separates concerns while maintaining a cohesive ecosystem:
Core structure
- docs/: Documentation resources for developers
- libs/: Contains all library packages in the monorepo
Library organization
- langchain-core/: Foundational abstractions and interfaces that define the framework
- langchain/: The main implementation library with core components:
- vectorstores/: Integrations with vector databases (Pinecone, Chroma, etc.)
- chains/: Pre-built chain implementations for common workflows
Other component directories for retrievers, embeddings, etc.
- langchain-experimental/: Cutting-edge features still under development
- langchain-community: Houses third-party integrations maintained by the LangChain community. This includes most integrations for components like LLMs, vector stores, and retrievers. Dependencies are optional to maintain a lightweight package.
- Partner packages: Popular integrations are separated into dedicated packages (e.g., langchain-openai, langchain-anthropic) to enhance independent support. These packages reside outside the LangChain repository but within the GitHub “langchain-ai” organization (see <github.com/orgs/langchain-ai>). A full list is available at python.langchain. com/v0.3/docs/integrations/platforms/.
• External partner packages: Some partners maintain their integration packages independently. For example, several packages from the Google organization (github.com/ orgs/googleapis/repositories?q=langchain), such as the langchain-google-cloudsql-mssql package, are developed and maintained outside the LangChain ecosystem.
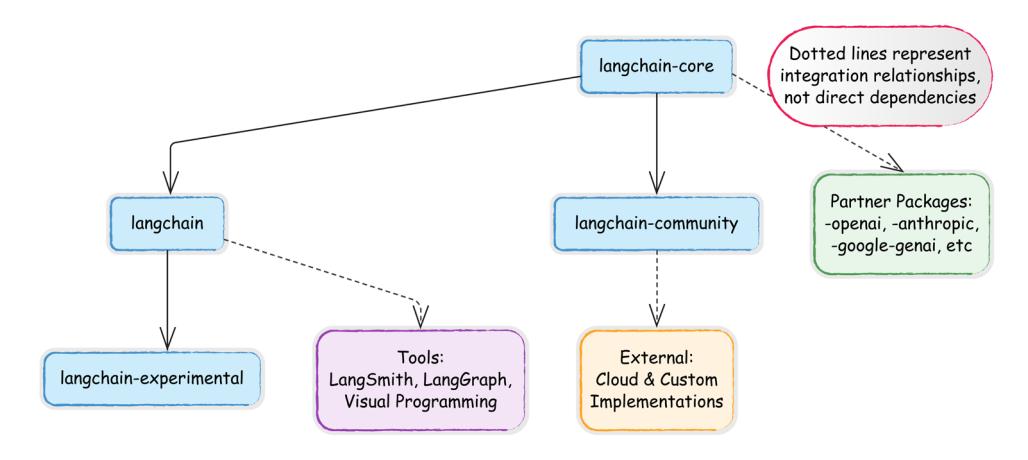
Figure 1.2: Integration ecosystem map

For full details on the dozens of available modules and packages, refer to the comprehensive LangChain API reference: https://api.python.langchain.com/. There are also hundreds of code examples demonstrating real-world use cases: https:// python.langchain.com/v0.1/docs/use\_cases/.
LangGraph, LangSmith, and companion tools
LangChain’s core functionality is extended by the following companion projects:
- LangGraph: An orchestration framework for building stateful, multi-actor applications with LLMs. While it integrates smoothly with LangChain, it can also be used independently. LangGraph facilitates complex applications with cyclic data flows and supports streaming and human-in-the-loop interactions. We’ll talk about LangGraph in more detail in Chapter 3.
- LangSmith: A platform that complements LangChain by providing robust debugging, testing, and monitoring capabilities. Developers can inspect, monitor, and evaluate their applications, ensuring continuous optimization and confident deployment.
These extensions, along with the core framework, provide a comprehensive ecosystem for developing, managing, and visualizing LLM applications, each with unique capabilities that enhance functionality and user experience.
LangChain also has an extensive array of tool integrations, which we’ll discuss in detail in Chapter 5. New integrations are added regularly, expanding the framework’s capabilities across domains.
Third-party applications and visual tools
Many third-party applications have been built on top of or around LangChain. For example, LangFlow and Flowise introduce visual interfaces for LLM development, with UIs that allow for the drag-and-drop assembly of LangChain components into executable workflows. This visual approach enables rapid prototyping and experimentation, lowering the barrier to entry for complex pipeline creation, as illustrated in the following screenshot of Flowise:
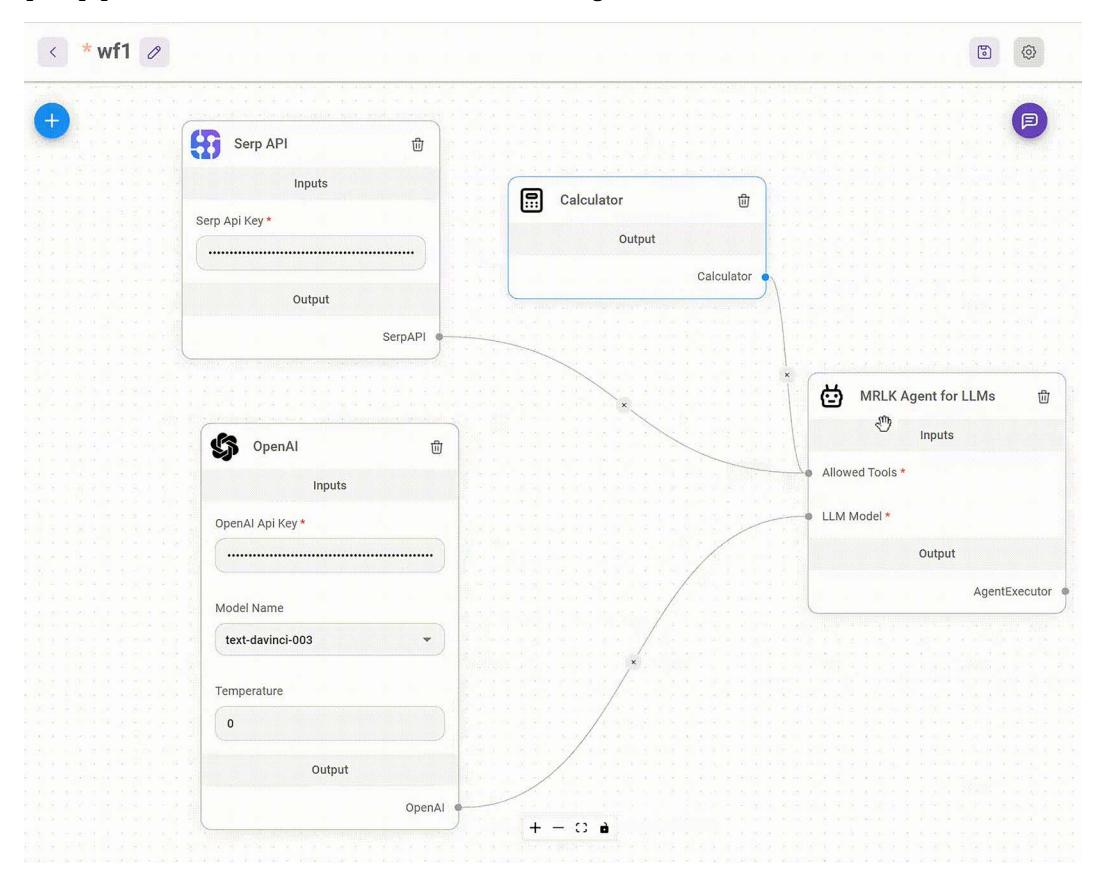
Figure 1.3: Flowise UI with an agent that uses an LLM, a calculator, and a search tool (Source: https://github.com/FlowiseAI/Flowise)
In the UI above, you can see an agent connected to a search interface (Serp API), an LLM, and a calculator. LangChain and similar tools can be deployed locally using libraries like Chainlit, or on various cloud platforms, including Google Cloud.
In summary, LangChain simplifies the development of LLM applications through its modular design, extensive integrations, and supportive ecosystem. This makes it an invaluable tool for developers looking to build sophisticated AI systems without reinventing fundamental components.
Summary
This chapter introduced the modern LLM landscape and positioned LangChain as a powerful framework for building production-ready AI applications. We explored the limitations of raw LLMs and then showed how these frameworks transform models into reliable, agentic systems capable of solving complex real-world problems. We also examined the LangChain ecosystem’s architecture, including its modular components, package structure, and companion projects that support the complete development lifecycle. By understanding the relationship between LLMs and the frameworks that extend them, you’re now equipped to build applications that go beyond simple text generation.
In the next chapter, we’ll set up our development environment and take our first steps with LangChain, translating the conceptual understanding from this chapter into working code. You’ll learn how to connect to various LLM providers, create your first chains, and begin implementing the patterns that form the foundation of enterprise-grade AI applications.
Questions
- What are the three primary limitations of raw LLMs that impact production applications, and how does LangChain address each one?
- Compare and contrast open-source and closed-source LLMs in terms of deployment options, cost considerations, and use cases. When might you choose each type?
- What is the difference between a LangChain chain and a LangGraph agent? When would you choose one over the other?
- Explain how LangChain’s modular architecture supports the rapid development of AI applications. Provide an example of how this modularity might benefit an enterprise use case.
- What are the key components of the LangChain ecosystem, and how do they work together to support the development lifecycle from building to deployment to monitoring?
- How does agentic AI differ from traditional LLM applications? Describe a business scenario where an agent would provide significant advantages over a simple chain.
- What factors should you consider when selecting an LLM provider for a production application? Name at least three considerations beyond just model performance.
- How does LangChain help address common challenges like hallucinations, context limitations, and tool integration that affect all LLM applications?
- Explain how the LangChain package structure (langchain-core, langchain, langchaincommunity) affects dependency management and integration options in your applications.
- What role does LangSmith play in the development lifecycle of production LangChain applications?
Chapter 2: First Steps with LangChain
In the previous chapter, we explored LLMs and introduced LangChain as a powerful framework for building LLM-powered applications. We discussed how LLMs have revolutionized natural language processing with their ability to understand context, generate human-like text, and perform complex reasoning. While these capabilities are impressive, we also examined their limitations—hallucinations, context constraints, and lack of up-to-date knowledge.
In this chapter, we’ll move from theory to practice by building our first LangChain application. We’ll start with the fundamentals: setting up a proper development environment, understanding LangChain’s core components, and creating simple chains. From there, we’ll explore more advanced capabilities, including running local models for privacy and cost efficiency and building multimodal applications that combine text with visual understanding. By the end of this chapter, you’ll have a solid foundation in LangChain’s building blocks and be ready to create increasingly sophisticated AI applications in subsequent chapters.
To sum up, this chapter will cover the following topics:
- Setting up dependencies
- Exploring LangChain’s building blocks (model interfaces, prompts and templates, and LCEL)
- Running local models
- Multimodal AI applications
Given the rapid evolution of both LangChain and the broader AI field, we maintain up-to-date code examples and resources in our GitHub repository: https://github. com/benman1/generative\_ai\_with\_langchain.
For questions or troubleshooting help, please create an issue on GitHub or join our Discord community: https://packt.link/lang.
Setting up dependencies for this book
This book provides multiple options for running the code examples, from zero-setup cloud notebooks to local development environments. Choose the approach that best fits your experience level and preferences. Even if you are familiar with dependency management, please read these instructions since all code in this book will depend on the correct installation of the environment as outlined here.
For the quickest start with no local setup required, we provide ready-to-use online notebooks for every chapter:
- Google Colab: Run examples with free GPU access
- Kaggle Notebooks: Experiment with integrated datasets
- Gradient Notebooks: Access higher-performance compute options
All code examples you find in this book are available as online notebooks on GitHub at https:// github.com/benman1/generative\_ai\_with\_langchain.
These notebooks don’t have all dependencies pre-configured but, usually, a few install commands get you going. These tools allow you to start experimenting immediately without worrying about setup. If you prefer working locally, we recommend using conda for environment management:
- Install Miniconda if you don’t have it already.
- Download it from https://docs.conda.io/en/latest/miniconda.html.
- Create a new environment with Python 3.11:
conda create -n langchain-book python=3.11
- Activate the environment:
conda activate langchain-book
- Install Jupyter and core dependencies:
conda install jupyter
pip install langchain langchain-openai jupyter
- Launch Jupyter Notebook:
jupyter notebook
This approach provides a clean, isolated environment for working with LangChain. For experienced developers with established workflows, we also support:
- pip with venv: Instructions in the GitHub repository
- Docker containers: Dockerfiles provided in the GitHub repository
- Poetry: Configuration files available in the GitHub repository
Choose the method you’re most comfortable with but remember that all examples assume a Python 3.10+ environment with the dependencies listed in requirements.txt.
For developers, Docker, which provides isolation via containers, is a good option. The downside is that it uses a lot of disk space and is more complex than the other options. For data scientists, I’d recommend Conda or Poetry.
Conda handles intricate dependencies efficiently, although it can be excruciatingly slow in large environments. Poetry resolves dependencies well and manages environments; however, it doesn’t capture system dependencies.
All tools allow sharing and replicating dependencies from configuration files. You can find a set of instructions and the corresponding configuration files in the book’s repository at https:// github.com/benman1/generative\_ai\_with\_langchain.
Once you are finished, please make sure you have LangChain version 0.3.17 installed. You can check this with the command pip show langchain.
With the rapid pace of innovation in the LLM field, library updates are frequent. The code in this book is tested with LangChain 0.3.17, but newer versions may introduce changes. If you encounter any issues running the examples:

- Create an issue on our GitHub repository
- Join the discussion on Discord at https://packt.link/lang
- Check the errata on the book’s Packt page
This community support ensures you’ll be able to successfully implement all projects regardless of library updates.
API key setup
LangChain’s provider-agnostic approach supports a wide range of LLM providers, each with unique strengths and characteristics. Unless you use a local LLM, to use these services, you’ll need to obtain the appropriate authentication credentials.
| Provider | Environment Variable | Setup URL | Free Tier? |
|---|---|---|---|
| OpenAI | OPENAI API KEY | platform.openai.com | No |
| HuggingFace | HUGGINGFACEHUB API TOKEN | Yes | |
| Anthropic | ANTHROPIC API KEY | console.anthropic.com | No |
| Google AI | GOOGLE API KEY | Yes | |
| Google VertexAI |
Application Default Credentials |
Yes (with limits) |
|
| Replicate | REPLICATE API TOKEN | replicate.com | No |
Table 2.1: API keys reference table (overview)
Most providers require an API key, while cloud providers like AWS and Google Cloud also support alternative authentication methods like Application Default Credentials (ADC). Many providers offer free tiers without requiring credit card details, making it easy to get started.
To set an API key in an environment, in Python, we can execute the following lines:
import os
<pre>os.environ["OPENAI_API_KEY"] = "<your token>"</pre>
Here, OPENAI API KEY is the environment key that is appropriate for OpenAI. Setting the keys in your environment has the advantage of not needing to include them as parameters in your code every time you use a model or service integration.
You can also expose these variables in your system environment from your terminal. In Linux and macOS, you can set a system environment variable from the terminal using the export command:
export OPENAI_API_KEY=<your token>To permanently set the environment variable in Linux or macOS, you would need to add the preceding line to the ~/.bashrc or ~/.bash_profile files, and then reload the shell using the command source ~/.bashrc or source ~/.bash_profile.
For Windows users, you can set the environment variable by searching for “Environment Variables” in the system settings, editing either “User variables” or “System variables,” and adding export OPENAI_API_KEY=your_key_here.
Our choice is to create a config.py file where all API keys are stored. We then import a function from this module that loads these keys into the environment variables. This approach centralizes credential management and makes it easier to update keys when needed:
import os
OPENAI_API_KEY = "... "
# I'm omitting all other keys
def set_environment():
 variable_dict = globals().items()
 for key, value in variable_dict:
 if "API" in key or "ID" in key:
 os.environ[key] = value
If you search for this file in the GitHub repository, you’ll notice it’s missing. This is intentional – I’ve excluded it from Git tracking using the .gitignore file. The .gitignore file tells Git which files to ignore when committing changes, which is essential for:
- Preventing sensitive credentials from being publicly exposed
- Avoiding accidental commits of personal API keys
- Protecting yourself from unauthorized usage charges
To implement this yourself, simply add config.py to your .gitignore file:
# In .gitignore
config.py
.env
**/api_keys.txt
# Other sensitive files
You can set all your keys in the config.py file. This function, set_environment(), loads all the keys into the environment as mentioned. Anytime you want to run an application, you import the function and run it like so:
from config import set_environment
set_environment()
For production environments, consider using dedicated secrets management services or environment variables injected at runtime. These approaches provide additional security while maintaining the separation between code and credentials.
While OpenAI’s models remain influential, the LLM ecosystem has rapidly diversified, offering developers multiple options for their applications. To maintain clarity, we’ll separate LLMs from the model gateways that provide access to them.
- Key LLM families
- Anthropic Claude: Excels in reasoning, long-form content processing, and vision analysis with up to 200K token context windows
- Mistral models: Powerful open-source models with strong multilingual capabilities and exceptional reasoning abilities
- Google Gemini: Advanced multimodal models with industry-leading 1M token context window and real-time information access
- OpenAI GPT-o: Leading omnimodal capabilities accepting text, audio, image, and video with enhanced reasoning
- DeepSeek models: Specialized in coding and technical reasoning with state-ofthe-art performance on programming tasks
- AI21 Labs Jurassic: Strong in academic applications and long-form content generation
- Inflection Pi: Optimized for conversational AI with exceptional emotional intelligence
- Perplexity models: Focused on accurate, cited answers for research applications
- Cohere models: Specialized for enterprise applications with strong multilingual capabilities
- Cloud provider gateways
- Amazon Bedrock: Unified API access to models from Anthropic, AI21, Cohere, Mistral, and others with AWS integration
- Azure OpenAI Service: Enterprise-grade access to OpenAI and other models with robust security and Microsoft ecosystem integration
- Google Vertex AI: Access to Gemini and other models with seamless Google Cloud integration
- Independent platforms
- Together AI: Hosts 200+ open-source models with both serverless and dedicated GPU options
- Replicate: Specializes in deploying multimodal open-source models with payas-you-go pricing
- HuggingFace Inference Endpoints: Production deployment of thousands of opensource models with fine-tuning capabilities
Throughout this book, we’ll work with various models accessed through different providers, giving you the flexibility to choose the best option for your specific needs and infrastructure requirements.
We will use OpenAI for many applications but will also try LLMs from other organizations. Refer to the Appendix at the end of the book to learn how to get API keys for OpenAI, Hugging Face, Google, and other providers.
There are two main integration packages:
- langchain-google-vertexai
- langchain-google-genai

We’ll be using langchain-google-genai, the package recommended by LangChain for individual developers. The setup is a lot simpler, only requiring a Google account and API key. It is recommended to move to langchain-google-vertexai for larger projects. This integration offers enterprise features such as customer encryption keys, virtual private cloud integration, and more, requiring a Google Cloud account with billing.
If you’ve followed the instructions on GitHub, as indicated in the previous section, you should already have the langchain-google-genai package installed.
Exploring LangChain’s building blocks
To build practical applications, we need to know how to work with different model providers. Let’s explore the various options available, from cloud services to local deployments. We’ll start with fundamental concepts like LLMs and chat models, then dive into prompts, chains, and memory systems.
Model interfaces
LangChain provides a unified interface for working with various LLM providers. This abstraction makes it easy to switch between different models while maintaining a consistent code structure. The following examples demonstrate how to implement LangChain’s core components in practical scenarios.

Please note that users should almost exclusively be using the newer chat models as most model providers have adopted a chat-like interface for interacting with language models. We still provide the LLM interface, because it’s very easy to use as string-in, string-out.
LLM interaction patterns
The LLM interface represents traditional text completion models that take a string input and return a string output. More and more use cases in LangChain use only the ChatModel interface, mainly because it’s better suited for building complex workflows and developing agents. The LangChain documentation is now deprecating the LLM interface and recommending the use of chat-based interfaces. While this chapter demonstrates both interfaces, we recommend using chat models as they represent the current standard to be up to date with LangChain.
Let’s see the LLM interface in action:
from langchain_openai import OpenAI
from langchain_google_genai import GoogleGenerativeAI
# Initialize OpenAI model
openai_llm = OpenAI()
# Initialize a Gemini model
gemini_pro = GoogleGenerativeAI(model="gemini-1.5-pro")
# Either one or both can be used with the same interface
response = openai_llm.invoke("Tell me a joke about light bulbs!")print(response)
Please note that you must set your environment variables to the provider keys when you run this. For example, when running this I’d start the file by calling set_environment() from config:
from config import set_environment
set_environment()
We get this output:
Why did the light bulb go to therapy? Because it was feeling a little dim!
For the Gemini model, we can run:
response = gemini_pro.invoke("Tell me a joke about light bulbs!")For me, Gemini comes up with this joke:
Why did the light bulb get a speeding ticket?
Because it was caught going over the watt limit!
Notice how we use the same invoke() method regardless of the provider. This consistency makes it easy to experiment with different models or switch providers in production.
Development testing
During development, you might want to test your application without making actual API calls. LangChain provides FakeListLLM for this purpose:
from langchain_community.llms import FakeListLLM
# Create a fake LLM that always returns the same response
fake_llm = FakeListLLM(responses=["Hello"])
result = fake_llm.invoke("Any input will return Hello")
print(result) # Output: Hello
Working with chat models
Chat models are LLMs that are fine-tuned for multi-turn interaction between a model and a human. These days most LLMs are fine-tuned for multi-turned conversations. Instead of providing input to the model, such as:
human: turn1
ai: answer1
human: turn2
ai: answer2
where we expect it to generate an output by continuing the conversation, these days model providers typically expose an API that expects each turn as a separate well-formatted part of the payload. Model providers typically don’t store the chat history server-side, they get the full history sent each time from the client and only format the final prompt server-side.
LangChain follows the same pattern with ChatModels, processing conversations through structured messages with roles and content. Each message contains:
- Role (who’s speaking), which is defined by the message class (all messages inherit from BaseMessage)
- Content (what’s being said)
Message types include:
• SystemMessage: Sets behavior and context for the model. Example:
SystemMessage(content="You're a helpful programming assistant")• HumanMessage: Represents user input like questions, commands, and data. Example:
HumanMessage(content="Write a Python function to calculate
factorial")
• AIMessage: Contains model responses
Let’s see this in action:
from langchain_anthropic import ChatAnthropic
from langchain_core.messages import SystemMessage, HumanMessage
chat = ChatAnthropic(model="claude-3-opus-20240229")
messages = [
 SystemMessage(content="You're a helpful programming assistant"),
 HumanMessage(content="Write a Python function to calculate factorial")
]
response = chat.invoke(messages)
print(response)
Claude comes up with a function, an explanation, and examples for calling the function.
Here’s a Python function that calculates the factorial of a given number:
def factorial(n):
 if n < 0:
 raise ValueError("Factorial is not defined for negative numbers.")
 elif n == 0:
 return 1
 else:
 result = 1
 for i in range(1, n + 1):
 result *= i
 return result
Let’s break that down. The factorial function is designed to take an integer n as input and calculate its factorial. It starts by checking if n is negative, and if so, it raises a ValueError since factorials aren’t defined for negative numbers. If n is zero, the function returns 1, which makes sense because, by definition, the factorial of 0 is 1. When dealing with positive numbers, the function kicks things off by setting a variable result to 1. From there, it enters a loop that runs from 1 to n, inclusive, thanks to the range function. During each step of the loop, it multiplies the result by the current number, gradually building up the factorial. Once the loop completes, the function returns the final calculated value. You can call this function by providing a nonnegative integer as an argument. Here are a few examples:
print(factorial(0)) # Output: 1
print(factorial(5)) # Output: 120
print(factorial(10)) # Output: 3628800
print(factorial(-5)) # Raises ValueError: Factorial is not defined for
negative numbers.
Note that the factorial function grows very quickly, so calculating the factorial of large numbers may exceed the maximum representable value in Python. In such cases, you might need to use a different approach or a library that supports arbitrary-precision arithmetic.
Similarly, we could have asked an OpenAI model such as GPT-4 or GPT-4o:
from langchain_openai.chat_models import ChatOpenAI
chat = ChatOpenAI(model_name='gpt-4o')
Reasoning models
Anthropic’s Claude 3.7 Sonnet introduces a powerful capability called extended thinking that allows the model to show its reasoning process before delivering a final answer. This feature represents a significant advancement in how developers can leverage LLMs for complex reasoning tasks.
Here’s how to configure extended thinking through the ChatAnthropic class:
from langchain_anthropic import ChatAnthropic
from langchain_core.prompts import ChatPromptTemplate
# Create a template
template = ChatPromptTemplate.from_messages([
 ("system", "You are an experienced programmer and mathematical
analyst."),
 ("user", "{problem}")
])
# Initialize Claude with extended thinking enabled
chat = ChatAnthropic(
 model_name="claude-3-7-sonnet-20240326", # Use latest model version
 max_tokens=64_000, # Total response length
limit
 thinking={"type": "enabled", "budget_tokens": 15000}, # Allocate
tokens for thinking
)
# Create and run a chain
chain = template | chat
# Complex algorithmic problem
problem = """
Design an algorithm to find the kth largest element in an unsorted array
with the optimal time complexity. Analyze the time and space complexity
of your solution and explain why it's optimal.
"""
# Get response with thinking included
response = chat.invoke([HumanMessage(content=problem)])
print(response.content)
The response will include Claude’s step-by-step reasoning about algorithm selection, complexity analysis, and optimization considerations before presenting its final solution. In the preceding example:
- Out of the 64,000-token maximum response length, up to 15,000 tokens can be used for Claude’s thinking process.
- The remaining ~49,000 tokens are available for the final response.
- Claude doesn’t always use the entire thinking budget—it uses what it needs for the specific task. If Claude runs out of thinking tokens, it will transition to its final answer.
While Claude offers explicit thinking configuration, you can achieve similar (though not identical) results with other providers through different techniques:
from langchain_openai import ChatOpenAI
from langchain_core.prompts import ChatPromptTemplate
template = ChatPromptTemplate.from_messages([
 ("system", "You are a problem-solving assistant."),
 ("user", "{problem}")
])
# Initialize with reasoning_effort parameter
chat = ChatOpenAI(
 model="o3-mini","
 reasoning_effort="high" # Options: "low", "medium", "high"
)
chain = template | chat
response = chain.invoke({"problem": "Calculate the optimal strategy
for..."})
chat = ChatOpenAI(model="gpt-4o")
chain = template | chat
response = chain.invoke({"problem": "Calculate the optimal strategy
for..."})
The reasoning_effort parameter streamlines your workflow by eliminating the need for complex reasoning prompts, allows you to adjust performance by reducing effort when speed matters more than detailed analysis, and helps manage token consumption by controlling how much processing power goes toward reasoning processes.
DeepSeek models also offer explicit thinking configuration through the LangChain integration.
Controlling model behavior
Understanding how to control an LLM’s behavior is crucial for tailoring its output to specific needs. Without careful parameter adjustments, the model might produce overly creative, inconsistent, or verbose responses that are unsuitable for practical applications. For instance, in customer service, you’d want consistent, factual answers, while in content generation, you might aim for more creative and promotional outputs.
exact implementation may vary between providers. Let’s explore the most important ones:
| Parameter | Description | Typical Range | Best For |
|---|---|---|---|
| Temperature | Controls randomness in text generation | 0.0-1.0 (OpenAI, Anthropic) 0.0-2.0 (Gemini) |
Lower (0.0-0.3): Factual tasks, Q&A Higher (0.7+): Creative writing, brainstorming |
| Top-k | Limits token selection to k most probable tokens | 1-100 | Lower values (1-10): More focused outputs Higher values: More diverse completions |
| Top-p (Nucleus Sampling) | Considers tokens until cumulative probability reaches threshold | 0.0-1.0 | Lower values (0.5): More focused outputs Higher values (0.9): More exploratory responses |
| Max tokens | Limits maximum response length | Model-specific | Controlling costs and preventing verbose outputs |
| Presence/frequency penalties | Discourages repetition by penalizing tokens that have appeared | -2.0 to 2.0 | Longer content generation where repetition is undesirable |
| Stop sequences | Tells model when to stop generating | Custom strings | Controlling exact ending points of generation |
Table 2.2: Parameters offered by LLMs
These parameters work together to shape model output:
- Temperature + Top-k/Top-p: First, Top-k/Top-p filter the token distribution, and then temperature affects randomness within that filtered set
- Penalties + Temperature: Higher temperatures with low penalties can produce creative but potentially repetitive text
LangChain provides a consistent interface for setting these parameters across different LLM providers:
from langchain_openai import OpenAI
# For factual, consistent responses
factual_llm = OpenAI(temperature=0.1, max_tokens=256)
# For creative brainstorming
creative_llm = OpenAI(temperature=0.8, top_p=0.95, max_tokens=512)
A few provider-specific considerations to keep in mind are:
- OpenAI: Known for consistent behavior with temperature in the 0.0-1.0 range
- Anthropic: May need lower temperature settings to achieve similar creativity levels to other providers
- Gemini: Supports temperature up to 2.0, allowing for more extreme creativity at higher settings
- Open-source models: Often require different parameter combinations than commercial APIs
Choosing parameters for applications
For enterprise applications requiring consistency and accuracy, lower temperatures (0.0-0.3) combined with moderate top-p values (0.5-0.7) are typically preferred. For creative assistants or brainstorming tools, higher temperatures produce more diverse outputs, especially when paired with higher top-p values.
Remember that parameter tuning is often empirical – start with provider recommendations, then adjust based on your specific application needs and observed outputs.
Prompts and templates
Prompt engineering is a crucial skill for LLM application development, particularly in production environments. LangChain provides a robust system for managing prompts with features that address common development challenges:
- Template systems for dynamic prompt generation
- Prompt management and versioning for tracking changes
- Few-shot example management for improved model performance
- Output parsing and validation for reliable results
LangChain’s prompt templates transform static text into dynamic prompts with variable substitution – compare these two approaches to see the key differences:
- Static use – problematic at scale:
def generate_prompt(question, context=None):
 if context:
 return f"Context information: {context}\n\nAnswer this
question concisely: {question}"
 return f"Answer this question concisely: {question}"
 # example use:
 prompt_text = generate_prompt("What is the capital of
France?")- PromptTemplate – production-ready:
from langchain_core.prompts import PromptTemplate
# Define once, reuse everywhere
question_template = PromptTemplate.from_template( "Answer this
question concisely: {question}" )
question_with_context_template = PromptTemplate.from_template(
"Context information: {context}\n\nAnswer this question concisely:
{question}" )
# Generate prompts by filling in variables
prompt_text = question_template.format(question="What is the capital
of France?")Templates matter – here’s why:
- Consistency: They standardize prompts across your application.
- Maintainability: They allow you to change the prompt structure in one place instead of throughout your codebase.
- Readability: They clearly separate template logic from business logic.
- Testability: It is easier to unit test prompt generation separately from LLM calls.
In production applications, you’ll often need to manage dozens or hundreds of prompts. Templates provide a scalable way to organize this complexity.
Chat prompt templates
For chat models, we can create more structured prompts that incorporate different roles:
from langchain_core.prompts import ChatPromptTemplate
from langchain_openai import ChatOpenAI
template = ChatPromptTemplate.from_messages([
 ("system", "You are an English to French translator."),
 ("user", "Translate this to French: {text}")
])
chat = ChatOpenAI()
formatted_messages = template.format_messages(text="Hello, how are you?")
response = chat.invoke(formatted_messages)
print(response)
Let’s start by looking at LangChain Expression Language (LCEL), which provides a clean, intuitive way to build LLM applications.
LangChain Expression Language (LCEL)
LCEL represents a significant evolution in how we build LLM-powered applications with Lang-Chain. Introduced in August 2023, LCEL is a declarative approach to constructing complex LLM workflows. Rather than focusing on how to execute each step, LCEL lets you define what you want to accomplish, allowing LangChain to handle the execution details behind the scenes.
At its core, LCEL serves as a minimalist code layer that makes it remarkably easy to connect different LangChain components. If you’re familiar with Unix pipes or data processing libraries like pandas, you’ll recognize the intuitive syntax: components are connected using the pipe operator (|) to create processing pipelines.
As we briefly introduced in Chapter 1, LangChain has always used the concept of a “chain” as its fundamental pattern for connecting components. Chains represent sequences of operations that transform inputs into outputs.
Originally, LangChain implemented this pattern through specific Chain classes like LLMChain and ConversationChain. While these legacy classes still exist, they’ve been deprecated in favor of the more flexible and powerful LCEL approach, which is built upon the Runnable interface.
The Runnable interface is the cornerstone of modern LangChain. A Runnable is any component that can process inputs and produce outputs in a standardized way. Every component built with LCEL adheres to this interface, which provides consistent methods including:
- invoke(): Processes a single input synchronously and returns an output
- stream(): Streams output as it’s being generated
- batch(): Efficiently processes multiple inputs in parallel
- ainvoke(), abatch(), astream(): Asynchronous versions of the above methods
This standardization means any Runnable component—whether it’s an LLM, a prompt template, a document retriever, or a custom function—can be connected to any other Runnable, creating a powerful composability system.
Every Runnable implements a consistent set of methods including:
- invoke(): Processes a single input synchronously and returns an output
- stream(): Streams output as it’s being generated
This standardization is powerful because it means any Runnable component—whether it’s an LLM, a prompt template, a document retriever, or a custom function—can be connected to any other Runnable. The consistency of this interface enables complex applications to be built from simpler building blocks.
LCEL offers several advantages that make it the preferred approach for building LangChain applications:
- Rapid development: The declarative syntax enables faster prototyping and iteration of complex chains.
- Production-ready features: LCEL provides built-in support for streaming, asynchronous execution, and parallel processing.
- Improved readability: The pipe syntax makes it easy to visualize data flow through your application.
- Seamless ecosystem integration: Applications built with LCEL automatically work with LangSmith for observability and LangServe for deployment.
- Customizability: Easily incorporate custom Python functions into your chains with RunnableLambda.
- Runtime optimization: LangChain can automatically optimize the execution of LCEL-defined chains.
LCEL truly shines when you need to build complex applications that combine multiple components in sophisticated workflows. In the next sections, we’ll explore how to use LCEL to build real-world applications, starting with the basic building blocks and gradually incorporating more advanced patterns.
The pipe operator (|) serves as the cornerstone of LCEL, allowing you to chain components sequentially:
# 1. Basic sequential chain: Just prompt to LLM
basic_chain = prompt | llm | StrOutputParser()
Here, StrOutputParser() is a simple output parser that extracts the string response from an LLM. It takes the structured output from an LLM and converts it to a plain string, making it easier to work with. This parser is especially useful when you need just the text content without metadata.
Under the hood, LCEL uses Python’s operator overloading to transform this expression into a RunnableSequence where each component’s output flows into the next component’s input. The pipe (|) is syntactic sugar that overrides the __or__ hidden method, in other words, A | B is equivalent to B.__or__(A).
The pipe syntax is equivalent to creating a RunnableSequence programmatically:
chain = RunnableSequence(first= prompt, middle=[llm], last= output_parser)
LCEL also supports adding transformations and custom functions:
with_transformation = prompt | llm | (lambda x: x.upper()) |
StrOutputParser()
For more complex workflows, you can incorporate branching logic:
decision_chain = prompt | llm | (lambda x: route_based_on_content(x)) | {
 "summarize": summarize_chain,
 "analyze": analyze_chain
}
Non-Runnable elements like functions and dictionaries are automatically converted to appropriate Runnable types:
# Function to Runnable
length_func = lambda x: len(x)
chain = prompt | length_func | output_parser
# Is converted to:
chain = prompt | RunnableLambda(length_func) | output_parser
The flexible, composable nature of LCEL will allow us to tackle real-world LLM application challenges with elegant, maintainable code.
Simple workflows with LCEL
As we’ve seen, LCEL provides a declarative syntax for composing LLM application components using the pipe operator. This approach dramatically simplifies workflow construction compared to traditional imperative code. Let’s build a simple joke generator to see LCEL in action:
from langchain_core.prompts import PromptTemplate
from langchain_core.output_parsers import StrOutputParser
from langchain_openai import ChatOpenAI
# Create components
prompt = PromptTemplate.from_template("Tell me a joke about {topic}")
llm = ChatOpenAI()
output_parser = StrOutputParser()
# Chain them together using LCEL
chain = prompt | llm | output_parser
# Execute the workflow with a single call
result = chain.invoke({"topic": "programming"})
print(result)This produces a programming joke:
Why don't programmers like nature?
It has too many bugs!
Without LCEL, the same workflow is equivalent to separate function calls with manual data passing:
formatted_prompt = prompt.invoke({"topic": "programming"})
llm_output = llm.invoke(formatted_prompt)
result = output_parser.invoke(llm_output)
As you can see, we have detached chain construction from its execution.
In production applications, this pattern becomes even more valuable when handling complex workflows with branching logic, error handling, or parallel processing – topics we’ll explore in Chapter 3.
Complex chain example
While the simple joke generator demonstrated basic LCEL usage, real-world applications typically require more sophisticated data handling. Let’s explore advanced patterns using a story generation and analysis example.
In this example, we’ll build a multi-stage workflow that demonstrates how to:
- Generate content with one LLM call
- Feed that content into a second LLM call
- Preserve and transform data throughout the chain
from langchain_core.prompts import PromptTemplate
from langchain_google_genai import GoogleGenerativeAI
from langchain_core.output_parsers import StrOutputParser
# Initialize the model
llm = GoogleGenerativeAI(model="gemini-1.5-pro")
# First chain generates a story
story_prompt = PromptTemplate.from_template("Write a short story about
{topic}")
story_chain = story_prompt | llm | StrOutputParser()
# Second chain analyzes the story
analysis_prompt = PromptTemplate.from_template(
"Analyze the following story's mood:\n{story}"
)
analysis_chain = analysis_prompt | llm | StrOutputParser()We can compose these two chains together. Our first simple approach pipes the story directly into the analysis chain:
# Combine chains
story_with_analysis = story_chain | analysis_chain
# Run the combined chain
story_analysis = story_with_analysis.invoke({"topic": "a rainy day"})
print("\nAnalysis:", story_analysis)
I get a long analysis. Here’s how it starts:
Analysis: The mood of the story is predominantly **calm, peaceful, and
subtly romantic.** There's a sense of gentle melancholy brought on by the
rain and the quiet emptiness of the bookshop, but this is balanced by a
feeling of warmth and hope.
While this works, we’ve lost the original story in our result – we only get the analysis! In production applications, we typically want to preserve context throughout the chain:
from langchain_core.runnables import RunnablePassthrough
# Using RunnablePassthrough.assign to preserve data
enhanced_chain = RunnablePassthrough.assign(
 story=story_chain # Add 'story' key with generated content
).assign(
 analysis=analysis_chain # Add 'analysis' key with analysis of the
story
)
# Execute the chain
result = enhanced_chain.invoke({"topic": "a rainy day"})
print(result.keys()) # Output: dict_keys(['topic', 'story', 'analysis'])
# dict_keys(['topic', 'story', 'analysis'])
For more control over the output structure, we could also construct dictionaries manually:
from operator import itemgetter
# Alternative approach using dictionary construction
manual_chain = (
 RunnablePassthrough() | # Pass through input
 {
 "story": story_chain, # Add story result
 "topic": itemgetter("topic") # Add analysis based on story
 } |
 RunnablePassthrough().assign( # Add analysis based on story
 analysis=analysis_chain
 )
)
result = manual_chain.invoke({"topic": "a rainy day"})
print(result.keys()) # Output: dict_keys(['story', 'topic', 'analysis'])
We can simplify this with dictionary conversion using a LCEL shorthand:
# Simplified dictionary construction
simple_dict_chain = story_chain | {"analysis": analysis_chain}
result = simple_dict_chain.invoke({"topic": "a rainy day"}) print(result.
keys()) # Output: dict_keys(['analysis', 'output'])
What makes these examples more complex than our simple joke generator?
- Multiple LLM calls: Rather than a single prompt LLM parser flow, we’re chaining multiple LLM interactions
- Data transformation: Using tools like RunnablePassthrough and itemgetter to manage and transform data
- Dictionary preservation: Maintaining context throughout the chain rather than just passing single values
- Structured outputs: Creating structured output dictionaries rather than simple strings
These patterns are essential for production applications where you need to:
- Track the provenance of generated content
- Combine results from multiple operations
- Structure data for downstream processing or display
- Implement more sophisticated error handling

While LCEL handles many complex workflows elegantly, for state management and advanced branching logic, you’ll want to explore LangGraph, which we’ll cover in Chapter 3.
While our previous examples used cloud-based models like OpenAI and Google’s Gemini, Lang-Chain’s LCEL and other functionality work seamlessly with local models as well. This flexibility allows you to choose the right deployment approach for your specific needs.
Running local models
When building LLM applications with LangChain, you need to decide where your models will run.
- Advantages of local models:
- Complete data control and privacy
- No API costs or usage limits
- No internet dependency
- Control over model parameters and fine-tuning
- Advantages of cloud models:
- No hardware requirements or setup complexity
- Access to the most powerful, state-of-the-art models
- Elastic scaling without infrastructure management
- Continuous model improvements without manual updates
- When to choose local models:
- Applications with strict data privacy requirements
- Development and testing environments
- Edge or offline deployment scenarios
- Cost-sensitive applications with predictable, high-volume usage
Let’s start with one of the most developer-friendly options for running local models.
Getting started with Ollama
Ollama provides a developer-friendly way to run powerful open-source models locally. It provides a simple interface for downloading and running various open-source models. The langchainollama dependency should already be installed if you’ve followed the instructions in this chapter; however, let’s go through them briefly anyway:
- Install the LangChain Ollama integration:
pip install langchain-ollama- Then pull a model. From the command line, a terminal such as bash or the WindowsPowerShell, run:
ollama pull deepseek-r1:1.5b- Start the Ollama server:
ollama serve
Here’s how to integrate Ollama with the LCEL patterns we’ve explored:
from langchain_ollama import ChatOllama
from langchain_core.prompts import PromptTemplate
from langchain_core.output_parsers import StrOutputParser
# Initialize Ollama with your chosen model
local_llm = ChatOllama(
 model="deepseek-r1:1.5b",
 temperature=0,
)
# Create an LCEL chain using the local model
prompt = PromptTemplate.from_template("Explain {concept} in simple terms")
local_chain = prompt | local_llm | StrOutputParser()
# Use the chain with your local model
result = local_chain.invoke({"concept": "quantum computing"})
print(result)
This LCEL chain functions identically to our cloud-based examples, demonstrating LangChain’s model-agnostic design.
Please note that since you are running a local model, you don’t need to set up any keys. The answer is very long – although quite reasonable. You can run this yourself and see what answers you get.
Now that we’ve seen basic text generation, let’s look at another integration. Hugging Face offers an approachable way to run models locally, with access to a vast ecosystem of pre-trained models.
Working with Hugging Face models locally
With Hugging Face, you can either run a model locally (HuggingFacePipeline) or on the Hugging Face Hub (HuggingFaceEndpoint). Here, we are talking about local runs, so we’ll focus on HuggingFacePipeline. Here we go:
from langchain_core.messages import SystemMessage, HumanMessage
from langchain_huggingface import ChatHuggingFace, HuggingFacePipeline
# Create a pipeline with a small model:
llm = HuggingFacePipeline.from_model_id(
 model_id="TinyLlama/TinyLlama-1.1B-Chat-v1.0",
 task="text-generation",
 pipeline_kwargs=dict(
 max_new_tokens=512,
 do_sample=False,
 repetition_penalty=1.03,
 ),
)
chat_model = ChatHuggingFace(llm=llm)
# Use it like any other LangChain LLM
messages = [
 SystemMessage(content="You're a helpful assistant"),
 HumanMessage(
 content="Explain the concept of machine learning in simple terms"
 ),
]
ai_msg = chat_model.invoke(messages)
print(ai_msg.content)
This can take quite a while, especially the first time, since the model has to be downloaded first. We’ve omitted the model response for the sake of brevity.
LangChain supports running models locally through other integrations as well, for example:
- llama.cpp: This high-performance C++ implementation allows running LLaMA-based models efficiently on consumer hardware. While we won’t cover the setup process in detail, LangChain provides straightforward integration with llama.cpp for both inference and fine-tuning.
- GPT4All: GPT4All offers lightweight models that can run on consumer hardware. Lang-Chain’s integration makes it easy to use these models as drop-in replacements for cloudbased LLMs in many applications.
As you begin working with local models, you’ll want to optimize their performance and handle common challenges. Here are some essential tips and patterns that will help you get the most out of your local deployments with LangChain.
Tips for local models
When working with local models, keep these points in mind:
- Resource management: Local models require careful configuration to balance performance and resource usage. The following example demonstrates how to configure an Ollama model for efficient operation:
# Configure model with optimized memory and processing settings
from langchain_ollama import ChatOllama
llm = ChatOllama(
 model="mistral:q4_K_M", # 4-bit quantized model (smaller memory
footprint)
 num_gpu=1, # Number of GPUs to utilize (adjust based on hardware)
 num_thread=4 # Number of CPU threads for parallel processing
)
Let’s look at what each parameter does:
- model=“mistral:q4_K_M”: Specifies a 4-bit quantized version of the Mistral model. Quantization reduces the model size by representing weights with fewer bits, trading minimal precision for significant memory savings. For example:
- Full precision model: ~8GB RAM required
- 4-bit quantized model: ~2GB RAM required
- num_gpu=1: Allocates GPU resources. Options include:
- 0: CPU-only mode (slower but works without a GPU)
- 1: Uses a single GPU (appropriate for most desktop setups)
- Higher values: For multi-GPU systems only
- num_thread=4: Controls CPU parallelization:
- Lower values (2-4): Good for running alongside other applications
- Higher values (8-16): Maximizes performance on dedicated servers
- Optimal setting: Usually matches your CPU’s physical core count
- Error handling: Local models can encounter various errors, from out-of-memory conditions to unexpected terminations. A robust error-handling strategy is essential:
def safe_model_call(llm, prompt, max_retries=2):
 """Safely call a local model with retry logic and graceful
 failure"""
 retries = 0
 while retries <= max_retries:
 try:
 return llm.invoke(prompt)
 except RuntimeError as e:
 # Common error with local models when running out of VRAM
 if "CUDA out of memory" in str(e):
 print(f"GPU memory error, waiting and retrying
({retries+1}/{max_retries+1})")
 time.sleep(2) # Give system time to free resources
 retries += 1
 else:
 print(f"Runtime error: {e}")
 return "An error occurred while processing your request."
 except Exception as e:
 print(f"Unexpected error calling model: {e}")
 return "An error occurred while processing your request."
 # If we exhausted retries
 return "Model is currently experiencing high load. Please try again
later."
# Use the safety wrapper in your LCEL chain
from langchain_core.prompts import PromptTemplate
from langchain_core.runnables import RunnableLambda
prompt = PromptTemplate.from_template("Explain {concept} in simple terms")
safe_llm = RunnableLambda(lambda x: safe_model_call(llm, x))
safe_chain = prompt | safe_llm
response = safe_chain.invoke({"concept": "quantum computing"})
Common local model errors you might run into are as follows:
- Out of memory: Occurs when the model requires more VRAM than available
- Model loading failure: When model files are corrupt or incompatible
- Timeout issues: When inference takes too long on resource-constrained systems
- Context length errors: When input exceeds the model’s maximum token limit
By implementing these optimizations and error-handling strategies, you can create robust LangChain applications that leverage local models effectively while maintaining a good user experience even when issues arise.

Figure 2.1: Decision chart for choosing between local and cloud-based models
Having explored how to build text-based applications with LangChain, we’ll now extend our understanding to multimodal capabilities. As AI systems increasingly work with multiple forms of data, LangChain provides interfaces for both generating images from text and understanding visual content – capabilities that complement the text processing we’ve already covered and open new possibilities for more immersive applications.
Multimodal AI applications
AI systems have evolved beyond text-only processing to work with diverse data types. In the current landscape, we can distinguish between two key capabilities that are often confused but represent different technological approaches.
Multimodal understanding represents the ability of models to process multiple types of inputs simultaneously to perform reasoning and generate responses. These advanced systems can understand the relationships between different modalities, accepting inputs like text, images, PDFs, audio, video, and structured data. Their processing capabilities include cross-modal reasoning, context awareness, and sophisticated information extraction. Models like Gemini 2.5, GPT-4V, Sonnet 3.7, and Llama 4 exemplify this capability. For instance, a multimodal model can analyze a chart image along with a text question to provide insights about the data trend, combining visual and textual understanding in a single processing flow.
Content generation capabilities, by contrast, focus on creating specific types of media, often with extraordinary quality but more specialized functionality. Text-to-image models create visual content from descriptions, text-to-video systems generate video clips from prompts, text-toaudio tools produce music or speech, and image-to-image models transform existing visuals. Examples include Midjourney, DALL-E, and Stable Diffusion for images; Sora and Pika for video; and Suno and ElevenLabs for audio. Unlike true multimodal models, many generation systems are specialized for their specific output modality, even if they can accept multiple input types. They excel at creation rather than understanding.
As LLMs evolve beyond text, LangChain is expanding to support both multimodal understanding and content generation workflows. The framework provides developers with tools to incorporate these advanced capabilities into their applications without needing to implement complex integrations from scratch. Let’s start with generating images from text descriptions. LangChain provides several approaches to incorporate image generation through external integrations and wrappers. We’ll explore multiple implementation patterns, starting with the simplest and progressing to more sophisticated techniques that can be incorporated into your applications.
Text-to-image
LangChain integrates with various image generation models and services, allowing you to:
- Generate images from text descriptions
- Edit existing images based on text prompts
- Control image generation parameters
- Handle image variations and styles
LangChain includes wrappers and models for popular image generation services. First, let’s see how to generate images with OpenAI’s DALL-E model series.
Using DALL-E through OpenAI
LangChain’s wrapper for DALL-E simplifies the process of generating images from text prompts. The implementation uses OpenAI’s API under the hood but provides a standardized interface consistent with other LangChain components.
from langchain_community.utilities.dalle_image_generator import
DallEAPIWrapper
dalle = DallEAPIWrapper(
 model_name="dall-e-3", # Options: "dall-e-2" (default) or "dall-e-3"
 size="1024x1024", # Image dimensions
 quality="standard", # "standard" or "hd" for DALL-E 3
 n=1 # Number of images to generate (only for
DALL-E 2)
)
# Generate an image
image_url = dalle.run("A detailed technical diagram of a quantum
computer")
# Display the image in a notebook
from IPython.display import Image, display
display(Image(url=image_url))
# Or save it locally
import requests
response = requests.get(image_url)
with open("generated_library.png", "wb") as f:
f.write(response.content)Here’s the image we got:
Figure 2.2: An image generated by OpenAI’s DALL-E Image Generator
You might notice that text generation within these images is not one of the strong suites of these models. You can find a lot of models for image generation on Replicate, including the latest Stable Diffusion models, so this is what we’ll use now.
Using Stable Diffusion
Stable Diffusion 3.5 Large is Stability AI’s latest text-to-image model, released in March 2024. It’s a Multimodal Diffusion Transformer (MMDiT) that generates high-resolution images with remarkable detail and quality.
This model uses three fixed, pre-trained text encoders and implements Query-Key Normalization for improved training stability. It’s capable of producing diverse outputs from the same prompt and supports various artistic styles.
from langchain_community.llms import Replicate
# Initialize the text-to-image model with Stable Diffusion 3.5 Large
text2image = Replicate(
 model="stability-ai/stable-diffusion-3.5-large",
 model_kwargs={
 "prompt_strength": 0.85,
 "cfg": 4.5,
 "steps": 40,
 "aspect_ratio": "1:1",
 "output_format": "webp",
 "output_quality": 90
 }
)
# Generate an image
image_url = text2image.invoke(
 "A detailed technical diagram of an AI agent"
)
The recommended parameters for the new model include:
- prompt_strength: Controls how closely the image follows the prompt (0.85)
- cfg: Controls how strictly the model follows the prompt (4.5)
- steps: More steps result in higher-quality images (40)
- aspect_ratio: Set to 1:1 for square images
- output_format: Using WebP for a better quality-to-size ratio
- output_quality: Set to 90 for high-quality output
Here’s the image we got:

Figure 2.3: An image generated by Stable Diffusion
Now let’s explore how to analyze and understand images using multimodal models.
Image understanding
Image understanding refers to an AI system’s ability to interpret and analyze visual information in ways similar to human visual perception. Unlike traditional computer vision (which focuses on specific tasks like object detection or facial recognition), modern multimodal models can perform general reasoning about images, understanding context, relationships, and even implicit meaning within visual content.
Gemini 2.5 Pro and GPT-4 Vision, among other models, can analyze images and provide detailed descriptions or answer questions about them.
Using Gemini 1.5 Pro
LangChain handles multimodal input through the same ChatModel interface. It accepts Messages as an input, and a Message object has a content field. IA content can consist of multiple parts, and each part can represent a different modality (that allows you to mix different modalities in your prompt).
You can send multimodal input by value or by reference. To send it by value, you should encode bytes as a string and construct an image_url variable formatted as in the example below using the image we generated using Stable Diffusion:
import base64
from langchain_google_genai.chat_models import ChatGoogleGenerativeAI
from langchain_core.messages.human import HumanMessage
with open("stable-diffusion.png", 'rb') as image_file:
 image_bytes = image_file.read()
 base64_bytes = base64.b64encode(image_bytes).decode("utf-8")
prompt = [
 {"type": "text", "text": "Describe the image: "},
 {"type": "image_url", "image_url": {"url": f"data:image/
jpeg;base64,{base64_bytes}"}},
]
llm = ChatGoogleGenerativeAI(
 model="gemini-1.5-pro",
 temperature=0,
)
response = llm.invoke([HumanMessage(content=prompt)])
print(response.content)
The image presents a futuristic, stylized depiction of a humanoid robot’s upper body against a backdrop of glowing blue digital displays. The robot’s head is rounded and predominantly white, with sections of dark, possibly metallic, material around the face and ears. The face itself features glowing orange eyes and a smooth, minimalist design, lacking a nose or mouth in the traditional human sense. Small, bright dots, possibly LEDs or sensors, are scattered across the head and body, suggesting advanced technology and intricate construction.
The robot’s neck and shoulders are visible, revealing a complex internal structure of dark, interconnected parts, possibly wires or cables, which contrast with the white exterior. The shoulders and upper chest are also white, with similar glowing dots and hints of the internal mechanisms showing through. The overall impression is of a sleek, sophisticated machine.
The background is a grid of various digital interfaces, displaying graphs, charts, and other abstract data visualizations. These elements are all in shades of blue, creating a cool, technological ambiance that complements the robot’s appearance. The displays vary in size and complexity, adding to the sense of a sophisticated control panel or monitoring system. The combination of the robot and the background suggests a theme of advanced robotics, artificial intelligence, or data analysis.
As multimodal inputs typically have a large size, sending raw bytes as part of your request might not be the best idea. You can send it by reference by pointing to the blob storage, but the specific type of storage depends on the model’s provider. For example, Gemini accepts multimedia input as a reference to Google Cloud Storage – a blob storage service provided by Google Cloud.
prompt = [
 {"type": "text", "text": "Describe the video in a few sentences."},
 {"type": "media", "file_uri": video_uri, "mime_type": "video/mp4"},
]
response = llm.invoke([HumanMessage(content=prompt)])
print(response.content)
Exact details on how to construct a multimodal input might depend on the provider of the LLM (and a corresponding LangChain integration handles a dictionary corresponding to a part of a content field accordingly). For example, Gemini accepts an additional “video_metadata” key that can point to the start and/or end offset of a video piece to be analyzed:
offset_hint = {
 "start_offset": {"seconds": 10},
 "end_offset": {"seconds": 20},
 }
prompt = [
 {"type": "text", "text": "Describe the video in a few sentences."},
 {"type": "media", "file_uri": video_uri, "mime_type": "video/mp4",
"video_metadata": offset_hint},
]
response = llm.invoke([HumanMessage(content=prompt)])
print(response.content)
And, of course, such multimodal parts can also be templated. Let’s demonstrate it with a simple template that expects an image_bytes_str argument that contains encoded bytes:
prompt = ChatPromptTemplate.from_messages(
 [("user",
 [{"type": "image_url",
 "image_url": {"url": "data:image/jpeg;base64,{image_bytes_str}"},
 }])]
)
prompt.invoke({"image_bytes_str": "test-url"})
Using GPT-4 Vision
After having explored image generation, let’s examine how LangChain handles image understanding using multimodal models. GPT-4 Vision capabilities (available in models like GPT-4o and GPT-4o-mini) allow us to analyze images alongside text, enabling applications that can “see” and reason about visual content.
LangChain simplifies working with these models by providing a consistent interface for multimodal inputs. Let’s implement a flexible image analyzer:
from langchain_core.messages import HumanMessage
from langchain_openai import ChatOpenAI
def analyze_image(image_url: str, question: str) -> str:
 chat = ChatOpenAI(model="gpt-4o-mini", max_tokens=256)
 message = HumanMessage(
 content=[
 {
 "type": "text",
 "text": question
 },
 {
 "type": "image_url",
 "image_url": {
 "url": image_url,
 "detail": "auto"
 }
 }
 ]
 )
 response = chat.invoke([message])
 return response.content
# Example usage
image_url = "https://replicate.delivery/yhqm/
pMrKGpyPDip0LRciwSzrSOKb5ukcyXCyft0IBElxsT7fMrLUA/out-0.png"

questions = [
 "What objects do you see in this image?",
 "What is the overall mood or atmosphere?",
 "Are there any people in the image?"
]
for question in questions:
 print(f"\nQ: {question}")
 print(f"A: {analyze_image(image_url, question)}")
The model provides a rich, detailed analysis of our generated cityscape:
Q: What objects do you see in this image? A: The image features a futuristic cityscape with tall, sleek skyscrapers. The buildings appear to have a glowing or neon effect, suggesting a high-
tech environment. There is a large, bright sun or light source in the sky, adding to the vibrant atmosphere. A road or pathway is visible in the foreground, leading toward the city, possibly with light streaks indicating motion or speed. Overall, the scene conveys a dynamic, otherworldly urban landscape. Q: What is the overall mood or atmosphere?
A: The overall mood or atmosphere of the scene is futuristic and vibrant. The glowing outlines of the skyscrapers and the bright sunset create a sense of energy and possibility. The combination of deep colors and light adds a dramatic yet hopeful tone, suggesting a dynamic and evolving urban environment.
Q: Are there any people in the image?
A: There are no people in the image. It appears to be a futuristic cityscape with tall buildings and a sunset.
This capability opens numerous possibilities for LangChain applications. By combining image analysis with the text processing patterns we explored earlier in this chapter, you can build sophisticated applications that reason across modalities. In the next chapter, we’ll build on these concepts to create more sophisticated multimodal applications.
Summary
After setting up our development environment and configuring necessary API keys, we’ve explored the foundations of LangChain development, from basic chains to multimodal capabilities. We’ve seen how LCEL simplifies complex workflows and how LangChain integrates with both text and image processing. These building blocks prepare us for more advanced applications in the coming chapters.
In the next chapter, we’ll expand on these concepts to create more sophisticated multimodal applications with enhanced control flow, structured outputs, and advanced prompt techniques. You’ll learn how to combine multiple modalities in complex chains, incorporate more sophisticated error handling, and build applications that leverage the full potential of modern LLMs.
Review questions
- What are the three main limitations of raw LLMs that LangChain addresses?
- Memory limitations
- Tool integration
- Context constraints
- Processing speed
- Cost optimization
- Which of the following best describes the purpose of LCEL (LangChain Expression Language)?
- A programming language for LLMs
- A unified interface for composing LangChain components
- A template system for prompts
- A testing framework for LLMs
- Name three types of memory systems available in LangChain
- Compare and contrast LLMs and chat models in LangChain. How do their interfaces and use cases differ?
- What role do Runnables play in LangChain? How do they contribute to building modular LLM applications?
- When running models locally, which factors affect model performance? (Select all that apply)
- Available RAM
- CPU/GPU capabilities
- Internet connection speed
- Model quantization level
- Operating system type
- Compare the following model deployment options and identify scenarios where each would be most appropriate:
- Cloud-based models (e.g., OpenAI)
- Local models with llama.cpp
- GPT4All integration
- Design a basic chain using LCEL that would:
- Take a user question about a product
- Query a database for product information
- Generate a response using an LLM
- Provide a sketch outlining the components and how they connect.
- Compare the following approaches for image analysis and mention the trade-offs between them:
- Approach A
from langchain_openai import ChatOpenAI
chat = ChatOpenAI(model="gpt-4-vision-preview")
• Approach B
from langchain_community.llms import Ollama
local_model = Ollama(model="llava")
Chapter 3: Building Workflows with LangGraph
So far, we’ve learned about LLMs, LangChain as a framework, and how to use LLMs with LangChain in a vanilla mode (just asking to generate a text output based on a prompt). In this chapter, we’ll start with a quick introduction to LangGraph as a framework and how to develop more complex workflows with LangChain and LangGraph by chaining together multiple steps. As an example, we’ll discuss parsing LLM outputs and look into error handling patterns with LangChain and LangGraph. Then, we’ll continue with more advanced ways to develop prompts and explore what building blocks LangChain offers for few-shot prompting and other techniques.
We’re also going to cover working with multimodal inputs, utilizing the long context, and adjusting your workloads to overcome limitations related to the context window size. Finally, we’ll look into the basic mechanisms of managing memory with LangChain. Understanding these fundamental and key techniques will help us read LangGraph code, understand tutorials and code samples, and develop our own complex workflows. We’ll, of course, discuss what LangGraph workflows are and will continue building on that skill in Chapters 5 and 6.
In a nutshell, we’ll cover the following main topics in this chapter:
- LangGraph fundamentals
- Prompt engineering
- Working with short context windows
- Understanding memory mechanisms

As always, you can find all the code samples on our public GitHub repository as Jupyter notebooks: https://github.com/benman1/generative\_ai\_with\_langchain/ tree/second\_edition/chapter3.
LangGraph fundamentals
LangGraph is a framework developed by LangChain (as a company) that helps control and orchestrate workflows. Why do we need another orchestration framework? Let’s park this question until Chapter 5, where we’ll touch on agents and agentic workflows, but for now, let us mention the flexibility of LangGraph as an orchestration framework and its robustness in handling complex scenarios.
Unlike many other frameworks, LangGraph allows cycles (most other orchestration frameworks operate only with directly acyclic graphs), supports streaming out of the box, and has many pre-built loops and components dedicated to generative AI applications (for example, human moderation). LangGraph also has a very rich API that allows you to have very granular control of your execution flow if needed. This is not fully covered in our book, but just keep in mind that you can always use a more low-level API if you need to.
A Directed Acyclic Graph (DAG) is a special type of graph in graph theory and computer science. Its edges (connections between nodes) have a direction, which means that the connection from node A to node B is different from the connection from node B to node A. It has no cycles. In other words, there is no path that starts at a node and returns to the same node by following the directed edges.
DAGs are often used as a model of workflows in data engineering, where nodes are tasks and edges are dependencies between these tasks. For example, an edge from node A to node B means that we need output from node A to execute node B.
For now, let’s start with the basics. If you’re new to this framework, we would also highly recommend a free online course on LangGraph that is available at https://academy.langchain.com/ to deepen your understanding.
State management
State management is crucial in real-world AI applications. For example, in a customer service chatbot, the state might track information such as customer ID, conversation history, and outstanding issues. LangGraph’s state management lets you maintain this context across a complex workflow of multiple AI components.
LangGraph allows you to develop and execute complex workflows called graphs. We will use the words graph and workflow interchangeably in this chapter. A graph consists of nodes and edges between them. Nodes are components of your workflow, and a workflow has a state. What is it? Firstly, a state makes your nodes aware of the current context by keeping track of the user input and previous computations. Secondly, a state allows you to persist your workflow execution at any point in time. Thirdly, a state makes your workflow truly interactive since a node can change the workflow’s behavior by updating the state. For simplicity, think about a state as a Python dictionary. Nodes are Python functions that operate on this dictionary. They take a dictionary as input and return another dictionary that contains keys and values to be updated in the state of the workflow.
Let’s understand that with a simple example. First, we need to define a state’s schema:
from typing_extensions import TypedDict
class JobApplicationState(TypedDict):
 job_description: str
 is_suitable: bool
 application: str
A TypedDict is a Python type constructor that allows to define dictionaries with a predefined set of keys and each key can have its own type (as opposed to a Dict[str, str] construction).

LangGraph state’s schema shouldn’t necessarily be defined as a TypedDict; you can use data classes or Pydantic models too.
After we have defined a schema for a state, we can define our first simple workflow:
from langgraph.graph import StateGraph, START, END, Graph
def analyze_job_description(state):
 print("...Analyzing a provided job description ...")
 return {"is_suitable": len(state["job_description"]) > 100}
def generate_application(state):
 print("...generating application...")
 return {"application": "some_fake_application"}
builder = StateGraph(JobApplicationState)
builder.add_node("analyze_job_description", analyze_job_description)
builder.add_node("generate_Graph", START, END, Graph
def analyze_job_description(state):
 print("...Analyzing a provided job description ...")
 return {"is_suitable": len(state["job_description"]) > 100}
def generate_application(state):
 print("...generating application...")
 return {"application": "some_fake_application"}
builder = StateGraph(JobApplicationState)
builder.add_node("analyze_job_description", analyze_job_description)
builder.add_node("generate_application", generate_application)
builder.add_edge(START, "analyze_job_description")
builder.add_edge("analyze_job_description", "generate_application")
builder.add_edge("generate_application", END)

graph = builder.compile()
Here, we defined two Python functions that are components of our workflow. Then, we defined our workflow by providing a state’s schema, adding nodes and edges between them. add_node is a convenient way to add a component to your graph (by providing its name and a corresponding Python function), and you can reference this name later when you define edges with add_edge. START and END are reserved built-in nodes that define the beginning and end of the workflow accordingly.
Let’s take a look at our workflow by using a built-in visualization mechanism:
from IPython.display import Image, display
display(Image(graph.get_graph().draw_mermaid_png()))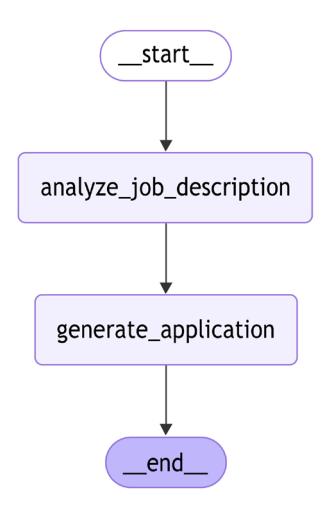
Figure 3.1: LangGraph built-in visualization of our first workflow
Our function accesses the state by simply reading from the dictionary that LangGraph automatically provides as input. LangGraph isolates state updates. When a node receives the state, it gets an immutable copy, not a reference to the actual state object. The node must return a dictionary containing the specific keys and values it wants to update. LangGraph then handles merging these updates into the master state. This pattern prevents side effects and ensures that state changes are explicit and traceable.
The only way for a node to modify a state is to provide an output dictionary with key-value pairs to be updated, and LangGraph will handle it. A node should modify at least one key in the state. A graph instance itself is a Runnable (to be precise, it inherits from Runnable) and we can execute it. We should provide a dictionary with the initial state, and we’ll get the final state as an output:
res = graph.invoke({"job_description":"fake_jd"})
print(res)
# >>...Analyzing a provided job description ...
#...generating application...
# {'job_description': 'fake_jd', 'is_suitable': True, 'application': 'some_
fake_application'}
We used a very simple graph as an example. With your real workflows, you can define parallel steps (for example, you can easily connect one node with multiple nodes) and even cycles. LangGraph executes the workflow in so-called supersteps that can call multiple nodes at the same time (and then merge state updates from these nodes). You can control the depth of recursion and amount of overall supersteps in the graph, which helps you avoid cycles running forever, especially because the LLMs output is non-deterministic.

A superstep on LangGraph represents a discrete iteration over one or a few nodes, and it’s inspired by Pregel, a system built by Google for processing large graphs at scale. It handles parallel execution of nodes and updates sent to the central graph’s state.
In our example, we used direct edges from one node to another. It makes our graph no different from a sequential chain that we could have defined with LangChain. One of the key LangGraph features is the ability to create conditional edges that can direct the execution flow to one or another node depending on the current state. A conditional edge is a Python function that gets the current state as an input and returns a string with the node’s name to be executed.
Let’s look at an example:
from typing import Literal
builder = StateGraph(JobApplicationState)
builder.add_node("analyze_job_description", analyze_job_description)
builder.add_node("generate_application", generate_application)
def is_suitable_condition(state: StateGraph) -> Literal["generate_
application", END]:
 if state.get("is_suitable"):
 return "generate_application"
 return END
builder.add_edge(START, "analyze_job_description")
builder.add_conditional_edges("analyze_job_description", is_suitable_
condition)
builder.add_edge("generate_application", END)
graph = builder.compile()
from IPython.display import Image, display
display(Image(graph.get_graph().draw_mermaid_png()))We’ve defined an edge is_suitable_condition that takes a state and returns either an END or generate_application string by analyzing the current state. We used a Literal type hint since it’s used by LangGraph to determine which destination nodes to connect the source node with when it’s creating conditional edges. If you don’t use a type hint, you can provide a list of destination nodes directly to the add_conditional_edges function; otherwise, LangGraph will connect the source node with all other nodes in the graph (since it doesn’t analyze the code of an edge function itself when creating a graph). The following figure shows the output generated:
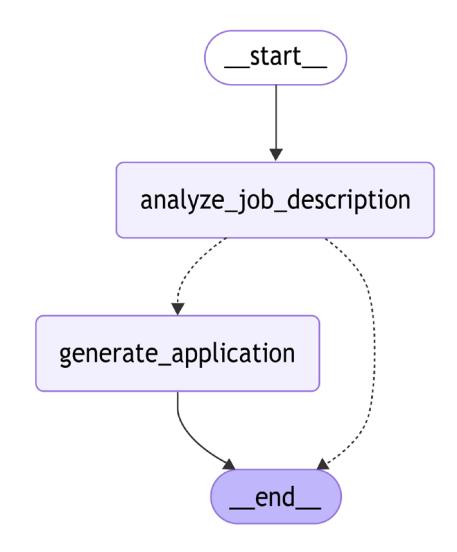
Figure 3.2: A workflow with conditional edges (represented as dotted lines)
Conditional edges are visualized with dotted lines, and now we can see that, depending on the output of the analyze_job_description step, our graph can perform different actions.
Reducers
So far, our nodes have changed the state by updating the value for a corresponding key. From another point of view, at each superstep, LangGraph can produce a new value for a given key. In other words, for every key in the state, there’s a sequence of values, and from a functional programming perspective, a reduce function can be applied to this sequence. The default reducer on LangGraph always replaces the final value with the new value. Let’s imagine we want to track custom actions (produced by nodes) and compare three options.
With the first option, a node should return a list as a value for the key actions. We provide short code samples just for illustration purposes, but you can find full ones on Github. If such a value already exists in the state, it will be replaced with the new one:
class JobApplicationState(TypedDict):
...
actions: list[str]Another option is to use the default add method with the Annotated type hint. By using this type hint, we tell the LangGraph compiler that the type of our variable in the state is a list of strings, and it should use the add method to concatenate two lists (if the value already exists in the state and a node produces a new one):
from typing import Annotated, Optional
from operator import add
class JobApplicationState(TypedDict):
...
actions: Annotated[list[str], add]The last option is to write your own custom reducer. In this example, we write a custom reducer that accepts not only a list from the node (as a new value) but also a single string that would be converted to a list:
from typing import Annotated, Optional, Union
def my_reducer(left: list[str], right: Optional[Union[str, list[str]]]) ->
list[str]:
if right:
return left + [right] if isinstance(right, str) else left + right
return left
class JobApplicationState(TypedDict):
...
actions: Annotated[list[str], my_reducer]LangGraph has a few built-in reducers, and we’ll also demonstrate how you can implement your own. One of the important ones is add_messages, which allows us to merge messages. Many of your nodes would be LLM agents, and LLMs typically work with messages. Therefore, according to the conversational programming paradigm we’ll talk about in more detail in Chapters 5 and 6, you typically need to keep track of these messages:
from langchain_core.messages import AnyMessage
from langgraph.graph.message import add_messages
class JobApplicationState(TypedDict):
...
messages: Annotated[list[AnyMessage], add_messages]Since this is such an important reducer, there’s a built-in state that you can inherit from:
from langgraph.graph import MessagesState
class JobApplicationState(MessagesState):
...Now, as we have discussed reducers, let’s talk about another important concept for any developer – how to write reusable and modular workflows by passing configurations to them.
Making graphs configurable
LangGraph provides a powerful API that allows you to make your graph configurable. It allows you to separate parameters from user input – for example, to experiment between different LLM providers or pass custom callbacks. A node can also access the configuration by accepting it as a second argument. The configuration will be passed as an instance of RunnableConfig.
RunnableConfig is a typed dictionary that gives you control over execution control settings. For example, you can control the maximum number of supersteps with the recursion_limit parameter. RunnableConfig also allows you to pass custom parameters as a separate dictionary under a configurable key.
Let’s allow our node to use different LLMs during application generation:
from langchain_core.runnables.config import RunnableConfig
def generate_application(state: JobApplicationState, config:
RunnableConfig):
model_provider = config["configurable"].get("model_provider", "Google")
model_name = config["configurable"].get("model_name", "gemini-1.5-
flash-002")
print(f"...generating application with {model_provider} and {model_
name} ...")
return {"application": "some_fake_application", "actions": ["action2",
"action3"]}Let’s now compile and execute our graph with a custom configuration (if you don’t provide any, LangGraph will use the default one):
res = graph.invoke({"job_description":"fake_jd"}, config={"configurable":
{"model_provider": "OpenAI", "model_name": "gpt-4o"}})
print(res)
# >> ...Analyzing a provided job description ...
# ...generating application with OpenAI and OpenAI ...
# {'job_description': 'fake_jd', 'is_suitable': True, 'application': 'some_
# fake_application', 'actions': ['action1', 'action2', 'action3']}Now that we’ve established how to structure complex workflows with LangGraph, let’s look at a common challenge these workflows face: ensuring LLM outputs follow the exact structure needed by downstream components. Robust output parsing and graceful error handling are essential for reliable AI pipelines.
Controlled output generation
When you develop complex workflows, one of the common tasks you need to solve is to force an LLM to generate an output that follows a certain structure. This is called a controlled generation. This way, it can be consumed programmatically by the next steps further down the workflow. For example, we can ask the LLM to generate JSON or XML for an API call, extract certain attributes from a text, or generate a CSV table. There are multiple ways to achieve this, and we’ll start exploring them in this chapter and continue in Chapter 5. Since an LLM might not always follow the exact output structure, the next step might fail, and you’ll need to recover from the error. Hence, we’ll also begin discussing error handling in this section.
Output parsing
Output parsing is essential when integrating LLMs into larger workflows, where subsequent steps require structured data rather than natural language responses. One way to do that is to add corresponding instructions to the prompt and parse the output.
Let’s see a simple task. We’d like to classify whether a certain job description is suitable for a junior Java programmer as a step of our pipeline and, based on the LLM’s decision, we’d like to either continue with an application or ignore this specific job description. We can start with a simple prompt:
from langchain_google_vertexai import ChatVertexAI
llm = ChatVertexAI(model="gemini-1.5-flash-002")job_description: str = ... # put your JD here
prompt_template = (
"Given a job description, decide whether it suits a junior Java
developer."
"\nJOB DESCRIPTION:\n{job_description}\n"
)
result = llm.invoke(prompt_template.format(job_description=job_
description))
print(result.content)
#>> No, this job description is not suitable for a junior Javadeveloper.key reasons are:* … (output reduced)
As you can see, the output of the LLM is free text, which might be difficult to parse or interpret in subsequent pipeline steps. What if we add a specific instruction to a prompt?
prompt_template_enum = (
"Given a job description, decide whether it suits a junior Java
developer."
"\nJOB DESCRIPTION:\n{job_description}\n\nAnswer only YES or NO."
)
result = llm.invoke(prompt_template_enum.format(job_description=job_
description))
print(result.content)
# >> NONow, how can we parse this output? Of course, our next step can be to just look at the text and have a condition based on a string comparison. But that won’t work for more complex use cases – for example, if the next step expects the output to be a JSON object. To deal with that, LangChain offers plenty of OutputParsers that take the output generated by the LLM and try to parse it into a desired format (by checking a schema if needed) – a list, CSV, enum, pandas DatafFrame, Pydantic model, JSON, XML, and so on. Each parser implements a BaseGenerationOutputParser interface, which extends the Runnable interface with an additional parse_result method.
Let’s build a parser that parses an output into an enum:
from enum import Enum
from langchain.output_parsers import EnumOutputParser
from langchain_core.messages import HumanMessageclass IsSuitableJobEnum(Enum):
YES = "YES"
NO = "NO"
parser = EnumOutputParser(enum=IsSuitableJobEnum)
assert parser.invoke("NO") == IsSuitableJobEnum.NO
assert parser.invoke("YES\n") == IsSuitableJobEnum.YES
assert parser.invoke(" YES \n") == IsSuitableJobEnum.YES
assert parser.invoke(HumanMessage(content="YES")) == IsSuitableJobEnum.YESThe EnumOutputParser converts text output into a corresponding Enum instance. Note that the parser handles any generation-like output (not only strings), and it actually also strips the output.

You can find a full list of parsers in the documentation at https://python. langchain.com/docs/concepts/output\_parsers/, and if you need your own parser, you can always build a new one!
As a final step, let’s combine everything into a chain:
chain = llm | parser
result = chain.invoke(prompt_template_enum.format(job_description=job_
description))
print(result)
# >> NONow let’s make this chain part of our LangGraph workflow:
class JobApplicationState(TypedDict):
job_description: str
is_suitable: IsSuitableJobEnum
application: str
analyze_chain = llm | parser
def analyze_job_description(state):
prompt = prompt_template_enum.format(job_description=state["job_
description"]) result = analyze_chain.invoke(prompt)
return {"is_suitable": result}
def is_suitable_condition(state: StateGraph):
return state["is_suitable"] == IsSuitableJobEnum.YES
builder = StateGraph(JobApplicationState)
builder.add_node("analyze_job_description", analyze_job_description)
builder.add_node("generate_application", generate_application)
builder.add_edge(START, "analyze_job_description")
builder.add_conditional_edges(
"analyze_job_description", is_suitable_condition,
{True: "generate_application", False: END})
builder.add_edge("generate_application", END)We made two important changes. First, our newly built chain is now part of a Python function that represents the analyze_job_description node, and that’s how we implement the logic within the node. Second, our conditional edge function doesn’t return a string anymore, but we added a mapping of returned values to destination edges to the add_conditional_edges function, and that’s an example of how you could implement a branching of your workflow.
Let’s take some time to discuss how to handle potential errors if our parsing fails!
Error handling
Effective error management is essential in any LangChain workflow, including when handling tool failures (which we’ll explore in Chapter 5 when we get to tools). When developing LangChain applications, remember that failures can occur at any stage:
- API calls to foundation models may fail
- LLMs might generate unexpected outputs
- External services could become unavailable
One of the possible approaches would be to use a basic Python mechanism for catching exceptions, logging them for further analysis, and continuing your workflow either by wrapping an exception as a text or by returning a default value. If your LangChain chain calls some custom Python function, think about appropriate exception handling. The same goes for your LangGraph nodes.
Logging is essential, especially as you approach production deployment. Proper logging ensures that exceptions don’t go unnoticed, allowing you to monitor their occurrence. Modern observability tools provide alerting mechanisms that group similar errors and notify you about frequently occurring issues.
Converting exceptions to text enables your workflow to continue execution while providing downstream LLMs with valuable context about what went wrong and potential recovery paths. Here is a simple example of how you can log the exception but continue executing your workflow by sticking to the default behavior:
import logging
logger = logging.getLogger(__name__)
llms = {
"fake": fake_llm,
"Google": llm
}
def analyze_job_description(state, config: RunnableConfig):
try:
llm = config["configurable"].get("model_provider", "Google")
llm = llms[model_provider]
analyze_chain = llm | parser
prompt = prompt_template_enum.format(job_description=job_description)
result = analyze_chain.invoke(prompt)
return {"is_suitable": result}
except Exception as e:
logger.error(f"Exception {e} occurred while executing analyze_job_
description")
return {"is_suitable": False}To test our error handling, we need to simulate LLM failures. LangChain has a few FakeChatModel classes that help you to test your chain:
- GenericFakeChatModel returns messages based on a provided iterator
- FakeChatModel always returns a “fake_response” string
- FakeListChatModel takes a list of messages and returns them one by one on each invocation
Let’s create a fake LLM that fails every second time:
from langchain_core.language_models import GenericFakeChatModel
from langchain_core.messages import AIMessage
class MessagesIterator:
def __init__(self):
self._count = 0
def __iter__(self):
return self
def __next__(self):
self._count += 1
if self._count % 2 == 1:
raise ValueError("Something went wrong")
return AIMessage(content="False")fake_llm = GenericFakeChatModel(messages=MessagesIterator())
When we provide this to our graph (the full code sample is available in our GitHub repo), we can see that the workflow continues despite encountering an exception:
res = graph.invoke({"job_description":"fake_jd"}, config={"configurable":
{"model_provider": "fake"}})
print(res)
>> ERROR:__main__:Exception Expected a Runnable, callable or dict.Instead
got an unsupported type: <class 'str'> occured while executing analyze_
job_description
{'job_description': 'fake_jd', 'is_suitable': False}When an error occurs, sometimes it helps to try again. LLMs have a non-deterministic nature, and the next attempt might be successful; also, if you’re using third-party APIs, various failures might happen on the provider’s side. Let’s discuss how to implement proper retries with LangGraph.
Retries
There are three distinct retry approaches, each suited to different scenarios:
- Generic retry with Runnable
- Node-specific retry policies
- Semantic output repair
Let’s look at these in turn, starting with generic retries that are available for every Runnable.
You can retry any Runnable or LangGraph node using a built-in mechanism:
fake_llm_retry = fake_llm.with_retry(
retry_if_exception_type=(ValueError,),
wait_exponential_jitter=True,
stop_after_attempt=2,
)
analyze_chain_fake_retries = fake_llm_retry | parserWith LangGraph, you can also describe specific retries for every node. For example, let’s retry our analyze_job_description node two times in case of a ValueError:
from langgraph.pregel import RetryPolicy
builder.add_node(
"analyze_job_description", analyze_job_description,
retry=RetryPolicy(retry_on=ValueError, max_attempts=2))The components you’re using, often known as building blocks, might have their own retry mechanism that tries to algorithmically fix the problem by giving an LLM additional input on what went wrong. For example, many chat models on LangChain have client-side retries on specific server-side errors.
ChatAnthropic has a max_retries parameter that you can define either per instance or per request. Another good example of a more advanced building block is trying to recover from a parsing error. Retrying a parsing step won’t help since typically parsing errors are related to the incomplete LLM output. What if we retry the generation step and hope for the best, or actually give LLM a hint about what went wrong? That’s exactly what a RetryWithErrorOutputParser is doing.
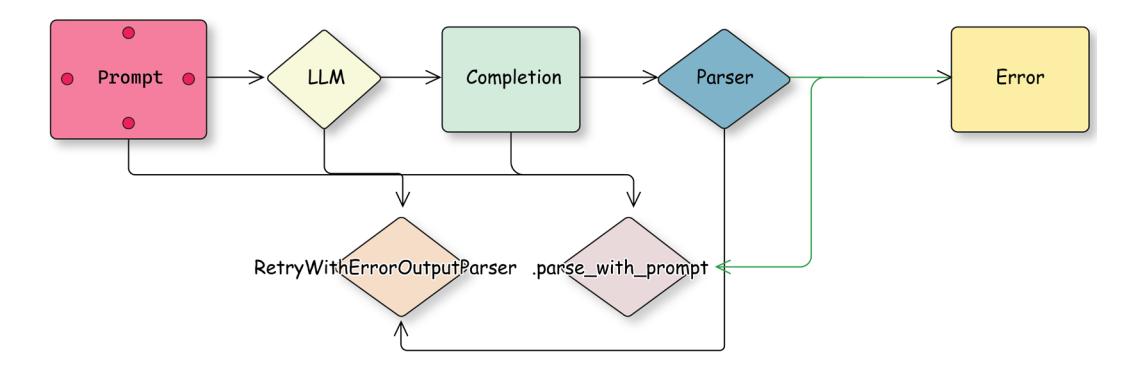
Figure 3.3: Adding a retry mechanism to a chain that has multiple steps
In order to use RetryWithErrorOutputParser, we need to first initialize it with an LLM (used to fix the output) and our parser. Then, if our parsing fails, we run it and provide our initial prompt (with all substituted parameters), generated response, and parsing error:
from langchain.output_parsers import RetryWithErrorOutputParser
fix_parser = RetryWithErrorOutputParser.from_llm(
llm=llm, # provide llm here
parser=parser, # your original parser that failed
prompt=retry_prompt, # an optional parameter, you can redefine the
default prompt
)
fixed_output = fix_parser.parse_with_prompt(
completion=original_response, prompt_value=original_prompt)We can read the source code on GitHub to better understand what’s going on, but in essence, that’s an example of a pseudo-code without too many details. We illustrate how we can pass the parsing error and the original output that led to this error back to an LLM and ask it to fix the problem:
prompt = """
Prompt: {prompt} Completion: {completion} Above, the Completion did not
satisfy the constraints given in the Prompt. Details: {error} Please try
again:
"""
retry_chain = prompt | llm | StrOutputParser()
# try to parse a completion with a provided parser
parser.parse(completion)
# if it fails, catch an error and try to recover max_retries attempts
completion = retry_chain.invoke(original_prompt, completion, error)We introduced the StrOutputParser in Chapter 2 to convert the output of the ChatModel from an AIMessage to a string so that we can easily pass it to the next step in the chain.
Another thing to keep in mind is that LangChain building blocks allow you to redefine parameters, including default prompts. You can always check them on Github; sometimes it’s a good idea to customize default prompts for your workflows.

You can read about other available output-fixing parsers here: https://python. langchain.com/docs/how\_to/output\_parser\_retry/.
Fallbacks
In software development, a fallback is an alternative program that allows you to recover if your base one fails. LangChain allows you to define fallbacks on a Runnable level. If execution fails, an alternative chain is triggered with the same input parameters. For example, if the LLM you’re using is not available for a short period of time, your chain will automatically switch to a different one that uses an alternative provider (and probably different prompts).
Our fake model fails every second time, so let’s add a fallback to it. It’s just a lambda that prints a statement. As we can see, every second time, the fallback is executed:
from langchain_core.runnables import RunnableLambda
chain_fallback = RunnableLambda(lambda _: print("running fallback"))
chain = fake_llm | RunnableLambda(lambda _: print("running main chain"))
chain_with_fb = chain.with_fallbacks([chain_fallback])
chain_with_fb.invoke("test")
chain_with_fb.invoke("test")
# >> running fallback
# running main chainGenerating complex outcomes that can follow a certain template and can be parsed reliably is called structured generation (or controlled generation). This can help to build more complex workflows, where an output of one LLM-driven step can be consumed by another programmatic step. We’ll pick this up again in more detail in Chapters 5 and 6.
Prompts that you send to an LLM are one of the most important building blocks of your workflows. Hence, let’s discuss some basics of prompt engineering next and see how to organize your prompts with LangChain.
Prompt engineering
Let’s continue by looking into prompt engineering and exploring various LangChain syntaxes related to it. But first, let’s discuss how prompt engineering is different from prompt design. These terms are sometimes used interchangeably, and it creates a certain level of confusion. As we discussed in Chapter 1, one of the big discoveries about LLMs was that they have the capability of domain adaptation by in-context learning. It’s often enough to describe the task we’d like it to perform in a natural language, and even though the LLM wasn’t trained on this specific task, it performs extremely well. But as we can imagine, there are multiple ways of describing the same task, and LLMs are sensitive to this. Improving our prompt (or prompt template, to be specific) to increase performance on a specific task is called prompt engineering. However, developing more universal prompts that guide LLMs to generate generally better responses on a broad set of tasks is called prompt design.
There exists a large variety of different prompt engineering techniques. We won’t discuss many of them in detail in this section, but we’ll touch on just a few of them to illustrate key LangChain capabilities that would allow you to construct any prompts you want.

You can find a good overview of prompt taxonomy in the paper The Prompt Report: A Systematic Survey of Prompt Engineering Techniques, published by Sander Schulhoff and colleagues: https://arxiv.org/abs/2406.06608.
Prompt templates
What we did in Chapter 2 is called zero-shot prompting. We created a prompt template that contained a description of each task. When we run the workflow, we substitute certain values of this prompt template with runtime arguments. LangChain has some very useful abstractions to help with that.
In Chapter 2, we introduced PromptTemplate, which is a RunnableSerializable. Remember that it substitutes a string template during invocation – for example, you can create a template based on f-string and add your chain, and LangChain would pass parameters from the input, substitute them in the template, and pass the string to the next step in the chain:
from langchain_core.output_parsers import StrOutputParser
lc_prompt_template = PromptTemplate.from_template(prompt_template)
chain = lc_prompt_template | llm | StrOutputParser()
chain.invoke({"job_description": job_description})For chat models, an input can not only be a string but also a list of messages – for example, a system message followed by a history of the conversation. Therefore, we can also create a template that prepares a list of messages, and a template itself can be created based on a list of messages or message templates, as in this example:
from langchain_core.prompts import ChatPromptTemplate,
HumanMessagePromptTemplate
from langchain_core.messages import SystemMessage, HumanMessage
msg_template = HumanMessagePromptTemplate.from_template(
prompt_template)
msg_example = msg_template.format(job_description="fake_jd")
chat_prompt_template = ChatPromptTemplate.from_messages([
SystemMessage(content="You are a helpful assistant."),
msg_template])
chain = chat_prompt_template | llm | StrOutputParser()
chain.invoke({"job_description": job_description})You can also do the same more conveniently without using chat prompt templates but by submitting a tuple (just because it’s faster and more convenient sometimes) with a type of message and a templated string instead:
chat_prompt_template = ChatPromptTemplate.from_messages(
[("system", "You are a helpful assistant."),
("human", prompt_template)])Another important concept is a placeholder. This substitutes a variable with a list of messages provided in real time. You can add a placeholder to your prompt by using a placeholder hint, or adding a MessagesPlaceholder:
from langchain_core.prompts import ChatPromptTemplate, MessagesPlaceholder
chat_prompt_template = ChatPromptTemplate.from_messages(
[("system", "You are a helpful assistant."),
("placeholder", "{history}"),
# same as MessagesPlaceholder("history"),
("human", prompt_template)])
len(chat_prompt_template.invoke({"job_description": "fake", "history":
[("human", "hi!"), ("ai", "hi!")]}).messages)
>> 4Now our input consists of four messages – a system message, two history messages that we provided, and one human message from a templated prompt. The best example of using a placeholder is to input a history of a chat, but we’ll see more advanced ones later in this book when we’ll talk about how an LLM interacts with an external world or how different LLMs coordinate together in a multi-agent setup.
Zero-shot vs. few-shot prompting
As we have discussed, the first thing that we want to experiment with is improving the task description itself. A description of a task without examples of solutions is called zero-shot prompting, and there are multiple tricks that you can try.
What typically works well is assigning the LLM a certain role (for example, “You are a useful enterprise assistant working for XXX Fortune-500 company”) and giving some additional instruction (for example, whether the LLM should be creative, concise, or factual). Remember that LLMs have seen various data and they can do different tasks, from writing a fantasy book to answering complex reasoning questions. But your goal is to instruct them, and if you want them to stick to the facts, you’d better give very specific instructions as part of their role profile. For chat models, such role setting typically happens through a system message (but remember that, even for a chat model, everything is combined to a single input prompt formatted on the server side).
The Gemini prompting guide recommends that each prompt should have four parts: a persona, a task, a relevant context, and a desired format. Keep in mind that different model providers might have different recommendations on prompt writing or formatting, hence if you have complex prompts, always check the documentation of the model provider, evaluate the performance of your workflows before switching to a new model provider, and adjust prompts accordingly if needed. If you want to use multiple model providers in production, you might end up with multiple prompt templates and select them dynamically based on the model provider.
Another big improvement can be to provide an LLM with a few examples of this specific task as input-output pairs as part of the prompt. This is called few-shot prompting. Typically, few-shot prompting is difficult to use in scenarios that require a long input (such as RAG, which we’ll talk about in the next chapter) but it’s still very useful for tasks with relatively short prompts, such as classification, extraction, etc.
Of course, you can always hard-code examples in the prompt template itself, but this makes it difficult to manage them as your system grows. A better way might be to store examples in a separate file on disk or in a database and load them into your prompt.
Chaining prompts together
As your prompts become more advanced, they tend to grow in size and complexity. One common scenario is to partially format your prompts, and you can do this either by string or function substitution. The latter is relevant if some parts of your prompt depend on dynamically changing variables (for example, current date, user name, etc.). Below, you can find an example of a partial substitution in a prompt template:
system_template = PromptTemplate.from_template("a: {a} b: {b}")
system_template_part = system_template.partial(
a="a" # you also can provide a function here
)
print(system_template_part.invoke({"b": "b"}).text)
# >> a: a b: bAnother way to make your prompts more manageable is to split them into pieces and chain them together:
>> a: a b: bYou can also build more complex substitutions by using the class langchain_core.prompts. PipelinePromptTemplate. Additionally, you can pass templates into a ChatPromptTemplate and they will automatically be composed together:
system_prompt_template = PromptTemplate.from_template("a: {a} b: {b}")
chat_prompt_template = ChatPromptTemplate.from_messages(
[("system", system_prompt_template.template),
("human", "hi"),
("ai", "{c}")])
messages = chat_prompt_template.invoke({"a": "a", "b": "b", "c": "c"}).
messages
print(len(messages))
print(messages[0].content)
# >> 3
# a: a b: bDynamic few-shot prompting
As the number of examples used in your few-shot prompts continues to grow, you might limit the number of examples to be passed into a specific prompt’s template substitution. We select examples for every input – by searching for examples similar to the user’s input (we’ll talk more about semantic similarity and embeddings in Chapter 4), limiting them by length, taking the freshest ones, etc.
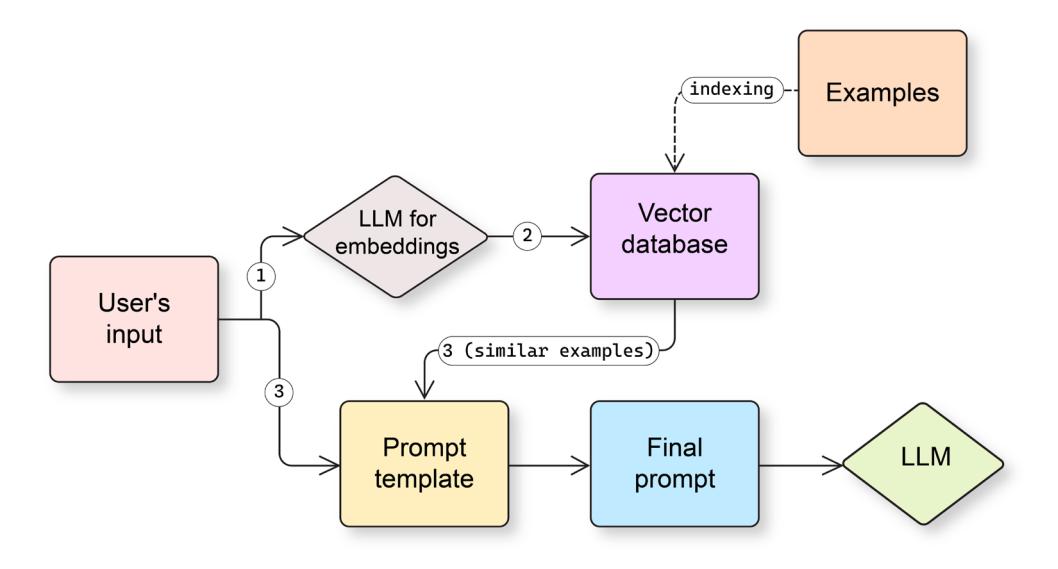
Figure 3.4: An example of a workflow with a dynamic retrieval of examples to be passed to a few-shot prompt
There are a few already built-in selectors under langchain_core.example_selectors. You can directly pass an instance of an example selector to the FewShotPromptTemplate instance during instantiation.
Chain of Thought
The Google Research team introduced the Chain-of-Thought (CoT) technique early in 2022. They demonstrated that a relatively simple modification to a prompt that encouraged a model to generate intermediate step-by-step reasoning steps significantly increased the LLM’s performance on complex symbolic reasoning, common sense, and math tasks. Such an increase in performance has been replicated multiple times since then.

You can read the original paper introducing CoT, Chain-of-Thought Prompting Elicits Reasoning in Large Language Models, published by Jason Wei and colleagues: https:// arxiv.org/abs/2201.11903.
There are different modifications of CoT prompting, and because it has long outputs, typically, CoT prompts are zero-shot. You add instructions that encourage an LLM to think about the problem first instead of immediately generating tokens representing the answer. A very simple example of CoT is just to add to your prompt template something like “Let’s think step by step.”
There are various CoT prompts reported in different papers. You can also explore the CoT template available on LangSmith. For our learning purposes, let’s use a CoT prompt with few-shot examples:
from langchain import hub
math_cot_prompt = hub.pull("arietem/math_cot")
cot_chain = math_cot_prompt | llm | StrOutputParser()
print(cot_chain.invoke("Solve equation 2*x+5=15"))>> Answer: Let's think step by step
Subtract 5 from both sides:
2x + 5 - 5 = 15 - 5
2x = 10
Divide both sides by 2:
2x / 2 = 10 / 2
x = 5We used a prompt from LangSmith Hub – a collection of private and public artifacts that you can use with LangChain. You can explore the prompt itself here: https://smith.langchain.com/hub.
In practice, you might want to wrap a CoT invocation with an extraction step to provide a concise answer to the user. For example, let us first run a cot_chain and then pass its output (please note that we pass a dictionary with an initial question and a cot_output to the next step) to an LLM that will use a prompt to create a final answer based on CoT reasoning:
from operator import itemgetter
parse_prompt_template = (
"Given the initial question and a full answer, "
"extract the concise answer. Do not assume anything and "
"only use a provided full answer.\n\nQUESTION:\n{question}\n"
"FULL ANSWER:\n{full_answer}\n\nCONCISE ANSWER:\n"
)
parse_prompt = PromptTemplate.from_template(
parse_prompt_template
)
final_chain = (
{"full_answer": itemgetter("question") | cot_chain,
"question": itemgetter("question"),
}
| parse_prompt
| llm
| StrOutputParser()
)
print(final_chain.invoke({"question": "Solve equation 2*x+5=15"}))
# >> 5Although a CoT prompt seems to be relatively simple, it’s extremely powerful since, as we’ve mentioned, it has been demonstrated multiple times that it significantly increases performance in many cases. We will see its evolution and expansion when we discuss agents in Chapters 5 and 6.
These days, we can observe how the CoT pattern gets more and more application with so-called reasoning models such as o3-mini or gemini-flash-thinking. To a certain extent, these models do exactly the same (but often in a more advanced manner) – they think before they answer, and this is achieved not only by changing the prompt but also by preparing training data (sometimes synthetic) that follows a CoT format.
Please note that alternatively to using reasoning models, we can use CoT modification with additional instructions by asking an LLM to first generate output tokens that represent a reasoning process:
template = ChatPromptTemplate.from_messages([
("system", """You are a problem-solving assistant that shows its
reasoning process. First, walk through your thought process step by step,
labeling this section as 'THINKING:'. After completing your analysis,
provide your final answer labeled as 'ANSWER:'."""),
("user", "{problem}")
])Self-consistency
The idea behind self-consistency is simple: let’s increase an LLM’s temperature, sample the answer multiple times, and then take the most frequent answer from the distribution. This has been demonstrated to improve the performance of LLM-based workflows on certain tasks, and it works especially well on tasks such as classification or entity extraction, where the output’s dimensionality is low.
Let’s use a chain from a previous example and try a quadratic equation. Even with CoT prompting, the first attempt might give us a wrong answer, but if we sample from a distribution, we will be more likely to get the right one:
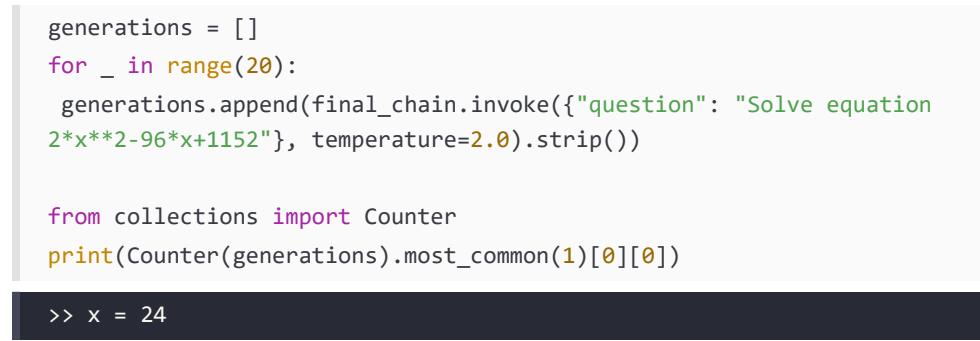
As you can see, we first created a list containing multiple outputs generated by an LLM for the same input and then created a Counter class that allowed us to easily find the most common element in this list, and we took it as a final answer.
Switching between model providers
Different providers might have slightly different guidance on how to construct the best working prompts. Always check the documentation on the provider’s side – for example, Anthropic emphasizes the importance of XML tags to structure your prompts. Reasoning models have different prompting guidelines (for example, typically, you should not use either CoT or few-shot prompting with such models).
Last but not least, if you’re changing the model provider, we highly recommend running an evaluation and estimating the quality of your end-to-end application.
Now that we have learned how to efficiently organize your prompt and use different prompt engineering approaches with LangChain, let’s talk about what can we do if prompts become too long and they don’t fit into the model’s context window.
Working with short context windows
A context window of 1 or 2 million tokens seems to be enough for almost any task we could imagine. With multimodal models, you can just ask the model questions about one, two, or many PDFs, images, or even videos. To process multiple documents (for summarization or question answering), you can use what’s known as the stuff approach. This approach is straightforward: use prompt templates to combine all inputs into a single prompt. Then, send this consolidated prompt to an LLM. This works well when the combined content fits within your model’s context window. In the coming chapter, we’ll discuss further ways of using external data to improve models’ responses.

Keep in mind that, typically, PDFs are treated as images by a multimodal LLM.
Compared to the context window length of 4096 input tokens that we were working with only 2 years ago, the current context window of 1 or 2 million tokens is tremendous progress. But it is still relevant to discuss techniques of overcoming limitations of context window size for a few reasons:
- Not all models have long context windows, especially open-sourced ones or the ones served on edge.
- Our knowledge bases and the complexity of tasks we’re handling with LLMs are also expanding since we might be facing limitations even with current context windows.
- Shorter inputs also help reduce costs and latency.
- Inputs like audio or video are used more and more, and there are additional limitations on the input length (total size of PDF files, length of the video or audio, etc.).
Hence, let’s take a close look at what we can do to work with a context that is larger than a context window that an LLM can handle – summarization is a good example of such a task. Handling a long context is similar to a classical Map-Reduce (a technique that was actively developed in the 2000s to handle computations on large datasets in a distributed and parallel manner). In general, we have two phases:
- Map: We split the incoming context into smaller pieces and apply the same task to every one of them in a parallel manner. We can repeat this phase a few times if needed.
- Reduce: We combine outputs of previous tasks together.
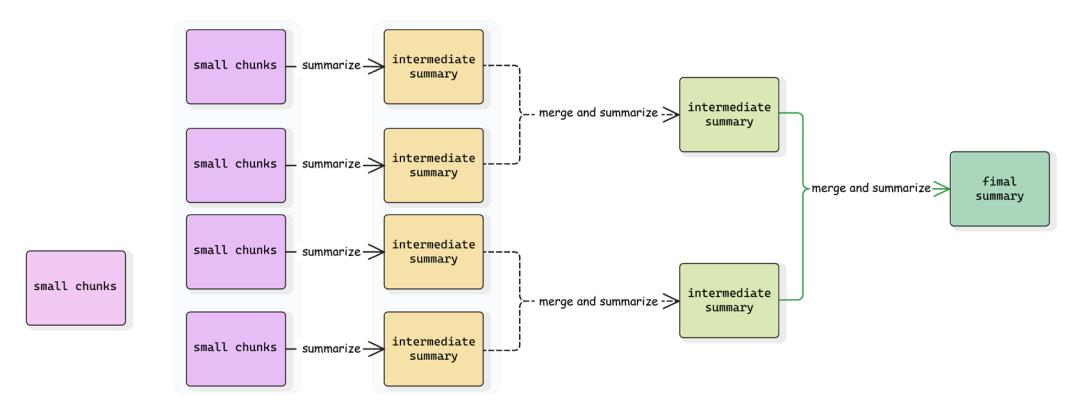
Figure 3.5: A Map-Reduce summarization pipeline
Summarizing long video
Let’s build a LangGraph workflow that implements the Map-Reduce approach presented above. First, let’s define the state of the graph that keeps track of the video in question, the intermediate summaries we produce during the phase step, and the final summary:
from langgraph.constants import Send
import operator
class AgentState(TypedDict):
video_uri: str
chunks: int
interval_secs: int
summaries: Annotated[list, operator.add]
final_summary: str
class _ChunkState(TypedDict):
video_uri: str
start_offset: int
interval_secs: intOur state schema now tracks all input arguments (so that they can be accessed by various nodes) and intermediate results so that we can pass them across nodes. However, the Map-Reduce pattern presents another challenge: we need to schedule many similar tasks that process different parts of the original video in parallel. LangGraph provides a special Send node that enables dynamic scheduling of execution on a node with a specific state. For this approach, we need an additional state schema called _ChunkState to represent a map step. It’s worth mentioning that ordering is guaranteed – results are collected (in other words, applied to the main state) in exactly the same order as nodes are scheduled.
Let’s define two nodes:
- summarize_video_chunk for the Map phase
- _generate_final_summary for the Reduce phase
The first node operates on a state different from the main state, but its output is added to the main state. We run this node multiple times and outputs are combined into a list within the main graph. To schedule these map tasks, we will create a conditional edge connecting the START and _summarize_video_chunk nodes with an edge based on a _map_summaries function:
human_part = {"type": "text", "text": "Provide a summary of the video."}
async def _summarize_video_chunk(state: _ChunkState):
start_offset = state["start_offset"]
interval_secs = state["interval_secs"]
video_part = {
"type": "media", "file_uri": state["video_uri"], "mime_type":
"video/mp4",
"video_metadata": {
"start_offset": {"seconds": start_offset*interval_secs},
"end_offset": {"seconds": (start_offset+1)*interval_secs}}
}
response = await llm.ainvoke(
[HumanMessage(content=[human_part, video_part])])
return {"summaries": [response.content]}
async def _generate_final_summary(state: AgentState):
summary = _merge_summaries(
summaries=state["summaries"], interval_secs=state["interval_secs"])
final_summary = await (reduce_prompt | llm | StrOutputParser()).
ainvoke({"summaries": summary})
return {"final_summary": final_summary}
def _map_summaries(state: AgentState):
chunks = state["chunks"]
payloads = [
{
"video_uri": state["video_uri"],
"interval_secs": state["interval_secs"],
"start_offset": i
} for i in range(state["chunks"])
]
return [Send("summarize_video_chunk", payload) for payload in payloads]Now, let’s put everything together and run our graph. We can pass all arguments to the pipeline in a simple manner:
graph = StateGraph(AgentState)
graph.add_node("summarize_video_chunk", _summarize_video_chunk)
graph.add_node("generate_final_summary", _generate_final_summary)
graph.add_conditional_edges(START, _map_summaries, ["summarize_video_
chunk"])
graph.add_edge("summarize_video_chunk", "generate_final_summary")
graph.add_edge("generate_final_summary", END)
app = graph.compile()
result = await app.ainvoke(
{"video_uri": video_uri, "chunks": 5, "interval_secs": 600},
{"max_concurrency": 3}
)["final_summary"]Now, as we’re prepared to build our first workflows with LangGraph, there’s one last important topic to discuss. What if your history of conversations becomes too long and won’t fit into the context window or it would start distracting an LLM from the last input? Let’s discuss the various memory mechanisms LangChain offers.
Understanding memory mechanisms
LangChain chains and any code you wrap them with are stateless. When you deploy LangChain applications to production, they should also be kept stateless to allow horizontal scaling (more about this in Chapter 9). In this section, we’ll discuss how to organize memory to keep track of interactions between your generative AI application and a specific user.
Trimming chat history
Every chat application should preserve a dialogue history. In prototype applications, you can store it in a variable, though this won’t work for production applications, which we’ll address in the next section.
The chat history is essentially a list of messages, but there are situations where trimming this history becomes necessary. While this was a very important design pattern when LLMs had a limited context window, these days, it’s not that relevant since most of the models (even small open-sourced models) now support 8192 tokens or even more. Nevertheless, understanding trimming techniques remains valuable for specific use cases.
There are five ways to trim the chat history:
- Discard messages based on length (like tokens or messages count): You keep only the most recent messages so their total length is shorter than a threshold. The special Lang-Chain function from langchain_core.messages import trim_messages allows you to trim a sequence of messages. You can provide a function or an LLM instance as a token_ counter argument to this function (and a corresponding LLM integration should support a get_token_ids method; otherwise, a default tokenizer might be used and results might differ from token counts for this specific LLM provider). This function also allows you to customize how to trim the messages – for example, whether to keep a system message and whether a human message should always come first since many model providers require that a chat always starts with a human message (or with a system message). In that case, you should trim the original sequence of human, ai, human, ai to a human, ai one and not ai, human, ai even if all three messages do fit within the context window threshold.
- Summarize the previous conversation: On each turn, you can summarize the previous conversation to a single message that you prepend to the next user’s input. LangChain offered some building blocks for a running memory implementation but, as of March 2025, the recommended way is to build your own summarization node with LangGraph.You can find a detailed guide in the LangChain documentation section: https://langchain-ai. github.io/langgraph/how-tos/memory/add-summary-conversation-history/).
When implementing summarization or trimming, think about whether you should keep both histories in your database for further debugging, analytics, etc. You might want to keep the short-memory history of the latest summary and the message after that summary for the application itself, and you probably want to keep track of the whole history (all raw messages and all the summaries) for further analysis. If yes, design your application carefully. For example, you probably don’t need to load all the raw history and summary messages; it’s enough to dump new messages into the database keeping track of the raw history.
- Combine both trimming and summarization: Instead of simply discarding old messages that make the context window too long, you could summarize these messages and prepend the remaining history.
- Summarize long messages into a short one: You could also summarize long messages. This might be especially relevant for RAG use cases, which we’re going to discuss in the next chapter, when your input to the model might include a lot of additional context added on top of the actual user’s input.
• Implement your own trimming logic: The recommended way is to implement your own tokenizer that can be passed to a trim_messages function since you can reuse a lot of logic that this function already cares for.
Of course, the question remains on how you can persist the chat history. Let’s examine that next.
Saving history to a database
As mentioned above, an application deployed to production can’t store chat history in a local memory. If you have your code running on more than one machine, there’s no guarantee that a request from the same user will hit the same server at the next turn. Of course, you can store history on the frontend and send it back and forth each time, but that also makes sessions not sharable, increases the request size, etc.
Various database providers might offer an implementation that inherits from the langchain_core. chat_history.BaseChatMessageHistory, which allows you to store and retrieve a chat history by session_id. If you’re saving a history to a local variable while prototyping, we recommend using InMemoryChatMessageHistory instead of a list to be able to later switch to integration with a database.
Let’s look at an example. We create a fake chat model with a callback that prints out the amount of input messages each time it’s called. Then we initialize the dictionary that keeps histories, and we create a separate function that returns a history given the session_id:
from langchain_core.chat_history import InMemoryChatMessageHistory
from langchain_core.runnables.history import RunnableWithMessageHistory
from langchain_core.language_models import FakeListChatModel
from langchain.callbacks.base import BaseCallbackHandler
class PrintOutputCallback(BaseCallbackHandler):
def on_chat_model_start(self, serialized, messages, **kwargs):
print(f"Amount of input messages: {len(messages)}")
sessions = {}
handler = PrintOutputCallback()
llm = FakeListChatModel(responses=["ai1", "ai2", "ai3"])
def get_session_history(session_id: str):
if session_id not in sessions:
sessions[session_id] = InMemoryChatMessageHistory()
return sessions[session_id]Now we create a trimmer that uses a len function and threshold 1 – i.e., it always removes the entire history and keeps a system message only:
trimmer = trim_messages(
max_tokens=1,
strategy="last",
token_counter=len,
include_system=True,
start_on="human",
)
raw_chain = trimmer | llm
chain = RunnableWithMessageHistory(raw_chain, get_session_history)Now let’s run it and make sure that our history keeps all the interactions with the user but a trimmed history is passed to the LLM:
config = {"callbacks": [PrintOutputCallback()], "configurable": {"session_
id": "1"}}
_ = chain.invoke(
[HumanMessage("Hi!")],
config=config,
)
print(f"History length: {len(sessions['1'].messages)}")
_ = chain.invoke(
[HumanMessage("How are you?")],
config=config,
)
print(f"History length: {len(sessions['1'].messages)}")
>> Amount of input messages: 1
History length: 2
Amount of input messages: 1
History length: 4We used a RunnableWithMessageHistory that takes a chain and wraps it (like a decorator) with calls to history before executing the chain (to retrieve the history and pass it to the chain) and after finishing the chain (to add new messages to the history).
Database providers might have their integrations as part of the langchain_commuity package or outside of it – for example, in libraries such as langchain_postgres for a standalone PostgreSQL database or langchain-google-cloud-sql-pg for a managed one.

You can find the full list of integrations to store chat history on the documentation page: python.langchain.com/api\_reference/community/chat\message\ histories.html.
When designing a real application, you should be cautious about managing access to somebody’s sessions. For example, if you use a sequential session_id, users might easily access sessions that don’t belong to them. Practically, it might be enough to use a uuid (a uniquely generated long identifier) instead of a sequential session_id, or, depending on your security requirements, add other permissions validations during runtime.
LangGraph checkpoints
A checkpoint is a snapshot of the current state of the graph. It keeps all the information to continue running the workflow from the moment when the snapshot has been taken – including the full state, metadata, nodes that were planned to be executed, and tasks that failed. This is a different mechanism from storing the chat history since you can store the workflow at any given point in time and later restore from the checkpoint to continue. It is important for multiple reasons:
- Checkpoints allow deep debugging and “time travel.”
- Checkpoints allow you to experiment with different paths in your complex workflow without the need to rerun it each time.
- Checkpoints facilitate human-in-the-loop workflows by making it possible to implement human intervention at a given point and continue further.
- Checkpoints help to implement production-ready systems since they add a required level of persistence and fault tolerance.
Let’s build a simple example with a single node that prints the amount of messages in the state and returns a fake AIMessage. We use a built-in MessageGraph that represents a state with only a list of messages, and we initiate a MemorySaver that will keep checkpoints in local memory and pass it to the graph during compilation:
from langgraph.graph import MessageGraph from langgraph.checkpoint.memory import MemorySaver
def test_node(state):
# ignore the last message since it's an input one
print(f"History length = {len(state[:-1])}")
return [AIMessage(content="Hello!")]
builder = MessageGraph()
builder.add_node("test_node", test_node)
builder.add_edge(START, "test_node")
builder.add_edge("test_node", END)
memory = MemorySaver()
graph = builder.compile(checkpointer=memory)Now, each time we invoke the graph, we should provide either a specific checkpoint or a threadid (a unique identifier of each run). We invoke our graph two times with different thread-id values, make sure they each start with an empty history, and then check that the first thread has a history when we invoke it for the second time:
_ = graph.invoke([HumanMessage(content="test")],
config={"configurable": {"thread_id": "thread-a"}})
_ = graph.invoke([HumanMessage(content="test")]
config={"configurable": {"thread_id": "thread-b"}})
_ = graph.invoke([HumanMessage(content="test")]
config={"configurable": {"thread_id": "thread-a"}})
>> History length = 0
History length = 0
History length = 2We can inspect checkpoints for a given thread:
checkpoints = list(memory.list(config={"configurable": {"thread_id":
"thread-a"}}))
for check_point in checkpoints:
print(check_point.config["configurable"]["checkpoint_id"])Let’s also restore from the initial checkpoint for thread-a. We’ll see that we start with an empty history:
checkpoint_id = checkpoints[-1].config["configurable"]["checkpoint_id"]
_ = graph.invoke(
[HumanMessage(content="test")],
config={"configurable": {"thread_id": "thread-a", "checkpoint_id":
checkpoint_id}})>> History length = 0We can also start from an intermediate checkpoint, as shown here:
checkpoint_id = checkpoints[-3].config["configurable"]["checkpoint_id"]
_ = graph.invoke(
[HumanMessage(content="test")],
config={"configurable": {"thread_id": "thread-a", "checkpoint_id":
checkpoint_id}})
# >> History length = 2One obvious use case for checkpoints is implementing workflows that require additional input from the user. We’ll run into exactly the same problem as above – when deploying our production to multiple instances, we can’t guarantee that the next request from the user hits the same server as before. Our graph is stateful (during the execution), but the application that wraps it as a web service should remain stateless. Hence, we can’t store checkpoints in local memory, and we should write them to the database instead. LangGraph offers two integrations: SqliteSaver and PostgresSaver. You can always use them as a starting point and build your own integration if you’d like to use another database provider since all you need to implement is storing and retrieving dictionaries that represent a checkpoint.
Now, you’ve learned the basics and are fully equipped to develop your own workflows. We’ll continue to look at more complex examples and techniques in the next chapter.
Summary
In this chapter, we dived into building complex workflows with LangChain and LangGraph, going beyond simple text generation. We introduced LangGraph as an orchestration framework designed to handle agentic workflows and also created a basic workflow with nodes and edges, and conditional edges, that allow workflow to branch based on the current state. Next, we shifted to output parsing and error handling, where we saw how to use built-in LangChain output parsers and emphasized the importance of graceful error handling.
We then looked into prompt engineering and discussed how to use zero-shot and dynamic fewshot prompting with LangChain, how to construct advanced prompts such as CoT prompting, and how to use substitution mechanisms. Finally, we discussed how to work with long and short contexts, exploring techniques for managing large contexts by splitting the input into smaller pieces and combining the outputs in a Map-Reduce fashion, and worked on an example of processing a large video that doesn’t fit into a context.
Finally, we covered memory mechanisms in LangChain, emphasized the need for statelessness in production deployments, and discussed methods for managing chat history, including trimming based on length and summarizing conversations.
We will use what we learned here to develop a RAG system in Chapter 4 and more complex agentic workflows in Chapters 5 and 6.
Questions
- What is LangGraph, and how does LangGraph workflow differ from LangChain’s vanilla chains?
- What is a “state” in LangGraph, and what are its main functions?
- Explain the purpose of add_node and add_edge in LangGraph.
- What are “supersteps” in LangGraph, and how do they relate to parallel execution?
- How do conditional edges enhance LangGraph workflows compared to sequential chains?
- What is the purpose of the Literal type hint when defining conditional edges?
- What are reducers in LangGraph, and how do they allow modification of the state?
- Why is error handling crucial in LangChain workflows, and what are some strategies for achieving it?
- How can memory mechanisms be used to trim the history of a conversational bot?
- What is the use case of LangGraph checkpoints?
Chapter 4: Building Intelligent RAG Systems
So far in this book, we’ve talked about LLMs and tokens and working with them in LangChain. Retrieval-Augmented Generation (RAG) extends LLMs by dynamically incorporating external knowledge during generation, addressing limitations of fixed training data, hallucinations, and context windows. A RAG system, in simple terms, takes a query, converts it directly into a semantic vector embedding, runs a search extracting relevant documents, and passes these to a model that generates a context-appropriate user-facing response.
This chapter explores RAG systems and the core components of RAG, including vector stores, document processing, retrieval strategies, implementation, and evaluation techniques. After that, we’ll put into practice a lot of what we’ve learned so far in this book by building a chatbot. We’ll build a production-ready RAG pipeline that streamlines the creation and validation of corporate project documentation. This corporate use case demonstrates how to generate initial documentation, assess it for compliance and consistency, and incorporate human feedback—all in a modular and scalable workflow.
The chapter has the following sections:
- From indexes to intelligent retrieval
- Components of a RAG system
- From embeddings to search
- Breaking down the RAG pipeline
- Developing a corporate documentation chatbot
- Troubleshooting RAG systems
Let’s begin by introducing RAG, its importance, and the main considerations when using the RAG framework.
From indexes to intelligent retrieval
Information retrieval has been a fundamental human need since the dawn of recorded knowledge. For the past 70 years, retrieval systems have operated under the same core paradigm:
- First, a user frames an information need as a query.
- They then submit this query to the retrieval system.
- Finally, the system returns references to documents that may satisfy the information need:
- References may be rank-ordered by decreasing relevance
- Results may contain relevant excerpts from each document (known as snippets)
While this paradigm has remained constant, the implementation and user experience have undergone remarkable transformations. Early information retrieval systems relied on manual indexing and basic keyword matching. The advent of computerized indexing in the 1960s introduced the inverted index—a data structure that maps each word to a list of documents containing it. This lexical approach powered the first generation of search engines like AltaVista (1996), where results were primarily based on exact keyword matches.
The limitations of this approach quickly became apparent, however. Words can have multiple meanings (polysemy), different words can express the same concept (synonymy), and users often struggle to articulate their information needs precisely.
Information-seeking activities come with non-monetary costs: time investment, cognitive load, and interactivity costs—what researchers call “Delphic costs.” User satisfaction with search engines correlates not just with the relevance of results, but with how easily users can extract the information they need.
Traditional retrieval systems aimed to reduce these costs through various optimizations:
- Synonym expansion to lower cognitive load when framing queries
- Result ranking to reduce the time cost of scanning through results
- Result snippeting (showing brief, relevant excerpts from search results) to lower the cost of evaluating document relevance
These improvements reflected an understanding that the ultimate goal of search is not just finding documents but satisfying information needs.
Google’s PageRank algorithm (late 1990s) improved results by considering link structures, but even modern search engines faced fundamental limitations in understanding meaning. The search experience evolved from simple lists of matching documents to richer presentations with contextual snippets (beginning with Yahoo’s highlighted terms in the late 1990s and evolving to Google’s dynamic document previews that extract the most relevant sentences containing search terms), but the underlying challenge remained: bridging the semantic gap between query terms and relevant information.
A fundamental limitation of traditional retrieval systems lies in their lexical approach to document retrieval. In the Uniterm model, query terms were mapped to documents through inverted indices, where each word in the vocabulary points to a “postings list” of document positions. This approach efficiently supported complex boolean queries but fundamentally missed semantic relationships between terms. For example, “turtle” and “tortoise” are treated as completely separate words in an inverted index, despite being semantically related. Early retrieval systems attempted to bridge this gap through pre-retrieval stages that augmented queries with synonyms, but the underlying limitation remained.
The breakthrough came with advances in neural network models that could capture the meaning of words and documents as dense vector representations—known as embeddings. Unlike traditional keyword systems, embeddings create a semantic map where related concepts cluster together—“turtle,” “tortoise,” and “reptile” would appear as neighbors in this space, while “bank” (financial) would cluster with “money” but far from “river.” This geometric organization of meaning enabled retrieval based on conceptual similarity rather than exact word matching.
This transformation gained momentum with models like Word2Vec (2013) and later transformer-based models such as BERT (2018), which introduced contextual understanding. BERT’s innovation was to recognize that the same word could have different meanings depending on its context—“bank” as a financial institution versus “bank” of a river. These distributed representations fundamentally changed what was possible in information retrieval, enabling the development of systems that could understand the intent behind queries rather than just matching keywords.
As transformer-based language models grew in scale, researchers discovered they not only learned linguistic patterns but also memorized factual knowledge from their training data. Studies by Google researchers showed that models like T5 could answer factual questions without external retrieval, functioning as implicit knowledge bases. This suggested a paradigm shift—from retrieving documents containing answers to directly generating answers from internalized knowledge. However, these “closed-book” generative systems faced limitations: hallucination risks, knowledge cutoffs limited to training data, inability to cite sources, and challenges with complex reasoning. The solution emerged in RAG, which bridges traditional retrieval systems with generative language models, combining their respective strengths while addressing their individual weaknesses.
Components of a RAG system
RAG enables language models to ground their outputs in external knowledge, providing an elegant solution to the limitations that plague pure LLMs: hallucinations, outdated information, and restricted context windows. By retrieving only relevant information on demand, RAG systems effectively bypass the context window constraints of language models, allowing them to leverage vast knowledge bases without squeezing everything into the model’s fixed attention span.
Rather than simply retrieving documents for human review (as traditional search engines do) or generating answers solely from internalized knowledge (as pure LLMs do), RAG systems retrieve information to inform and ground AI-generated responses. This approach combines the verifiability of retrieval with the fluency and comprehension of generative AI.
At its core, RAG consists of these main components working in concert:
- Knowledge base: The storage layer for external information
- Retriever: The knowledge access layer that finds relevant information
- Augmenter: The integration layer that prepares retrieved content
- Generator: The response layer that produces the final output
From a process perspective, RAG operates through two interconnected pipelines:
- An indexing pipeline that processes, chunks, and stores documents in the knowledge base
- A query pipeline that retrieves relevant information and generates responses using that information
The workflow in a RAG system follows a clear sequence: when a query arrives, it’s processed for retrieval; the retriever then searches the knowledge base for relevant information; this retrieved context is combined with the original query through augmentation; finally, the language model generates a response grounded in both the query and the retrieved information. We can see this in the following diagram:

Figure 4.1: RAG architecture and workflow
This architecture offers several advantages for production systems: modularity allows components to be developed independently; scalability enables resources to be allocated based on specific needs; maintainability is improved through the clear separation of concerns; and flexibility permits different implementation strategies to be swapped in as requirements evolve.
In the following sections, we’ll explore each component in Figure 4.1 in detail, beginning with the fundamental building blocks of modern RAG systems: embeddings and vector stores that power the knowledge base and retriever components. But before we dive in, it’s important to first consider the decision between implementing RAG or using pure LLMs. This choice will fundamentally impact your application’s overall architecture and operational characteristics. Let’s discuss the trade-offs!
When to implement RAG
Introducing RAG brings architectural complexity that must be carefully weighed against your application requirements. RAG proves particularly valuable in specialized domains where current or verifiable information is crucial. Healthcare applications must process both medical images and time-series data, while financial systems need to handle high-dimensional market data alongside historical analysis. Legal applications benefit from RAG’s ability to process complex document structures and maintain source attribution. These domain-specific requirements often justify the additional complexity of implementing RAG.
The benefits of RAG, however, come with significant implementation considerations. The system requires efficient indexing and retrieval mechanisms to maintain reasonable response times. Knowledge bases need regular updates and maintenance to remain valuable. Infrastructure must be designed to handle errors and edge cases gracefully, especially where different components interact. Development teams must be prepared to manage these ongoing operational requirements.
Pure LLM implementations, on the other hand, might be more appropriate when these complexities outweigh the benefits. Applications focusing on creative tasks, general conversation, or scenarios requiring rapid response times often perform well without the overhead of retrieval systems. When working with static, limited knowledge bases, techniques like fine-tuning or prompt engineering might provide simpler solutions.
This analysis, drawn from both research and practical implementations, suggests that specific requirements for knowledge currency, accuracy, and domain expertise should guide the choice between RAG and pure LLMs, balanced against the organizational capacity to manage the additional architectural complexity.

At Chelsea AI Ventures, our team has observed that clients in regulated industries particularly benefit from RAG’s verifiability, while creative applications often perform adequately with pure LLMs.
Development teams should consider RAG when their applications require:
- Access to current information not available in LLM training data
- Domain-specific knowledge integration
- Verifiable responses with source attribution
- Processing of specialized data formats
- High precision in regulated industries
With that, let’s explore the implementation details, optimization strategies, and production deployment considerations for each RAG component.
From embeddings to search
As mentioned, a RAG system comprises a retriever that finds relevant information, an augmentation mechanism that integrates this information, and a generator that produces the final output. When building AI applications with LLMs, we often focus on the exciting parts – prompts, chains, and model outputs. However, the foundation of any robust RAG system lies in how we store and retrieve our vector embeddings. Think of it like building a library – before we can efficiently find books (vector search), we need both a building to store them (vector storage) and an organization system to find them (vector indexing). In this section, we introduce the core components of a RAG system: vector embeddings, vector stores, and indexing strategies to optimize retrieval.
To make RAG work, we first need to solve a fundamental challenge: how do we help computers understand the meaning of text so they can find relevant information? This is where embeddings come in.
Embeddings
Embeddings are numerical representations of text that capture semantic meaning. When we create an embedding, we’re converting words or chunks of text into vectors (lists of numbers) that computers can process. These vectors can be either sparse (mostly zeros with few non-zero values) or dense (most values are non-zero), with modern LLM systems typically using dense embeddings.
What makes embeddings powerful is that texts with similar meanings have similar numerical representations, enabling semantic search through nearest neighbor algorithms.
In other words, the embedding model transforms text into numerical vectors. The same model is used for both documents as well as queries to ensure consistency in the vector space. Here’s how you’d use embeddings in LangChain:
from langchain_openai import OpenAIEmbeddings
# Initialize the embeddings model
embeddings_model = OpenAIEmbeddings()
# Create embeddings for the original example sentences
text1 = "The cat sat on the mat"
text2 = "A feline rested on the carpet"
text3 = "Python is a programming language"
# Get embeddings using LangChain
embeddings = embeddings_model.embed_documents([text1, text2, text3])
# These similar sentences will have similar embeddings
embedding1 = embeddings[0] # Embedding for "The cat sat on the mat"
embedding2 = embeddings[1] # Embedding for "A feline rested on the
carpet"
embedding3 = embeddings[2] # Embedding for "Python is a programming
language"
# Output shows 3 documents with their embedding dimensions
print(f"Number of documents: {len(embeddings)}")
print(f"Dimensions per embedding: {len(embeddings[0])}")
# Typically 1536 dimensions with OpenAI's embeddingsOnce we have these OpenAI embeddings (the 1536-dimensional vectors we generated for our example sentences above), we need a purpose-built system to store them. Unlike regular database values, these high-dimensional vectors require specialized storage solutions.
The Embeddings class in LangChain provides a standard interface for all embedding models from various providers (OpenAI, Cohere, Hugging Face, and others). It exposes two primary methods:
- embed_documents: Takes multiple texts and returns embeddings for each
- embed_query: Takes a single text (your search query) and returns its embedding
Some providers use different embedding methods for documents versus queries, which is why these are separate methods in the API.
This brings us to vector stores – specialized databases optimized for similarity searches in high-dimensional spaces.
Vector stores
Vector stores are specialized databases designed to store, manage, and efficiently search vector embeddings. As we’ve seen, embeddings convert text (or other data) into numerical vectors that capture semantic meaning.
Vector stores solve the fundamental challenge of how to persistently and efficiently search through these high-dimensional vectors. Please note that the vector database operates as an independent system that can be:
- Scaled independently of the RAG components
- Maintained and optimized separately
- Potentially shared across multiple RAG applications
- Hosted as a dedicated service
When working with embeddings, several challenges arise:
- Scale: Applications often need to store millions of embeddings
- Dimensionality: Each embedding might have hundreds or thousands of dimensions
- Search performance: Finding similar vectors quickly becomes computationally intensive
- Associated data: We need to maintain connections between vectors and their source documents
Consider a real-world example of what we need to store:
# Example of data that needs efficient storage in a vector store
document_data = {
"id": "doc_42",
"text": "LangChain is a framework for developing applications powered
by language models.",
"embedding": [0.123, -0.456, 0.789, ...], # 1536 dimensions for
OpenAI embeddings
"metadata": {
"source": "documentation.pdf",
"page": 7,
"created_at": "2023-06-15"
}
}At their core, vector stores combine two essential components:
- Vector storage: The actual database that persists vectors and metadata
- Vector index: A specialized data structure that enables efficient similarity search
The efficiency challenge comes from the curse of dimensionality – as vector dimensions increase, computing similarities becomes increasingly expensive, requiring O(dN) operations for d dimensions and N vectors. This makes naive similarity search impractical for large-scale applications.
Vector stores enable similarity-based search through distance calculations in high-dimensional space. While traditional databases excel at exact matching, vector embeddings allow for semantic search and approximate nearest neighbor (ANN) retrieval.
The key difference from traditional databases is how vector stores handle searches.
Traditional database search:
- Uses exact matching (equality, ranges)
- Optimized for structured data (for example, “find all customers with age > 30”)
- Usually utilizes B-trees or hash-based indexes
Vector store search:
- Uses similarity metrics (cosine similarity, Euclidean distance)
- Optimized for high-dimensional vector spaces
- Employs Approximate Nearest Neighbor (ANN) algorithms
Vector stores comparison
Vector stores manage high-dimensional embeddings for retrieval. The following table compares popular vector stores across key attributes to help you select the most appropriate solution for your specific needs:
| Database | Deployment options |
License | Notable features |
|---|---|---|---|
| Pinecone | Cloud-only | Commercial | Auto-scaling, enterprise security, monitoring |
| Milvus | Cloud, Self hosted |
Apache 2.0 | HNSW/IVF indexing, multi-modal support, CRUD operations |
| Weaviate | Cloud, Self hosted |
BSD 3-Clause | Graph-like structure, multi-modal support |
| Qdrant | Cloud, Self hosted |
Apache 2.0 | HNSW indexing, filtering optimization, JSON metadata |
| ChromaDB | Cloud, Self hosted |
Apache 2.0 | Lightweight, easy setup |
| AnalyticDB-V | Cloud-only | Commercial | OLAP integration, SQL support, enterprise features |
| pg_vector | Cloud, Self hosted |
OSS | SQL support, PostgreSQL integration |
| Vertex Vector Search |
Cloud-only | Commercial | Easy setup, low latency, high scalability |
Table 4.1: Vector store comparison by deployment options, licensing, and key features
Each vector store offers different tradeoffs in terms of deployment flexibility, licensing, and specialized capabilities. For production RAG systems, consider factors such as:
- Whether you need cloud-managed or self-hosted deployment
- The need for specific features like SQL integration or multi-modal support
- The complexity of setup and maintenance
- Scaling requirements for your expected embedding volume
For many applications starting with RAG, lightweight options like ChromaDB provide an excellent balance of simplicity and functionality, while enterprise deployments might benefit from the advanced features of Pinecone or AnalyticDB-V. Modern vector stores support several search patterns:
- Exact search: Returns precise nearest neighbors but becomes computationally prohibitive with large vector collections
- Approximate search: Trades accuracy for speed using techniques like LSH, HNSW, or quantization; measured by recall (the percentage of true nearest neighbors retrieved)
- Hybrid search: Combines vector similarity with text-based search (like keyword matching or BM25) in a single query
- Filtered vector search: Applies traditional database filters (for example, metadata constraints) alongside vector similarity search
Vector stores also handle different types of embeddings:
- Dense vector search: Uses continuous embeddings where most dimensions have non-zero values, typically from neural models (like BERT, OpenAI embeddings)
- Sparse vector search: Uses high-dimensional vectors where most values are zero, resembling traditional TF-IDF or BM25 representations
- Sparse-dense hybrid: Combines both approaches to leverage semantic similarity (dense) and keyword precision (sparse)
They also often give a choice of multiple similarity measures, for example:
- Inner product: Useful for comparing semantic directions
- Cosine similarity: Normalizes for vector magnitude
- Euclidean distance: Measures the L2 distance in vector space (note: with normalized embeddings, this becomes functionally equivalent to the dot product)
- Hamming distance: For binary vector representations
When implementing vector storage for RAG applications, one of the first architectural decisions is whether to use local storage or a cloud-based solution. Let’s explore the tradeoffs and considerations for each approach.
- Choose local storage when you need maximum control, have strict privacy requirements, or operate at a smaller scale with predictable workloads.
- Choose cloud storage when you need elastic scaling, prefer managed services, or operate distributed applications with variable workloads.
• Consider hybrid storage architecture when you want to balance performance and scalability, combining local caching with cloud-based persistence.
Hardware considerations for vector stores
Regardless of your deployment approach, understanding the hardware requirements is crucial for optimal performance:
- Memory requirements: Vector databases are memory-intensive, with production systems often requiring 16-64GB RAM for millions of embeddings. Local deployments should plan for sufficient memory headroom to accommodate index growth.
- CPU vs. GPU: While basic vector operations work on CPUs, GPU acceleration significantly improves performance for large-scale similarity searches. For high-throughput applications, GPU support can provide 10-50x speed improvements.
- Storage speed: SSD storage is strongly recommended over HDD for production vector stores, as index loading and search performance depend heavily on I/O speed. This is especially critical for local deployments.
- Network bandwidth: For cloud-based or distributed setups, network latency and bandwidth become critical factors that can impact query response times.
For development and testing, most vector stores can run on standard laptops with 8GB+ RAM, but production deployments should consider dedicated infrastructure or cloud-based vector store services that handle these resource considerations automatically.
Vector store interface in LangChain
Now that we’ve explored the role of vector stores and compared some common options, let’s look at how LangChain simplifies working with them. LangChain provides a standardized interface for working with vector stores, allowing you to easily switch between different implementations:
from langchain_openai import OpenAIEmbeddings
from langchain_chroma import Chroma
# Initialize with an embedding model
embeddings = OpenAIEmbeddings()
vector_store = Chroma(embedding_function=embeddings)The vectorstore base class in LangChain provides these essential operations:
- Adding documents:
docs = [Document(page_content="Content 1"), Document(page_
content="Content 2")]
ids = vector_store.add_documents(docs)- Similarity search:
results = vector_store.similarity_search("How does LangChain work?",
k=3)- Deletion:
vector_store.delete(ids=["doc_1", "doc_2"])- Maximum marginal relevance search:
# Find relevant BUT diverse documents (reduce redundancy)
results = vector_store.max_marginal_relevance_search(
"How does LangChain work?",
k=3,
fetch_k=10,
lambda_mult=0.5 # Controls diversity (0=max diversity, 1=max
relevance)
)It’s important to also briefly highlight applications of vector stores apart from RAG:
- Anomaly detection in large datasets
- Personalization and recommendation systems
- NLP tasks
- Fraud detection
- Network security monitoring
Storing vectors isn’t enough, however. We need to find similar vectors quickly when processing queries. Without proper indexing, searching through vectors would be like trying to find a book in a library with no organization system – you’d have to check every single book.
Vector indexing strategies
Vector indexing is a critical component that makes vector databases practical for real-world applications. At its core, indexing solves a fundamental performance challenge: how to efficiently find similar vectors without comparing against every single vector in the database (brute force approach), which is computationally prohibitive for even medium-sized data volumes.
Vector indexes are specialized data structures that organize vectors in ways that allow the system to quickly identify which sections of the vector space are most likely to contain similar vectors. Instead of checking every vector, the system can focus on promising regions first.
Some common indexing approaches include:
- Tree-based structures that hierarchically divide the vector space
- Graph-based methods like Hierarchical Navigable Small World (HNSW) that create navigable networks of connected vectors
- Hashing techniques that map similar vectors to the same “buckets”
Each of the preceding approaches offers different trade-offs between:
- Search speed
- Accuracy of results
- Memory usage
- Update efficiency (how quickly new vectors can be added)
When using a vector store in LangChain, the indexing strategy is typically handled by the underlying implementation. For example, when you create a FAISS index or use Pinecone, those systems automatically apply appropriate indexing strategies based on your configuration.
The key takeaway is that proper indexing transforms vector search from an O(n) operation (where n is the number of vectors) to something much more efficient (often closer to O(log n)), making it possible to search through millions of vectors in milliseconds rather than seconds or minutes.
| Strategy | Core algo rithm |
Complex ity |
Memory usage |
Best for | Notes |
|---|---|---|---|---|---|
| Exact Search (Brute Force) |
Compares query vector with every vector in database |
Search: O(DN) Build: O(1) |
Low – only stores raw vectors |
• Small datasets • When 100% recall needed • Testing/baseline |
• Easiest to im plement • Good baseline for testing |
| HNSW (Hierarchical Naviga ble Small World) |
Creates layered graph with decreasing connec tivity from bottom to top |
Search: O(log N) Build: O(N log N) |
High – stores graph connec tions plus vectors |
• Production systems • When high accuracy needed • Large-scale search |
• Industry stan dard • Requires care ful tuning of M (connections) and ef (search depth) |
| LSH (Local ity Sensitive Hashing) |
Uses hash functions that map similar vectors to the same buckets |
Search: O(N ) Build: O(N) |
Medium – stores multiple hash tables |
• Streaming data • When updates frequent • Approximate search OK |
• Good for dy namic data • Tunable accu racy vs speed |
| IVF (In verted File Index) |
Clusters vectors and searches within relevant clusters |
Search: O(DN/k) Build: O(kN) |
Low – stores cluster assign ments |
• Limited memory • Balance of speed/ accuracy • Simple implemen tation |
• k = number of clusters • Often com bined with other methods |
| Product Quantiza tion (PQ) |
Compresses vectors by splitting into sub spaces and quantizing |
Search: varies Build: O(N) |
Very Low – com pressed vectors |
• Memory-con strained systems • Massive datasets |
• Often com bined with IVF • Requires train ing codebooks • Complex im plementation |
Here’s a table to provide an overview of different strategies:
| Tree-Based | Recursively | Search: | Medi | • Low dimensional |
• Works well for |
|---|---|---|---|---|---|
| (KD-Tree, | partitions | O(D log N) | um – tree | data | D < 100 |
| Ball Tree) | space into | best case | structure | • Static datasets |
• Expensive |
| regions | Build: O(N | updates | |||
| log N) |
Table 4.2: Vector store comparison by deployment options, licensing, and key features
When selecting an indexing strategy for your RAG system, consider these practical tradeoffs:
- For maximum accuracy with small datasets (<100K vectors): Exact Search provides perfect recall but becomes prohibitively expensive as your dataset grows.
- For production systems with millions of vectors: HNSW offers the best balance of search speed and accuracy, making it the industry standard for large-scale applications. While it requires more memory than other approaches, its logarithmic search complexity delivers consistent performance even as your dataset scales.
- For memory-constrained environments: IVF+PQ (Inverted File Index with Product Quantization) dramatically reduces memory requirements—often by 10-20x compared to raw vectors—with a modest accuracy tradeoff. This combination is particularly valuable for edge deployments or when embedding billions of documents.
- For frequently updated collections: LSH provides efficient updates without rebuilding the entire index, making it suitable for streaming data applications where documents are continuously added or removed.
Most modern vector databases default to HNSW for good reason, but understanding these tradeoffs allows you to optimize for your specific constraints when necessary. To illustrate the practical difference between indexing strategies, let’s compare the performance and accuracy of exact search versus HNSW indexing using FAISS:
import numpy as np
import faiss
import time
# Create sample data - 10,000 vectors with 128 dimensions
dimension = 128
num_vectors = 10000
vectors = np.random.random((num_vectors, dimension)).astype('float32')
query = np.random.random((1, dimension)).astype('float32')# Exact search index
exact_index = faiss.IndexFlatL2(dimension)
exact_index.add(vectors)
# HNSW index (approximate but faster)
hnsw_index = faiss.IndexHNSWFlat(dimension, 32) # 32 connections per node
hnsw_index.add(vectors)
# Compare search times
start_time = time.time()
exact_D, exact_I = exact_index.search(query, k=10) # Search for 10
nearest neighbors
exact_time = time.time() - start_time
start_time = time.time()
hnsw_D, hnsw_I = hnsw_index.search(query, k=10)
hnsw_time = time.time() - start_time
# Calculate overlap (how many of the same results were found)
overlap = len(set(exact_I[0]).intersection(set(hnsw_I[0])))
overlap_percentage = overlap * 100 / 10
print(f"Exact search time: {exact_time:.6f} seconds")
print(f"HNSW search time: {hnsw_time:.6f} seconds")
print(f"Speed improvement: {exact_time/hnsw_time:.2f}x faster")
print(f"Result overlap: {overlap_percentage:.1f}%")
Running this code typically produces results like:
Exact search time: 0.003210 seconds
HNSW search time: 0.000412 seconds
Speed improvement: 7.79x faster
Result overlap: 90.0%This example demonstrates the fundamental tradeoff in vector indexing: exact search guarantees finding the true nearest neighbors but takes longer, while HNSW provides approximate results significantly faster. The overlap percentage shows how many of the same nearest neighbors were found by both methods.
For small datasets like this example (10,000 vectors), the absolute time difference is minimal. However, as your dataset grows to millions or billions of vectors, exact search becomes prohibitively expensive, while HNSW maintains logarithmic scaling—making approximate indexing methods essential for production RAG systems.
Here’s a diagram that can help developers choose the right indexing strategy based on their requirements:
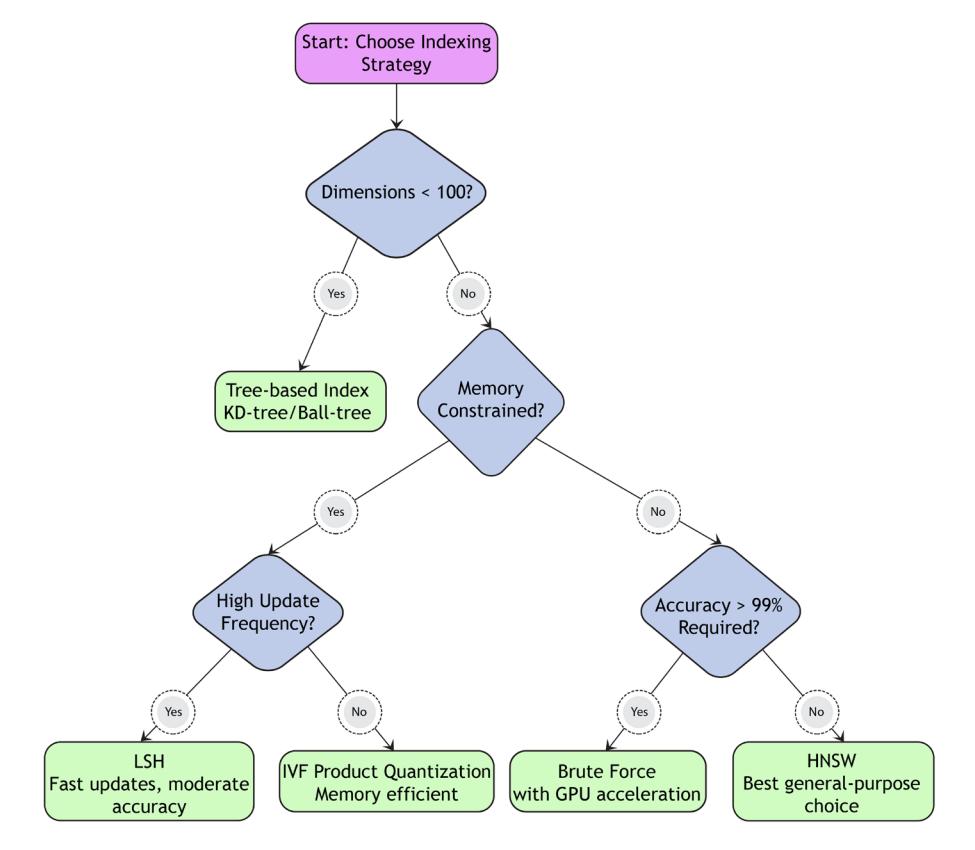
Figure 4.2: Choosing an indexing strategy
The preceding figure illustrates a decision tree for selecting the appropriate indexing strategy based on your deployment constraints. The flowchart helps you navigate key decision points:
- Start by assessing your dataset size: For small collections (under 100K vectors), exact search remains viable and provides perfect accuracy.
- Consider your memory constraints: If memory is limited, follow the left branch toward compression techniques like Product Quantization (PQ).
- Evaluate update frequency: If your application requires frequent index updates, prioritize methods like LSH that support efficient updates.
- Assess search speed requirements: For applications demanding ultra-low latency, HNSW typically provides the fastest search times once built.
- Balance with accuracy needs: As you move downward in the flowchart, consider the accuracy-efficiency tradeoff based on your application’s tolerance for approximate results.
For most production RAG applications, you’ll likely end up with HNSW or a combined approach like IVF+HNSW, which clusters vectors first (IVF) and then builds efficient graph structures (HNSW) within each cluster. This combination delivers excellent performance across a wide range of scenarios.
To improve retrieval, documents must be processed and structured effectively. The next section explores loading various document types and handling multi-modal content.
Vector libraries, like Facebook (Meta) Faiss or Spotify Annoy, provide functionality for working with vector data. They typically offer different implementations of the ANN algorithm, such as clustering or tree-based methods, and allow users to perform vector similarity searches for various applications. Let’s quickly go through a few of the most popular ones:
Faiss is a library developed by Meta (previously Facebook) that provides efficient similarity search and clustering of dense vectors. It offers various indexing algorithms, including PQ, LSH, and HNSW. Faiss is widely used for large-scale vector search tasks and supports both CPU and GPU acceleration.
Annoy is a C++ library for approximate nearest neighbor search in high-dimensional spaces maintained and developed by Spotify, implementing the Annoy algorithm based on a forest of random projection trees.
hnswlib is a C++ library for approximate nearest-neighbor search using the HNSW algorithm.
• Non-Metric Space Library (nmslib) supports various indexing algorithms like HNSW, SW-graph, and SPTAG.
SPTAG by Microsoft implements a distributed ANN. It comes with a k-d tree and relative neighborhood graph (SPTAG-KDT), and a balanced k-means tree and relative neighborhood graph (SPTAG-BKT).

There are a lot more vector search libraries you can choose from. You can get a complete overview at https://github.com/erikbern/ann-benchmarks.
When implementing vector storage solutions, consider:
- The tradeoff between exact and approximate search
- Memory constraints and scaling requirements
- The need for hybrid search capabilities combining vector and traditional search
- Multi-modal data support requirements
- Integration costs and maintenance complexity
For many applications, a hybrid approach combining vector search with traditional database capabilities provides the most flexible solution.
Breaking down the RAG pipeline
Think of the RAG pipeline as an assembly line in a library, where raw materials (documents) get transformed into a searchable knowledge base that can answer questions. Let us walk through how each component plays its part.
- Document processing – the foundation
Document processing is like preparing books for a library. When documents first enter the system, they need to be:
- Loaded using document loaders appropriate for their format (PDF, HTML, text, etc.)
- Transformed into a standard format that the system can work with
- Split into smaller, meaningful chunks that are easier to process and retrieve
For example, when processing a textbook, we might break it into chapter-sized or paragraph-sized chunks while preserving important context in metadata.
- Vector indexing – creating the card catalog
Once documents are processed, we need a way to make them searchable. This is where vector indexing comes in. Here’s how it works:
- An embedding model converts each document chunk into a vector (think of it as capturing the document’s meaning in a list of numbers)
- These vectors are organized in a special data structure (the vector store) that makes them easy to search
- The vector store also maintains connections between these vectors and their original documents
This is similar to how a library’s card catalog organizes books by subject, making it easy to find related materials.
- Vector stores – the organized shelves
Vector stores are like the organized shelves in our library. They:
- Store both the document vectors and the original document content
- Provide efficient ways to search through the vectors
- Offer different organization methods (like HNSW or IVF) that balance speed and accuracy
For example, using FAISS (a popular vector store), we might organize our vectors in a hierarchical structure that lets us quickly narrow down which documents to examine in detail.
- Retrieval – finding the right books
Retrieval is where everything comes together. When a question comes in:
- The question gets converted into a vector using the same embedding model
- The vector store finds documents whose vectors are most similar to the question vector
The retriever might apply additional logic, like:
- Removing duplicate information
- Balancing relevance and diversity
- Combining results from different search methods
A basic RAG implementation looks like this:
# For query transformation
from langchain.prompts import PromptTemplate
from langchain_openai import ChatOpenAI
from langchain_core.output_parsers import StrOutputParser
# For basic RAG implementation
from langchain_community.document_loaders import JSONLoader
from langchain_openai import OpenAIEmbeddings
from langchain_community.vectorstores import FAISS
# 1. Load documents
loader = JSONLoader(
file_path="knowledge_base.json",
jq_schema=".[].content", # This extracts the content field from each
array item
text_content=True
)
documents = loader.load()
# 2. Convert to vectors
embedder = OpenAIEmbeddings()
embeddings = embedder.embed_documents([doc.page_content for doc in
documents])
# 3. Store in vector database
vector_db = FAISS.from_documents(documents, embedder)
# 4. Retrieve similar docs
query = "What are the effects of climate change?"results = vector_db.similarity_search(query)This implementation covers the core RAG workflow: document loading, embedding, storage, and retrieval.
Building a RAG system with LangChain requires understanding two fundamental building blocks, which we should discuss a bit more in detail: document loaders and retrievers. Let’s explore how these components work together to create effective retrieval systems.
Document processing
LangChain provides a comprehensive system for loading documents from various sources through document loaders. A document loader is a component in LangChain that transforms various data sources into a standardized document format that can be used throughout the LangChain ecosystem. Each document contains the actual content and associated metadata.
Document loaders serve as the foundation for RAG systems by:
- Converting diverse data sources into a uniform format
- Extracting text and metadata from files
- Preparing documents for further processing (like chunking or embedding)
LangChain supports loading documents from a wide range of document types and sources through specialized loaders, for example:
- PDFs: Using PyPDFLoader
- HTML: WebBaseLoader for extracting web page text
- Plain text: TextLoader for raw text inputs
- WebBaseLoader for web page content extraction
- ArxivLoader for scientific papers
- WikipediaLoader for encyclopedia entries
- YoutubeLoader for video transcripts
- ImageCaptionLoader for image content
You may have noticed some non-text content types in the preceding list. Advanced RAG systems can handle non-text data; for example, image embeddings or audio transcripts.
The following table organizes LangChain document loaders into a comprehensive table:
| Category | Description | Notable Examples | Common Use |
|---|---|---|---|
| Cases | |||
| File Systems | Load from local files |
TextLoader, CSVLoader, PDF Loader |
Processing local documents, data files |
| Web Content | Extract from online sources |
WebBaseLoader, RecursiveURL Loader, SitemapLoader |
Web scraping, con tent aggregation |
| Cloud Stor | Access | S3DirectoryLoader, GCSFileLoad | Enterprise data |
|---|---|---|---|
| age | cloud-hosted | er, DropboxLoader | integration |
| files | |||
| Databases | Load from | MongoDBLoader, Snowflake | Business intelli |
| structured data | Loader, BigQueryLoader | gence, data analysis | |
| stores | |||
| Social Media | Import social | TwitterTweetLoader, RedditPost | Social media anal |
| platform con | sLoader, DiscordChatLoader | ysis | |
| tent | |||
| Productivity | Access work | NotionDirectoryLoader, SlackDi | Knowledge base |
| Tools | space docu | rectoryLoader, TrelloLoader | creation |
| ments | |||
| Scientific | Load academic | ArxivLoader, PubMedLoader | Research applica |
| Sources | content | tions |
Table 4.3: Document loaders in LangChain
Finally, modern document loaders offer several sophisticated capabilities:
- Concurrent loading for better performance
- Metadata extraction and preservation
- Format-specific parsing (like table extraction from PDFs)
- Error handling and validation
- Integration with transformation pipelines
Let’s go through an example of loading a JSON file. Here’s a typical pattern for using a document loader:
from langchain_community.document_loaders import JSONLoader
# Load a json file
loader = JSONLoader(
file_path="knowledge_base.json",
jq_schema=".[].content", # This extracts the content field from each
array item
text_content=True
)
documents = loader.load()
print(documents)Document loaders come with a standard .load() method interface that returns documents in LangChain’s document format. The initialization is source-specific. After loading, documents often need processing before storage and retrieval, and selecting the right chunking strategy determines the relevance and diversity of AI-generated responses.
Chunking strategies
Chunking—how you divide documents into smaller pieces—can dramatically impact your RAG system’s performance. Poor chunking can break apart related concepts, lose critical context, and ultimately lead to irrelevant retrieval results. The way you chunk documents affects:
- Retrieval accuracy: Well-formed chunks maintain semantic coherence, making them easier to match with relevant queries
- Context preservation: Poor chunking can split related information, causing knowledge gaps
- Response quality: When the LLM receives fragmented or irrelevant chunks, it generates less accurate responses
Let’s explore a hierarchy of chunking approaches, from simple to sophisticated, to help you implement the most effective strategy for your specific use case.
Fixed-size chunking
The most basic approach divides text into chunks of a specified length without considering content structure:
from langchain_text_splitters import CharacterTextSplitter
text_splitter = CharacterTextSplitter(
separator=" ", # Split on spaces to avoid breaking words
chunk_size=200,
chunk_overlap=20
)
chunks = text_splitter.split_documents(documents)
print(f"Generated {len(chunks)} chunks from document")Fixed-size chunking is good for quick prototyping or when document structure is relatively uniform, however, it often splits text at awkward positions, breaking sentences, paragraphs, or logical units.
Recursive character chunking
This method respects natural text boundaries by recursively applying different separators:
from langchain_text_splitters import RecursiveCharacterTextSplitter
text_splitter = RecursiveCharacterTextSplitter(
separators=["\n\n", "\n", ". ", " ", ""],
chunk_size=150,
chunk_overlap=20
)
document = """
document = """# Introduction to RAG
Retrieval-Augmented Generation (RAG) combines retrieval systems with
generative AI models.
It helps address hallucinations by grounding responses in retrieved
information.
## Key Components
RAG consists of several components:
1. Document processing
2. Vector embedding
3. Retrieval
4. Augmentation
5. Generation
### Document Processing
This step involves loading and chunking documents appropriately.
"""
chunks = text_splitter.split_text(document)
print(chunks)Here are the chunks:
['# Introduction to RAG\nRetrieval-Augmented Generation (RAG) combines
retrieval systems with generative AI models.', 'It helps address
hallucinations by grounding responses in retrieved information.', '## Key
Components\nRAG consists of several components:\n1. Document processing\
n2. Vector embedding\n3. Retrieval\n4. Augmentation\n5. Generation', '###
Document Processing\nThis step involves loading and chunking documents
appropriately.']How it works is that the splitter first attempts to divide text at paragraph breaks (). If the resulting chunks are still too large, it tries the next separator (), and so on. This approach preserves natural text boundaries while maintaining reasonable chunk sizes.
Recursive character chunking is the recommended default strategy for most applications. It works well for a wide range of document types and provides a good balance between preserving context and maintaining manageable chunk sizes.
Document-specific chunking
Different document types have different structures. Document-specific chunking adapts to these structures. An implementation could involve using different specialized splitters based on document type using if statements. For example, we could be using a MarkdownTextSplitter, PythonCodeTextSplitter, or HTMLHeaderTextSplitter depending on the content type being markdown, Python, or HTML.
This can be useful when working with specialized document formats where structure matters – code repositories, technical documentation, markdown articles, or similar. Its advantage is that it preserves logical document structure, maintains functional units together (like code functions, markdown sections), and improves retrieval relevance for domain-specific queries.
Semantic chunking
Unlike previous approaches that rely on textual separators, semantic chunking analyzes the meaning of content to determine chunk boundaries.
from langchain_experimental.text_splitter import SemanticChunker
from langchain_openai import OpenAIEmbeddings
embeddings = OpenAIEmbeddings()
text_splitter = SemanticChunker(
embeddings=embeddings,
add_start_index=True # Include position metadata
)
chunks = text_splitter.split_text(document)These are the chunks:
[‘# Introduction to RAG-Augmented Generation (RAG) combines retrieval systems with generative AI models. It helps address hallucinations by grounding responses in retrieved information. ## Key Componentsconsists of several components:. Document processing n2. Vector embedding. Retrieval.’, ‘Augmentation. Generation### Document Processingstep involves loading and chunking documents appropriately.’]
Here’s how the SemanticChunker works:
- Splits text into sentences
- Creates embeddings for groups of sentences (determined by buffer_size)
- Measures semantic similarity between adjacent groups
- Identifies natural breakpoints where topics or concepts change
- Creates chunks that preserve semantic coherence
You may use semantic chunking for complex technical documents where semantic cohesion is crucial for accurate retrieval and when you’re willing to spend additional compute/costs on embedding generation.
Benefits include chunk creation based on actual meaning rather than superficial text features and keeping related concepts together even when they span traditional separator boundaries.
Agent-based chunking
This experimental approach uses LLMs to intelligently divide text based on semantic analysis and content understanding in the following manner:
- Analyze the document’s structure and content
- Identify natural breakpoints based on topic shifts
- Determine optimal chunk boundaries that preserve meaning
- Return a list of starting positions for creating chunks
This type of chunking can be useful for exceptionally complex documents where standard splitting methods fail to preserve critical relationships between concepts. This approach is particularly useful when:
• Documents contain intricate logical flows that need to be preserved
- Content requires domain-specific understanding to chunk appropriately
- Maximum retrieval accuracy justifies the additional expense of LLM-based processing
The limitations are that it comes with a higher computational cost and latency, and that chunk sizes are less predictable.
Multi-modal chunking
Modern documents often contain a mix of text, tables, images, and code. Multi-modal chunking handles these different content types appropriately.
We can imagine the following process for multi-modal content:
- Extract text, images, and tables separately
- Process text with appropriate text chunker
- Process tables to preserve structure
- For images: generate captions or extract text via OCR or a vision LLM
- Create metadata linking related elements
- Embed each element appropriately
In practice, you would use specialized libraries such as unstructured for document parsing, vision models for image understanding, and table extraction tools for structured data.
Choosing the right chunking strategy
Your chunking strategy should be guided by document characteristics, retrieval needs, and computational resources as the following table illustrates:
| Factor | Condition | Recommended Strategy |
|---|---|---|
| Document Characteristics |
Highly structured documents (markdown, code) |
Document-specific chunking |
| Complex technical content | Semantic chunking | |
| Mixed media | Multi-modal approaches | |
| Retrieval Needs | Fact-based QA | Smaller chunks (100-300 tokens) |
| Complex reasoning | Larger chunks (500-1000 tokens) |
| Context-heavy answers | Sliding window with significant overlap |
||
|---|---|---|---|
| Computational Resources |
Limited API budget | Basic recursive chunking | |
| Performance-critical | Pre-computed semantic chunks |
Table 4.4: Comparison of chunking strategies
We recommend starting with Level 2 (Recursive Character Chunking) as your baseline, then experiment with more advanced strategies if retrieval quality needs improvement.
For most RAG applications, the RecursiveCharacterTextSplitter with appropriate chunk size and overlap settings provides an excellent balance of simplicity, performance, and retrieval quality. As your system matures, you can evaluate whether more sophisticated chunking strategies deliver meaningful improvements.
However, it is often critical to performance to experiment with different chunk sizes specific to your use case and document types. Please refer to Chapter 8 for testing and benchmarking strategies.
The next section covers semantic search, hybrid methods, and advanced ranking techniques.
Retrieval
Retrieval integrates a vector store with other LangChain components for simplified querying and compatibility. Retrieval systems form a crucial bridge between unstructured queries and relevant documents.
In LangChain, a retriever is fundamentally an interface that accepts natural language queries and returns relevant documents. Let’s explore how this works in detail.
At its heart, a retriever in LangChain follows a simple yet powerful pattern:
- Input: Takes a query as a string
- Processing: Applies retrieval logic specific to the implementation
- Output: Returns a list of document objects, each containing:
- page_content: The actual document content
- metadata: Associated information like document ID or source
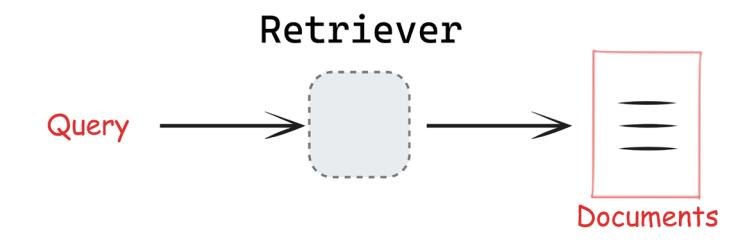
This diagram (from the LangChain documentation) illustrates this relationship.
Figure 4.3: The relationship between query, retriever, and documents
LangChain offers a rich ecosystem of retrievers, each designed to solve specific information retrieval challenges.
LangChain retrievers
The retrievers can be broadly categorized into a few key groups that serve different use cases and implementation needs:
- Core infrastructure retrievers include both self-hosted options like ElasticsearchRetriever and cloud-based solutions from major providers like Amazon, Google, and Microsoft.
- External knowledge retrievers tap into external and established knowledge bases. ArxivRetriever, WikipediaRetriever, and TavilySearchAPI stand out here, offering direct access to academic papers, encyclopedia entries, and web content respectively.
- Algorithmic retrievers include several classic information retrieval methods. The BM25 and TF-IDF retrievers excel at lexical search, while kNN retrievers handle semantic similarity searches. Each of these algorithms brings its own strengths – BM25 for keyword precision, TF-IDF for document classification, and kNN for similarity matching.
- Advanced/Specialized retrievers often address specific performance requirements or resource constraints that may arise in production environments. LangChain offers specialized retrievers with unique capabilities. NeuralDB provides CPU-optimized retrieval, while LLMLingua focuses on document compression.
- Integration retrievers connect with popular platforms and services. These retrievers, like those for Google Drive or Outline, make it easier to incorporate existing document repositories into your RAG application.
Here’s a basic example of retriever usage:
# Basic retriever interaction
docs = retriever.invoke("What is machine learning?")LangChain supports several sophisticated approaches to retrieval:
Vector store retrievers
Vector stores serve as the foundation for semantic search, converting documents and queries into embeddings for similarity matching. Any vector store can become a retriever through the as_retriever() method:
from langchain_community.retrievers import KNNRetriever
from langchain_openai import OpenAIEmbeddings
retriever = KNNRetriever.from_documents(documents, OpenAIEmbeddings())
results = retriever.invoke("query")These are the retrievers most relevant for RAG systems.
- Search API retrievers: These retrievers interface with external search services without storing documents locally. For example:
from langchain_community.retrievers.pubmed import PubMedRetriever
retriever = PubMedRetriever()
results = retriever.invoke("COVID research")- Database retrievers: These connect to structured data sources, translating natural language queries into database queries:
- SQL databases using text-to-SQL conversion
- Graph databases using text-to-Cypher translation
- Document databases with specialized query interfaces
- Lexical search retrievers: These implement traditional text-matching algorithms:
- BM25 for probabilistic ranking
- TF-IDF for term frequency analysis
- Elasticsearch integration for scalable text search
Modern retrieval systems often combine multiple approaches for better results:
- Hybrid search: Combines semantic and lexical search to leverage:
- Vector similarity for semantic understanding
- Keyword matching for precise terminology
- Weighted combinations for optimal results
- Maximal Marginal Relevance (MMR): Optimizes for both relevance and diversity by:
- Selecting documents similar to the query
- Ensuring retrieved documents are distinct from each other
- Balancing exploration and exploitation
- Custom retrieval logic: LangChain allows the creation of specialized retrievers by implementing the BaseRetriever class.
Advanced RAG techniques
When building production RAG systems, a simple vector similarity search often isn’t enough. Modern applications need more sophisticated approaches to find and validate relevant information. Let’s explore how to enhance a basic RAG system with advanced techniques that dramatically improve result quality.
A standard vector search has several limitations:
- It might miss contextually relevant documents that use different terminology
- It can’t distinguish between authoritative and less reliable sources
- It might return redundant or contradictory information
- It has no way to verify if generated responses accurately reflect the source material
Modern retrieval systems often employ multiple complementary techniques to improve result quality. Two particularly powerful approaches are hybrid retrieval and re-ranking.
Hybrid retrieval: Combining semantic and keyword search
Hybrid retrieval combines two retrieval methods in parallel and the results are fused to leverage the strengths of both approaches:
- Dense retrieval: Uses vector embeddings for semantic understanding
- Sparse retrieval: Employs lexical methods like BM25 for keyword precision
For example, a hybrid retriever might use vector similarity to find semantically related documents while simultaneously running a keyword search to catch exact terminology matches, then combine the results using rank fusion algorithms.
from langchain.retrievers import EnsembleRetriever
from langchain_community.retrievers import BM25Retriever
from langchain.vectorstores import FAISS
# Setup semantic retriever
vector_retriever = vector_store.as_retriever(search_kwargs={"k": 5})
# Setup lexical retriever
bm25_retriever = BM25Retriever.from_documents(documents)
bm25_retriever.k = 5
# Combine retrievers
hybrid_retriever = EnsembleRetriever(
retrievers=[vector_retriever, bm25_retriever],
weights=[0.7, 0.3] # Weight semantic search higher than keyword
search
)
results = hybrid_retriever.get_relevant_documents("climate change
impacts")Re-ranking
Re-ranking is a post-processing step that can follow any retrieval method, including hybrid retrieval:
- First, retrieve a larger set of candidate documents
- Apply a more sophisticated model to re-score documents
- Reorder based on these more precise relevance scores
Re-ranking follows three main paradigms:
- Pointwise rerankers: Score each document independently (for example, on a scale of 1-10) and sort the resulting array of documents accordingly
- Pairwise rerankers: Compare document pairs to determine preferences, then construct a final ordering by ranking documents based on their win/loss record across all comparisons
• Listwise rerankers: The re-ranking model processes the entire list of documents (and the original query) holistically to determine optimal order by optimizing NDCG or MAP
LangChain offers several re-ranking implementations:
• Cohere rerank: Commercial API-based solution with excellent quality:
# Complete document compressor example
from langchain.retrievers.document_compressors import CohereRerank
from langchain.retrievers import ContextualCompressionRetriever
# Initialize the compressor
compressor = CohereRerank(top_n=3)
# Create a compression retriever
compression_retriever = ContextualCompressionRetriever(
base_compressor=compressor,
base_retriever=base_retriever
)
# Original documents
print("Original documents:")
original_docs = base_retriever.get_relevant_documents("How do
transformers work?")
for i, doc in enumerate(original_docs):
print(f"Doc {i}: {doc.page_content[:100]}...")
# Compressed documents
print("\nCompressed documents:")
compressed_docs = compression_retriever.get_relevant_documents("How
do transformers work?")
for i, doc in enumerate(compressed_docs):
print(f"Doc {i}: {doc.page_content[:100]}...")• RankLLM: Library supporting open-source LLMs fine-tuned specifically for re-ranking:
from langchain_community.document_compressors.rankllm_rerank import
RankLLMRerank
compressor = RankLLMRerank(top_n=3, model="zephyr")• LLM-based custom rerankers: Using any LLM to score document relevance:
# Simplified example - LangChain provides more streamlined
implementations
relevance_score_chain = ChatPromptTemplate.from_template(
"Rate relevance of document to query on scale of 1-10:
{document}"
) | llm | StrOutputParser()Please note that while Hybrid retrieval focuses on how documents are retrieved, re-ranking focuses on how they’re ordered after retrieval. These approaches can, and often should, be used together in a pipeline. When evaluating re-rankers, use position-aware metrics like Recall@k, which measures how effectively the re-ranker surfaces all relevant documents in the top positions.
Cross-encoder re-ranking typically improves these metrics by 10-20% over initial retrieval, especially for the top positions.
Query transformation: Improving retrieval through better queries
Even the best retrieval system can struggle with poorly formulated queries. Query transformation techniques address this challenge by enhancing or reformulating the original query to improve retrieval results.
Query expansion generates multiple variations of the original query to capture different aspects or phrasings. This helps bridge the vocabulary gap between users and documents:
from langchain.prompts import PromptTemplate
from langchain_openai import ChatOpenAI
expansion_template = """Given the user question: {question}Generate three alternative versions that express the same information need but with different wording:
1."""
expansion_prompt = PromptTemplate(
input_variables=["question"],
template=expansion_template
)
llm = ChatOpenAI(temperature=0.7)
expansion_chain = expansion_prompt | llm | StrOutputParser()Let’s see this in practice:
# Generate expanded queries
original_query = "What are the effects of climate change?"
expanded_queries = expansion_chain.invoke(original_query)
print(expanded_queries)We should be getting something like this:
What impacts does climate change have?
2. How does climate change affect the environment?
3. What are the consequences of climate change?A more advanced approach is Hypothetical Document Embeddings (HyDE).
Hypothetical Document Embeddings (HyDE)
HyDE uses an LLM to generate a hypothetical answer document based on the query, and then uses that document’s embedding for retrieval. This technique is especially powerful for complex queries where the semantic gap between query and document language is significant:
from langchain.prompts import PromptTemplate
from langchain_openai import ChatOpenAI, OpenAIEmbeddings
# Create prompt for generating hypothetical document
hyde_template = """Based on the question: {question}
Write a passage that could contain the answer to this question:"""
hyde_prompt = PromptTemplate(
input_variables=["question"],
template=hyde_template
)
llm = ChatOpenAI(temperature=0.2)
hyde_chain = hyde_prompt | llm | StrOutputParser()
# Generate hypothetical document
query = "What dietary changes can reduce carbon footprint?"
hypothetical_doc = hyde_chain.invoke(query)
# Use the hypothetical document for retrieval
embeddings = OpenAIEmbeddings()
embedded_query = embeddings.embed_query(hypothetical_doc)
results = vector_db.similarity_search_by_vector(embedded_query, k=3)Query transformation techniques are particularly useful when dealing with ambiguous queries, questions formulated by non-experts, or situations where terminology mismatches between queries and documents are common. They do add computational overhead but can dramatically improve retrieval quality, especially for complex or poorly formulated questions.
Context processing: maximizing retrieved information value
Once documents are retrieved, context processing techniques help distill and organize the information to maximize its value in the generation phase.
Contextual compression
Contextual compression extracts only the most relevant parts of retrieved documents, removing irrelevant content that might distract the generator:
from langchain.retrievers.document_compressors import LLMChainExtractor
from langchain.retrievers import ContextualCompressionRetriever
from langchain_openai import ChatOpenAI
llm = ChatOpenAI(temperature=0)
compressor = LLMChainExtractor.from_llm(llm)
# Create a basic retriever from the vector store
base_retriever = vector_db.as_retriever(search_kwargs={"k": 3})
compression_retriever = ContextualCompressionRetriever(
base_compressor=compressor,
base_retriever=base_retriever
)
compressed_docs = compression_retriever.invoke("How do transformers
work?")Here are our compressed documents:
[Document(metadata={'source': 'Neural Network Review 2021', 'page': 42},
page_content="The transformer architecture was introduced in the paper
'Attention is All You Need' by Vaswani et al. in 2017."),
Document(metadata={'source': 'Large Language Models Survey', 'page': 89},
page_content='GPT models are autoregressive transformers that predict the
next token based on previous tokens.')]Maximum marginal relevance
Another powerful approach is Maximum Marginal Relevance (MMR), which balances document relevance with diversity, ensuring that the retrieved set contains varied perspectives rather than redundant information:
from langchain_community.vectorstores import FAISS
vector_store = FAISS.from_documents(documents, embeddings)
mmr_results = vector_store.max_marginal_relevance_search(
query="What are transformer models?",
k=5, # Number of documents to return
fetch_k=20, # Number of documents to initially fetch
lambda_mult=0.5 # Diversity parameter (0 = max diversity, 1 = max
relevance)
)Context processing techniques are especially valuable when dealing with lengthy documents where only portions are relevant, or when providing comprehensive coverage of a topic requires diverse viewpoints. They help reduce noise in the generator’s input and ensure that the most valuable information is prioritized.
The final area for RAG enhancement focuses on improving the generated response itself, ensuring it’s accurate, trustworthy, and useful.
Response enhancement: Improving generator output
These response enhancement techniques are particularly important in applications where accuracy and transparency are paramount, such as educational resources, healthcare information, or legal advice. They help build user trust by making AI-generated content more verifiable and reliable.
Let’s first assume we have some documents as our knowledge base:
from langchain_core.documents import Document
# Example documents
documents = [
Document(
page_content="The transformer architecture was introduced in the
paper 'Attention is All You Need' by Vaswani et al. in 2017.", metadata={"source": "Neural Network Review 2021", "page": 42}
),
Document(
page_content="BERT uses bidirectional training of the Transformer,
masked language modeling, and next sentence prediction tasks.",
metadata={"source": "Introduction to NLP", "page": 137}
),
Document(
page_content="GPT models are autoregressive transformers that
predict the next token based on previous tokens.",
metadata={"source": "Large Language Models Survey", "page": 89}
)
]Source attribution
fact or claim in your answer,
Source attribution explicitly connects generated information to the retrieved sources, helping users verify facts and understand where information comes from. Let’s set up our foundation for source attribution. We’ll initialize a vector store with our documents and create a retriever configured to fetch the top 3 most relevant documents for each query. The attribution prompt template instructs the model to use citations for each claim and include a reference list:
from langchain_core.prompts import ChatPromptTemplate
from langchain_openai import ChatOpenAI
from langchain_core.output_parsers import StrOutputParser
from langchain_community.vectorstores import FAISS
from langchain_openai import OpenAIEmbeddings
# Create a vector store and retriever
embeddings = OpenAIEmbeddings()
vector_store = FAISS.from_documents(documents, embeddings)
retriever = vector_store.as_retriever(search_kwargs={"k": 3})
# Source attribution prompt template
attribution_prompt = ChatPromptTemplate.from_template("""
You are a precise AI assistant that provides well-sourced information.
Answer the following question based ONLY on the provided sources. For each
include a citation using [1], [2], etc. that refers to the source. Include
a numbered reference list at the end.
Question: {question}
Sources:
{sources}
Your answer:
""")Next, we’ll need helper functions to format the sources with citation numbers and generate attributed responses:
# Create a source-formatted string from documents
def format_sources_with_citations(docs):
formatted_sources = []
for i, doc in enumerate(docs, 1):
source_info = f"[{i}] {doc.metadata.get('source', 'Unknown
source')}"
if doc.metadata.get('page'):
source_info += f", page {doc.metadata['page']}"
formatted_sources.append(f"{source_info}\n{doc.page_content}")
return "\n\n".join(formatted_sources)
# Build the RAG chain with source attribution
def generate_attributed_response(question):
# Retrieve relevant documents
retrieved_docs = retriever.invoke(question)
# Format sources with citation numbers
sources_formatted = format_sources_with_citations(retrieved_docs)
# Create the attribution chain using LCEL
attribution_chain = (
attribution_prompt
| ChatOpenAI(temperature=0)
| StrOutputParser()
)
# Generate the response with citations
response = attribution_chain.invoke({
"question": question,
"sources": sources_formatted
})
return responseThis example implements source attribution by:
- Retrieving relevant documents for a query
- Formatting each document with a citation number
- Using a prompt that explicitly requests citations for each fact
- Generating a response that includes inline citations ([1], [2], etc.)
- Adding a references section that links each citation to its source
The key advantages of this approach are transparency and verifiability – users can trace each claim back to its source, which is especially important for academic, medical, or legal applications.
Let’s see what we get when we execute this with a query:
# Example usage
question = "How do transformer models work and what are some examples?"
attributed_answer = generate_attributed_response(question)
attributed_answer
We should be getting a response like this:
Transformer models work by utilizing self-attention mechanisms to weigh
the importance of different input tokens when making predictions. This
architecture was first introduced in the paper 'Attention is All You Need'
by Vaswani et al. in 2017 [1].
One example of a transformer model is BERT, which employs bidirectional
training of the Transformer, masked language modeling, and next sentence
prediction tasks [2]. Another example is GPT (Generative Pre-trained
Transformer) models, which are autoregressive transformers that predict
the next token based on previous tokens [3].
Reference List:- [1] Neural Network Review 2021, page 42
- [2] Introduction to NLP, page 137
- [3] Large Language Models Survey, page 89
Self-consistency checking compares the generated response against the retrieved context to verify accuracy and identify potential hallucinations.
Self-consistency checking: ensuring factual accuracy
Self-consistency checking verifies that generated responses accurately reflect the information in retrieved documents, providing a crucial layer of protection against hallucinations. We can use LCEL to create streamlined verification pipelines:
from langchain_core.prompts import ChatPromptTemplate
from langchain_core.output_parsers import StrOutputParser
from langchain_openai import ChatOpenAI
from typing import List, Dict
from langchain_core.documents import Document
def verify_response_accuracy(
retrieved_docs: List[Document],
generated_answer: str,
llm: ChatOpenAI = None
) -> Dict:
"""
Verify if a generated answer is fully supported by the retrieved
documents.
Args:
retrieved_docs: List of documents used to generate the answer
generated_answer: The answer produced by the RAG system
llm: Language model to use for verification
Returns:
Dictionary containing verification results and any identified
issues
"""
if llm is None:
llm = ChatOpenAI(model="gpt-3.5-turbo", temperature=0)
# Create context from retrieved documents
context = "\n\n".join([doc.page_content for doc in retrieved_docs])The function above begins our verification process by accepting the retrieved documents and generated answers as inputs. It initializes a language model for verification if one isn’t provided and combines all document content into a single context string. Next, we’ll define the verification prompt that instructs the LLM to perform a detailed fact-checking analysis:
# Define verification prompt - fixed to avoid JSON formatting issues
in the template
verification_prompt = ChatPromptTemplate.from_template("""
As a fact-checking assistant, verify whether the following answer is
fully supported
by the provided context. Identify any statements that are not
supported or contradict the context.
Context:
{context}
Answer to verify:
{answer}
Perform a detailed analysis with the following structure:
1. List any factual claims in the answer
2. For each claim, indicate whether it is:
- Fully supported (provide the supporting text from context)
- Partially supported (explain what parts lack support)
- Contradicted (identify the contradiction)
- Not mentioned in context
3. Overall assessment: Is the answer fully grounded in the context?
Return your analysis in JSON format with the following structure:
{{
"claims": [
{{
"claim": "The factual claim",
"status": "fully_supported|partially_supported|contradicted|not_
mentioned",
"evidence": "Supporting or contradicting text from context",
"explanation": "Your explanation"
}}
],
"fully_grounded": true|false,
"issues_identified": ["List any specific issues"]
}}
""")The verification prompt is structured to perform a comprehensive fact check. It instructs the model to break down each claim in the answer and categorize it based on how well it’s supported by the provided context. The prompt also requests the output in a structured JSON format that can be easily processed programmatically.
Finally, we’ll complete the function with the verification chain and example usage:
# Create verification chain using LCEL
verification_chain = (
verification_prompt
| llm
| StrOutputParser()
)
# Run verification
result = verification_chain.invoke({
"context": context,
"answer": generated_answer
})
return result
# Example usage
retrieved_docs = [
Document(page_content="The transformer architecture was introduced in the paper 'Attention Is All You Need' by Vaswani et al. in 2017. It relies on self-attention mechanisms instead of recurrent or convolutional neural networks."),
Document(page_content="BERT is a transformer-based model developed by Google that uses masked language modeling and next sentence prediction as pre-training objectives.")
]
generated_answer = "The transformer architecture was introduced by OpenAI
in 2018 and uses recurrent neural networks. BERT is a transformer model
developed by Google."
verification_result = verify_response_accuracy(retrieved_docs, generated_
answer)
print(verification_result)We should get a response like this:
{
"claims": [
{
"claim": "The transformer architecture was introduced by
OpenAI in 2018",
"status": "contradicted",
"evidence": "The transformer architecture was introduced in
the paper 'Attention is All You Need' by Vaswani et al. in 2017.",
"explanation": "The claim is contradicted by the fact that the
transformer architecture was introduced in 2017 by Vaswani et al., not by
OpenAI in 2018."
},
{
"claim": "The transformer architecture uses recurrent neural
networks",
"status": "contradicted",
"evidence": "It relies on self-attention mechanisms instead of
recurrent or convolutional neural networks.",
"explanation": "The claim is contradicted by the fact that the
transformer architecture does not use recurrent neural networks but relies
on self-attention mechanisms."
},
{
"claim": "BERT is a transformer model developed by Google",
"status": "fully_supported",
"evidence": "BERT is a transformer-based model developed by
Google that uses masked language modeling and next sentence prediction as
pre-training objectives.",
"explanation": "This claim is fully supported by the provided
context."
}
],
"fully_grounded": false,
"issues_identified": ["The answer contains incorrect information about
the introduction of the transformer architecture and its use of recurrent
neural networks."]
}Based on the verification result, you can:
- Regenerate the answer if issues are found
- Add qualifying statements to indicate uncertainty
- Filter out unsupported claims
- Include confidence indicators for different parts of the response
This approach systematically analyzes generated responses against source documents, identifying specific unsupported claims rather than just providing a binary assessment. For each factual assertion, it determines whether it’s fully supported, partially supported, contradicted, or not mentioned in the context.
Self-consistency checking is essential for applications where trustworthiness is paramount, such as medical information, financial advice, or educational content. Detecting and addressing hallucinations before they reach users significantly improves the reliability of RAG systems.
The verification can be further enhanced by:
- Granular claim extraction: Breaking down complex responses into atomic factual claims
- Evidence linking: Explicitly connecting each claim to specific supporting text
- Confidence scoring: Assigning numerical confidence scores to different parts of the response
- Selective regeneration: Regenerating only the unsupported portions of responses
These techniques create a verification layer that substantially reduces the risk of presenting incorrect information to users while maintaining the fluency and coherence of generated responses.
While the techniques we’ve discussed enhance individual components of the RAG pipeline, corrective RAG represents a more holistic approach that addresses fundamental retrieval quality issues at a systemic level.
Corrective RAG
The techniques we’ve explored so far mostly assume that our retrieval mechanism returns relevant, accurate documents. But what happens when it doesn’t? In real-world applications, retrieval systems often return irrelevant, insufficient, or even misleading content. This “garbage in, garbage out” problem represents a critical vulnerability in standard RAG systems. Corrective Retrieval-Augmented Generation (CRAG) directly addresses this challenge by introducing explicit evaluation and correction mechanisms into the RAG pipeline.
CRAG extends the standard RAG pipeline with evaluation and conditional branching:
- Initial retrieval: Standard document retrieval from the vector store based on the query.
- Retrieval evaluation: A retrieval evaluator component assesses each document’s relevance and quality.
- Conditional correction:
- Relevant documents: Pass high-quality documents directly to the generator.
- Irrelevant documents: Filter out low-quality documents to prevent noise.
- Insufficient/Ambiguous results: Trigger alternative information-seeking strategies (like web search) when internal knowledge is inadequate.
- Generation: Produce the final response using the filtered or augmented context.
This workflow transforms RAG from a static pipeline into a more dynamic, self-correcting system capable of seeking additional information when needed.
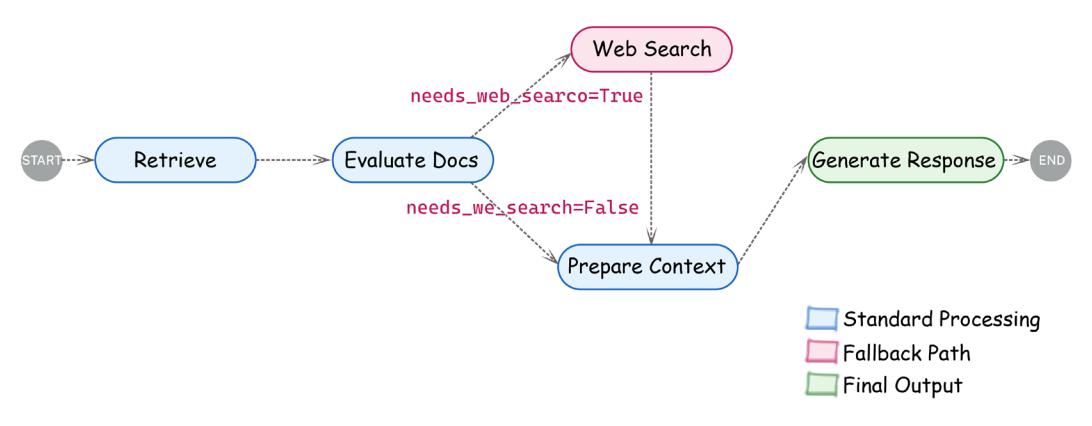
Figure 4.4: Corrective RAG workflow showing evaluation and conditional branching
The retrieval evaluator is the cornerstone of CRAG. Its job is to analyze the relationship between retrieved documents and the query, determining which documents are truly relevant. Implementations typically use an LLM with a carefully crafted prompt:
from pydantic import BaseModel, Field
class DocumentRelevanceScore(BaseModel):
"""Binary relevance score for document evaluation."""
is_relevant: bool = Field(description="Whether the document contains
information relevant to the query")
reasoning: str = Field(description="Explanation for the relevance
decision")
def evaluate_document(document, query, llm):
"""Evaluate if a document is relevant to a query."""
prompt = f""" You are an expert document evaluator. Your task is to
determine if the following document contains information relevant to the
given query.
Query: {query}
Document content:
{document.page_content}
Analyze whether this document contains information that helps answer the
query.
"""
Evaluation = llm.with_structured_output(DocumentRelevanceScore).
invoke(prompt)
return evaluationBy evaluating each document independently, CRAG can make fine-grained decisions about which content to include, exclude, or supplement, substantially improving the quality of the final context provided to the generator.
Since the CRAG implementation builds on concepts we’ll introduce in Chapter 5, we’ll not be showing the complete code here, but you can find the implementation in the book’s companion repository. Please note that LangGraph is particularly well-suited for implementing CRAG because it allows for conditional branching based on document evaluation.
While CRAG enhances RAG by adding evaluation and correction mechanisms to the retrieval pipeline, Agentic RAG represents a more fundamental paradigm shift by introducing autonomous AI agents to orchestrate the entire RAG process.
Agentic RAG
Agentic RAG employs AI agents—autonomous systems capable of planning, reasoning, and decision-making—to dynamically manage information retrieval and generation. Unlike traditional RAG or even CRAG, which follow relatively structured workflows, agentic RAG uses agents to:
- Analyze queries and decompose complex questions into manageable sub-questions
- Plan information-gathering strategies based on the specific task requirements
- Select appropriate tools (retrievers, web search, calculators, APIs, etc.)
- Execute multi-step processes, potentially involving multiple rounds of retrieval and reasoning
- Reflect on intermediate results and adapt strategies accordingly
The key distinction between CRAG and agentic RAG lies in their focus: CRAG primarily enhances data quality through evaluation and correction, while agentic RAG focuses on process intelligence through autonomous planning and orchestration.
Agentic RAG is particularly valuable for complex use cases that require:
- Multi-step reasoning across multiple information sources
- Dynamic tool selection based on query analysis
- Persistent task execution with intermediate reflection
- Integration with various external systems and APIs
However, agentic RAG introduces significant complexity in implementation, potentially higher latency due to multiple reasoning steps, and increased computational costs from multiple LLM calls for planning and reflection.
In Chapter 5, we’ll explore the implementation of agent-based systems in depth, including patterns that can be applied to create agentic RAG systems. The core techniques—tool integration, planning, reflection, and orchestration—are fundamental to both general agent systems and agentic RAG specifically.
By understanding both CRAG and agentic RAG approaches, you’ll be equipped to select the most appropriate RAG architecture based on your specific requirements, balancing accuracy, flexibility, complexity, and performance.
Choosing the right techniques
When implementing advanced RAG techniques, consider the specific requirements and constraints of your application. To guide your decision-making process, the following table provides a comprehensive comparison of RAG approaches discussed throughout this chapter:
| RAG Ap- proach |
Chapter Section |
Core Mech- anism |
Key Strengths | Key Weaknesses | Primary Use Cases |
Relative Com- plexity |
|---|---|---|---|---|---|---|
| Naive RAG |
Breaking down the RAG pipe- line |
Basic index \(\rightarrow\) retrieve \(\rightarrow\) generate workflow with single retrieval step |
Simple imple- mentation Low initial resource usage Straightfor- ward debug- ging |
Limited retrieval quality • Vulnerability to hallucinations No handling of retrieval failures |
• Simple Q&A systems Basic docu- ment lookup Prototyping \(\bullet\) |
Low |
| Hybrid Retrieval |
Advanced RAG techniques - hybrid retrieval |
Combines \(sparse\\\) (BM25) and dense (vector) retrieval methods |
• Balances key- word precision with semantic understanding Handles vocab- ulary mismatch Improves recall without sacri- ficing precision |
Increased system complexity • Challenge in optimizing fusion weights • Higher computa- tional overhead |
Technical doc- umentation • Content with \(specialized\\\) terminology Multi-domain knowledge bases |
Medium |
| Re-rank- ing |
Advanced RAG techniques- re-ranking |
Post-pro- cesses initial retrieval results with more so- phisticated relevance models |
Improves result ordering • Captures nu- anced relevance signals • Can be applied to any retrieval method |
Additional com- putation layer May create bot- tlenecks for large result sets Requires training or configuring re-rankers |
When retrieval quality is critical • For handling ambiguous queries • High-value information needs |
Medium |
| Query Transfor- mation (HyDE) |
Advanced RAG techniques- query trans- formation |
Generates hypothet- ical docu- ment from query for \(\operatorname{improved}\) retrieval |
Bridges que- ry-document semantic gap Improves re- trieval for com- plex queries • Handles implic- it information needs |
Additional LLM generation step • Depends on hypothetical doc- ument quality Potential for query drift |
• Complex or ambiguous queries Users with unclear infor- mation needs • Domain-spe- cific search |
Medium |
| Context Process ing |
Advanced RAG techniques - context processing |
Optimizes retrieved documents before sending to the generator (compres sion, MMR) |
• Maximizes con text window utilization • Reduces redundancy Focuses on most relevant information |
• Risk of remov ing important context • Processing adds latency • May lose docu ment coherence |
• Large docu ments • When context window is limited • Redundant information sources |
Medium |
|---|---|---|---|---|---|---|
| Response Enhance ment |
Advanced RAG techniques – response enhance ment |
Improves generated output with source attribu tion and consistency checking |
• Increases out put trustwor thiness • Provides verification mechanisms • Enhances user confidence |
• May reduce flu ency or concise ness • Additional post-processing overhead • Complex imple mentation logic |
• Educational or research content • Legal or med ical informa tion • When attribu tion is required |
Medi um-High |
| Correc tive RAG (CRAG) |
Advanced RAG techniques – corrective RAG |
Evaluates retrieved documents and takes corrective actions (fil tering, web search) |
• Explicitly handles poor retrieval results • Improves robustness • Can dynamical ly supplement knowledge |
• Increased latency from evaluation • Depends on eval uator accuracy • More complex conditional logic |
• High-reliabil ity require ments • Systems need ing factual accuracy • Applications with potential knowledge gaps |
High |
| Agentic RAG |
Advanced RAG techniques – agentic RAG |
Uses auton omous AI agents to orchestrate informa tion gath ering and synthesis |
• Highly adapt able to complex tasks • Can use diverse tools beyond retrieval • Multi-step reasoning capa bilities |
• Significant implementation complexity • Higher cost and latency • Challenging to debug and control |
• Complex multi-step information tasks • Research applications • Systems integrating multiple data sources |
Very High |
Table 4.5: Comparing RAG techniques
For technical or specialized domains with complex terminology, hybrid retrieval provides a strong foundation by capturing both semantic relationships and exact terminology. When dealing with lengthy documents where only portions are relevant, add contextual compression to extract the most pertinent sections.
For applications where accuracy and transparency are critical, implement source attribution and self-consistency checking to ensure that generated responses are faithful to the retrieved information. If users frequently submit ambiguous or poorly formulated queries, query transformation techniques can help bridge the gap between user language and document terminology.
So when should you choose each approach?
- Start with naive RAG for quick prototyping and simple question-answering
- Add hybrid retrieval when facing vocabulary mismatch issues or mixed content types
- Implement re-ranking when the initial retrieval quality needs refinement
- Use query transformation for complex queries or when users struggle to articulate information needs
- Apply context processing when dealing with limited context windows or redundant information
- Add response enhancement for applications requiring high trustworthiness and attribution
- Consider CRAG when reliability and factual accuracy are mission-critical

Explore agentic RAG (covered more in Chapter 5) for complex, multi-step information tasks requiring reasoning
In practice, production RAG systems often combine multiple approaches. For example, a robust enterprise system might use hybrid retrieval with query transformation, apply context processing to optimize the retrieved information, enhance responses with source attribution, and implement CRAG’s evaluation layer for critical applications.
Start with implementing one or two key techniques that address your most pressing challenges, then measure their impact on performance metrics like relevance, accuracy, and user satisfaction. Add additional techniques incrementally as needed, always considering the tradeoff between improved results and increased computational costs.
To demonstrate a RAG system in practice, in the next section, we’ll walk through the implementation of a chatbot that retrieves and integrates external knowledge into responses.
Developing a corporate documentation chatbot
In this section, we will build a corporate documentation chatbot that leverages LangChain for LLM interactions and LangGraph for state management and workflow orchestration. LangGraph complements the implementation in several critical ways:
- Explicit state management: Unlike basic RAG pipelines that operate as linear sequences, LangGraph maintains a formal state object containing all relevant information (queries, retrieved documents, intermediate results, etc.).
- Conditional processing: LangGraph enables conditional branching based on the quality of retrieved documents or other evaluation criteria—essential for ensuring reliable output.
- Multi-step reasoning: For complex documentation tasks, LangGraph allows breaking the process into discrete steps (retrieval, generation, validation, refinement) while maintaining context throughout.
- Human-in-the-loop integration: When document quality or compliance cannot be automatically verified, LangGraph facilitates seamless integration of human feedback.
With the Corporate Documentation Manager tool we built, you can generate, validate, and refine project documentation while incorporating human feedback to ensure compliance with corporate standards. In many organizations, maintaining up-to-date project documentation is critical. Our pipeline leverages LLMs to:
- Generate documentation: Produce detailed project documentation from a user’s prompt
- Conduct compliance checks: Analyze the generated document for adherence to corporate standards and best practices
- Handle human feedback: Solicit expert feedback if compliance issues are detected
- Finalize documentation: Revise the document based on feedback to ensure it is both accurate and compliant
The idea is that this process not only streamlines documentation creation but also introduces a safety net by involving human-in-the-loop validation. The code is split into several modules, each handling a specific part of the pipeline, and a Streamlit app ties everything together for a web-based interface.
The code will demonstrate the following key features:
• Modular pipeline design: Defines a clear state and uses nodes for documentation generation, compliance analysis, human feedback, and finalization
• Interactive interface: Integrates the pipeline with Gradio for real-time user interactions
While this chapter provides a brief overview of performance measurements and evaluation metrics, an in-depth discussion of performance and observability will be covered in Chapter 8. Please make sure you have installed all the dependencies needed for this book, as explained in Chapter 2. Otherwise, you might run into issues.

Additionally, given the pace of the field and the development of the LangChain library, we are making an effort to keep the GitHub repository up to date. Please see https://github.com/benman1/generative\_ai\_with\_langchain.
For any questions, or if you have any trouble running the code, please create an issue on GitHub or join the discussion on Discord: https://packt.link/lang.
Let’s get started! Each file in the project serves a specific role in the overall documentation chatbot. Let’s first look at document loading.
Document loading
The main purpose of this module is to give an interface to read different document formats.
The Document class in LangChain is a fundamental data structure for storing and manipulating text content along with associated metadata. It stores text content through its required page_content parameter along with optional metadata stored as a dictionary.

The class also supports an optional id parameter that ideally should be formatted as a UUID to uniquely identify documents across collections, though this isn’t strictly enforced. Documents can be created by simply passing content and metadata, as in this example:
Document(page_content="Hello, world!", metadata={"source":
"https://example.com"})This interface serves as the standard representation of text data throughout LangChain’s document processing pipelines, enabling consistent handling during loading, splitting, transformation, and retrieval operations.
This module is responsible for loading documents in various formats. It defines:
- Custom Loader classes: The EpubReader class inherits from UnstructuredEPubLoader and configures it to work in “fast” mode using element extraction, optimizing it for EPUB document processing.
- DocumentLoader class: A central class that manages document loading across different file formats by maintaining a mapping between file extensions and their appropriate loader classes.
- load_document function: A utility function that accepts a file path, determines its extension, instantiates the appropriate loader class from the DocumentLoader’s mapping, and returns the loaded content as a list of Document objects.
Let’s get the imports out of the way:
import logging
import os
import pathlib
import tempfile
from typing import Any
from langchain_community.document_loaders.epub import
UnstructuredEPubLoader
from langchain_community.document_loaders.pdf import PyPDFLoader
from langchain_community.document_loaders.text import TextLoader
from langchain_community.document_loaders.word_document import (
UnstructuredWordDocumentLoader
)
from langchain_core.documents import Document
from streamlit.logger import get_logger
logging.basicConfig(encoding="utf-8", level=logging.INFO)
LOGGER = get_logger(__name__)This module first defines a custom class, EpubReader, that inherits from UnstructuredEPubLoader. This class is responsible for loading documents with supported extensions. The supported_ extentions dictionary maps file extensions to their corresponding document loader classes. This gives us interfaces to read PDF, text, EPUB, and Word documents with different extensions.
The EpubReader class inherits from an EPUB loader and configures it to work in “fast” mode using element extraction:
class EpubReader(UnstructuredEPubLoader):
def __init__(self, file_path: str | list[str], **unstructured_kwargs:
Any):
super().__init__(file_path, **unstructured_kwargs,
mode="elements", strategy="fast")
class DocumentLoaderException(Exception):
pass
class DocumentLoader(object):
"""Loads in a document with a supported extension."""
supported_extensions = {
".pdf": PyPDFLoader,
".txt": TextLoader,
".epub": EpubReader,
".docx": UnstructuredWordDocumentLoader,
".doc": UnstructuredWordDocumentLoader,
}Our DocumentLoader maintains a mapping (supported_extensions) of file extensions (for example, .pdf, .txt, .epub, .docx, .doc) to their respective loader classes. But we’ll also need one more function:
def load_document(temp_filepath: str) -> list[Document]:
"""Load a file and return it as a list of documents."""
ext = pathlib.Path(temp_filepath).suffix
loader = DocumentLoader.supported_extensions.get(ext)
if not loader:
raise DocumentLoaderException(
f"Invalid extension type {ext}, cannot load this type of file"
)
loaded = loader(temp_filepath)
docs = loaded.load() logging.info(docs)
return docsThe load_document function defined above takes a file path, determines its extension, selects the appropriate loader from the supported_extensions dictionary, and returns a list of Document objects. If the file extension isn’t supported, it raises a DocumentLoaderException to alert the user that the file type cannot be processed.
Language model setup
The llms.py module sets up the LLM and embeddings for the application. First, the imports and loading the API keys as environment variables – please see Chapter 2 for details if you skipped that part.
from langchain.embeddings import CacheBackedEmbeddings
from langchain.storage import LocalFileStore
from langchain_groq import ChatGroq
from langchain_openai import OpenAIEmbeddings
from config import set_environment
set_environment()Let’s initialize the LangChain ChatGroq interface using the API key from environment variables:
chat_model = ChatGroq(
model="deepseek-r1-distill-llama-70b",
temperature=0,
max_tokens=None,
timeout=None,
max_retries=2,
)This uses ChatGroq (configured with a specific model, temperature, and retries) for generating documentation drafts and revisions. The configured model is the DeepSeek 70B R1 model.
We’ll then use OpenAIEmbeddings to convert text into vector representations:
store = LocalFileStore("./cache/")
underlying_embeddings = OpenAIEmbeddings( model="text-embedding-3-large",
)
# Avoiding unnecessary costs by caching the embeddings.
EMBEDDINGS = CacheBackedEmbeddings.from_bytes_store(
underlying_embeddings, store, namespace=underlying_embeddings.model
)To reduce API costs and speed up repeated queries, it wraps the embeddings with a caching mechanism (CacheBackedEmbeddings) that stores vectors locally in a file-based store (LocalFileStore).
Document retrieval
The rag.py module implements document retrieval based on semantic similarity. We have these main components:
- Text splitting
- In-memory vector store
- DocumentRetriever class
Let’s start with the imports again:
import os
import tempfile
from typing import List, Any
from langchain_core.callbacks import CallbackManagerForRetrieverRun
from langchain_core.documents import Document
from langchain_core.retrievers import BaseRetriever
from langchain_core.vectorstores import InMemoryVectorStore
from langchain_text_splitters import RecursiveCharacterTextSplitter
from chapter4.document_loader import load_document
from chapter4.llms import EMBEDDINGSWe need to set up a vector store for the retriever to use:
VECTOR_STORE = InMemoryVectorStore(embedding=EMBEDDINGS)The document chunks are stored in an InMemoryVectorStore using the cached embeddings, allowing for fast similarity searches. The module uses RecursiveCharacterTextSplitter to break documents into smaller chunks, which makes them more manageable for retrieval:
def split_documents(docs: List[Document]) -> list[Document]:
"""Split each document."""
text_splitter = RecursiveCharacterTextSplitter(
chunk_size=1500, chunk_overlap=200
)
return text_splitter.split_documents(docs)This custom retriever inherits from a base retriever and manages an internal list of documents:
class DocumentRetriever(BaseRetriever):
"""A retriever that contains the top k documents that contain the user
query."""
documents: List[Document] = []
k: int = 5
def model_post_init(self, ctx: Any) -> None:
self.store_documents(self.documents)
@staticmethod
def store_documents(docs: List[Document]) -> None:
"""Add documents to the vector store."""
splits = split_documents(docs)
VECTOR_STORE.add_documents(splits)
def add_uploaded_docs(self, uploaded_files):
"""Add uploaded documents."""
docs = []
temp_dir = tempfile.TemporaryDirectory()
for file in uploaded_files:
temp_filepath = os.path.join(temp_dir.name, file.name)
with open(temp_filepath, "wb") as f:
f.write(file.getvalue())
docs.extend(load_document(temp_filepath))
self.documents.extend(docs)
self.store_documents(docs)
def _get_relevant_documents(
self, query: str, *, run_manager:
CallbackManagerForRetrieverRun
) -> List[Document]:
"""Sync implementations for retriever."""
if len(self.documents) == 0:
return []
return VECTOR_STORE.similarity_search(query="", k=self.k)There are a few methods that we should explain:
- store_documents() splits the documents and adds them to the vector store.
- add_uploaded_docs() processes files uploaded by the user, stores them temporarily, loads them as documents, and adds them to the vector store.
- _get_relevant_documents() returns the top k documents related to a given query from the vector store. This is the similarity search that we’ll use.
Designing the state graph
The rag.py module implements the RAG pipeline that ties together document retrieval with LLM-based generation:
- System prompt: A template prompt instructs the AI on how to use the provided document snippets when generating a response. This prompt sets the context and provides guidance on how to utilize the retrieved information.
- State definition: A TypedDict class defines the structure of our graph’s state, tracking key information like the user’s question, retrieved context documents, generated answers, issues reports, and the conversation’s message history. This state object flows through each node in our pipeline and gets updated at each step.
- Pipeline steps: The module defines several key functions that serve as processing nodes in our graph:
- Retrieve function: Fetches relevant documents based on the user’s query
- generate function: Creates a draft answer using the retrieved documents and query
- double_check function: Evaluates the generated content for compliance with corporate standards
- doc_finalizer function: Either returns the original answer if no issues were found or revises it based on the feedback from the checker
• Graph compilation: Uses a state graph (via LangGraph’s StateGraph) to define the sequence of steps. The pipeline is then compiled into a runnable graph that can process queries through the complete workflow.
Let’s get the imports out of the way:
from typing import Annotated
from langchain_core.documents import Document
from langchain_core.messages import AIMessage
from langchain_core.prompts import ChatPromptTemplate
from langgraph.checkpoint.memory import MemorySaver
from langgraph.constants import END
from langgraph.graph import START, StateGraph, add_messages
from typing_extensions import List, TypedDict
from chapter4.llms import chat_model
from chapter4.retriever import DocumentRetrieverAs we mentioned earlier, the system prompt template instructs the AI on how to use the provided document snippets when generating a response:
system_prompt = (
"You're a helpful AI assistant. Given a user question "
"and some corporate document snippets, write documentation."
"If none of the documents is relevant to the question, "
"mention that there's no relevant document, and then "
"answer the question to the best of your knowledge."
"\n\nHere are the corporate documents: "
"{context}"
)We’ll then instantiate a DocumentRetriever and a prompt:
retriever = DocumentRetriever()
prompt = ChatPromptTemplate.from_messages(
[
("system", system_prompt),
("human", "{question}"),
]
)We then have to define the state of the graph. A TypedDict state is used to hold the current state of the application (for example, question, context documents, answer, issues report):
class State(TypedDict):
question: str
context: List[Document]
answer: str
issues_report: str
issues_detected: bool
messages: Annotated[list, add_messages]Each of these fields corresponds to a node in the graph that we’ll define with LangGraph. We have the following processing in the nodes:
- retrieve function: Uses the retriever to get relevant documents based on the most recent message
- generate function: Creates a draft answer by combining the retrieved document content with the user question using the chat prompt
- double_check function: Reviews the generated draft for compliance with corporate standards. It checks the draft and sets flags if issues are detected
- doc_finalizer function: If issues are found, it revises the document based on the provided feedback; otherwise, it returns the original answer
Let’s start with the retrieval:
def retrieve(state: State):
retrieved_docs = retriever.invoke(state["messages"][-1].content)
print(retrieved_docs)
return {"context": retrieved_docs}
def generate(state: State):
docs_content = "\n\n".join(doc.page_content for doc in
state["context"])
messages = prompt.invoke(
{"question": state["messages"][-1].content, "context": docs_
content}
)
response = chat_model.invoke(messages)
print(response.content)
return {"answer": response.content}We’ll also implement a content validation check as a critical quality assurance step in our RAG pipeline. Please note that this is the simplest implementation possible. In a production environment, we could have implemented a human-in-the-loop review process or more sophisticated guardrails. Here, we’re using an LLM to analyze the generated content for any issues:
def double_check(state: State):
result = chat_model.invoke(
[{
"role": "user",
"content": (
f"Review the following project documentation for
compliance with our corporate standards. "
f"Return 'ISSUES FOUND' followed by any issues detected or
'NO ISSUES': {state['answer']}"
)
}]
)
if "ISSUES FOUND" in result.content:
print("issues detected")
return {
"issues_report": result.split("ISSUES FOUND", 1)[1].strip(),
"issues_detected": True
}
print("no issues detected")
return {
"issues_report": "",
"issues_detected": False
}The final node integrates any feedback to produce the finalized, compliant document:
def doc_finalizer(state: State):
"""Finalize documentation by integrating feedback."""
if "issues_detected" in state and state["issues_detected"]:
response = chat_model.invoke(
messages=[{
"role": "user",
"content": ( f"Revise the following documentation to address these
feedback points: {state['issues_report']}\n"
f"Original Document: {state['answer']}\n"
f"Always return the full revised document, even if no
changes are needed."
)
}]
)
return {
"messages": [AIMessage(response.content)]
}
return {
"messages": [AIMessage(state["answer"])]
}With our nodes defined, we construct the state graph:
graph_builder = StateGraph(State).add_sequence(
[retrieve, generate, double_check, doc_finalizer]
)
graph_builder.add_edge(START, "retrieve")
graph_builder.add_edge("doc_finalizer", END)
memory = MemorySaver()
graph = graph_builder.compile(checkpointer=memory)
config = {"configurable": {"thread_id": "abc123"}}
We can visualize this graph from a Jupyter notebook:
from IPython.display import Image, display
display(Image(graph.get_graph().draw_mermaid_png()))This is what the sequential flow from document retrieval to generation, validation, and finalization looks like:
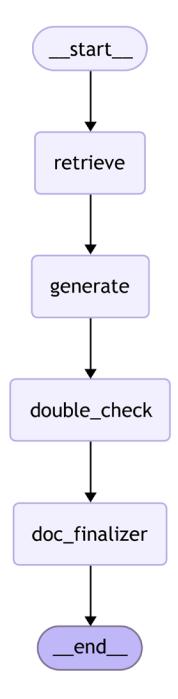
Figure 4.5: State graph of the corporate documentation pipeline
Before building a user interface, it’s important to test our RAG pipeline to ensure it functions correctly. Let’s examine how we can do this programmatically:
from langchain_core.messages import HumanMessage
input_messages = [HumanMessage("What's the square root of 10?")]
response = graph.invoke({"messages": input_messages}, config=config
The execution time varies depending on the complexity of the query and how extensively the model needs to reason about its response. Each step in our graph may involve API calls to the LLM, which contributes to the overall processing time. Once the pipeline completes, we can extract the final response from the returned object:
print(response["messages"][-1].content)The response object contains the complete state of our workflow, including all intermediate results. By accessing response[“messages”][-1].content, we’re retrieving the content of the last message, which contains the finalized answer generated by our RAG pipeline.
Now that we’ve confirmed our pipeline works as expected, we can create a user-friendly interface. While there are several Python frameworks available for building interactive interfaces (such as Gradio, Dash, and Taipy), we’ll use Streamlit due to its popularity, simplicity, and strong integration with data science workflows. Let’s explore how to create a comprehensive user interface for our RAG application!
Integrating with Streamlit for a user interface
We integrate our pipeline with Streamlit to enable interactive documentation generation. This interface lets users submit documentation requests and view the process in real time:
import streamlit as st
from langchain_core.messages import HumanMessage
from chapter4.document_loader import DocumentLoader
from chapter4.rag import graph, config, retriever
We’ll configure the Streamlit page with a title and wide layout for better readability:
st.set_page_config(page_title="Corporate Documentation Manager",
layout="wide")
We’ll initialize the session state for chat history and file management:
if "chat_history" not in st.session_state:
 st.session_state.chat_history = []
if 'uploaded_files' not in st.session_state:
 st.session_state.uploaded_files = []
Every time we reload the app, we display chat messages from the history on the app rerun:
for message in st.session_state.chat_history:
 print(f"message: {message}")
 with st.chat_message(message["role"]):
 st.markdown(message["content"])
The retriever processes all uploaded files and embeds them for semantic search:
docs = retriever.add_uploaded_docs(st.session_state.uploaded_files)
We need a function next to invoke the graph and return a string:
def process_message(message):
 """Assistant response."""
 response = graph.invoke({"messages": HumanMessage(message)},
config=config)
 return response["messages"][-1].content
This ignores the previous messages. We could change the prompt to provide previous messages to the LLM. We can then show a project description using markdown. Just briefly:
st.markdown("""
# Corporate Documentation Manager with Citations
""")
Next, we present our UI in two columns, one for chat and one for file management:
col1, col2 = st.columns([2, 1])Column 1 looks like this:
with col1:
 st.subheader("Chat Interface")
 # React to user input
 if user_message := st.chat_input("Enter your message:"):
 # Display user message in chat message container
 with st.chat_message("User"):
 st.markdown(user_message)
 # Add user message to chat history
 st.session_state.chat_history.append({"role": "User", "content":
user_message})
 response = process_message(user_message)
 with st.chat_message("Assistant"):
 st.markdown(response)
 # Add response to chat history
 st.session_state.chat_history.append(
 {"role": "Assistant", "content": response}
 )
Column 2 takes the files and gives them to the retriever:
with col2:
 st.subheader("Document Management")
 # File uploader
 uploaded_files = st.file_uploader(
 "Upload Documents",
 type=list(DocumentLoader.supported_extensions),
 accept_multiple_files=True
 )
 if uploaded_files:
 for file in uploaded_files:
 if file.name not in st.session_state.uploaded_files:
 st.session_state.uploaded_files.append(file)
To run our Corporate Documentation Manager application on Linux or macOS, follow these steps:
- Open your terminal and change directory to where your project files are. This ensures that the chapter4/ directory is accessible.
- Set PYTHONPATH and run Streamlit. The imports within the project rely on the current directory being in the Python module search path. Therefore, we’ll set PYTHONPATH when we run Streamlit:
PYTHONPATH=. streamlit run chapter4/streamlit\_app.pyThe preceding command tells Python to look in the current directory for modules, allowing it to find the chapter4 package.
- Once the command runs successfully, Streamlit will start a web server. Open your web browser and navigate to http://localhost:8501 to use the application.
Troubleshooting tips
- Please make sure you’ve installed all required packages. You can ensure you have Python installed on your system by using pip or other package managers as explained in Chapter 2.
- If you encounter import errors, verify that you’re in the correct directory and that PYTHONPATH is set correctly.
By following these steps, you should be able to run the application and use it to generate, check, and finalize corporate documentation with ease.
Evaluation and performance considerations
In Chapter 3, we explored implementing RAG with citations in the Corporate Documentation Manager example. To further enhance reliability, additional mechanisms can be incorporated into the pipeline. One improvement is to integrate a robust retrieval system such as FAISS, Pinecone, or Elasticsearch to fetch real-time sources. This is complemented by scoring mechanisms like precision, recall, and mean reciprocal rank to evaluate retrieval quality. Another enhancement involves assessing answer accuracy by comparing generated responses against ground-truth data or curated references and incorporating human-in-the-loop validation to ensure the outputs are both correct and useful.
It is also important to implement robust error-handling routines within each node. For example, if a citation retrieval fails, the system might fall back to default sources or note that citations could not be retrieved. Building observability into the pipeline by logging API calls, node execution times, and retrieval performance is essential for scaling up and maintaining reliability in production. Optimizing API use by leveraging local models when possible, caching common queries, and managing memory efficiently when handling large-scale embeddings further supports cost optimization and scalability.
Evaluating and optimizing our documentation chatbot is vital for ensuring both accuracy and efficiency. Modern benchmarks focus on whether the documentation meets corporate standards and how accurately it addresses the original request. Retrieval quality metrics such as precision, recall, and mean reciprocal rank measure the effectiveness of retrieving relevant content during compliance checks. Comparing the AI-generated documentation against ground-truth or manually curated examples provides a basis for assessing answer accuracy. Performance can be improved by fine-tuning search parameters for faster retrieval, optimizing memory management for largescale embeddings, and reducing API costs by using local models for inference when applicable.
These strategies build a more reliable, transparent, and production-ready RAG application that not only generates content but also explains its sources. Further performance and observability strategies will be covered in Chapter 8.
Building an effective RAG system means understanding its common failure points and addressing them with quantitative and testing-based strategies. In the next section, we’ll explore the typical failure points and best practices in relation to RAG systems.
Troubleshooting RAG systems
Barnett and colleagues in their paper Seven Failure Points When Engineering a Retrieval Augmented Generation System (2024), and Li and colleagues in their paper Enhancing Retrieval-Augmented Generation: A Study of Best Practices (2025) emphasize the importance of both robust design and continuous system calibration:
- Foundational setup: Ensure comprehensive and high-quality document collections, clear prompt formulations, and effective retrieval techniques that enhance precision and relevance.
- Continuous calibration: Regular monitoring, user feedback, and updates to the knowledge base help identify emerging issues during operation.
By implementing these practices early in development, many common RAG failures can be prevented. However, even well-designed systems encounter issues. The following sections explore the seven most common failure points identified by Barnett and colleagues (2024) and provide targeted solutions informed by empirical research.
A few common failure points and their remedies are as follows:
Missing content: Failure occurs when the system lacks relevant documents. Prevent this by validating content during ingestion and adding domain-specific resources. Use explicit signals to indicate when information is unavailable.
Missed top-ranked documents: Even with relevant documents available, poor ranking can lead to their exclusion. Improve this with advanced embedding models, hybrid semantic-lexical searches, and sentence-level retrieval.
Context window limitations: When key information is spread across documents that exceed the model’s context limit, it may be truncated. Mitigate this by optimizing document chunking and extracting the most relevant sentences.
• Information extraction failure: Sometimes, the LLM fails to synthesize the available context properly. This can be resolved by refining prompt design—using explicit instructions and contrastive examples enhances extraction accuracy.
Format compliance issues: Answers may be correct but delivered in the wrong format (e.g., incorrect table or JSON structure). Enforce structured output with parsers, precise format examples, and post-processing validation.
Specificity mismatch: The output may be too general or too detailed. Address this by using query expansion techniques and tailoring prompts based on the user’s expertise level.
Incomplete information: Answers might capture only a portion of the necessary details. Increase retrieval diversity (e.g., using maximum marginal relevance) and refine query transformation methods to cover all aspects of the query.
Integrating focused retrieval methods, such as retrieving documents first and then extracting key sentences, has been shown to improve performance—even bridging some gaps caused by smaller model sizes. Continuous testing and prompt engineering remain essential to maintaining system quality as operational conditions evolve.
Summary
In this chapter, we explored the key aspects of RAG, including vector storage, document processing, retrieval strategies, and implementation. Following this, we built a comprehensive RAG chatbot that leverages LangChain for LLM interactions and LangGraph for state management and workflow orchestration. This is a prime example of how you can design modular, maintainable, and user-friendly LLM applications that not only generate creative outputs but also incorporate dynamic feedback loops.
This foundation opens the door to more advanced RAG systems, whether you’re retrieving documents, enhancing context, or tailoring outputs to meet specific user needs. As you continue to develop production-ready LLM applications, consider how these patterns can be adapted and extended to suit your requirements. In Chapter 8, we’ll be discussing how to benchmark and quantify the performance of RAG systems to ensure performance is up to requirements.
In the next chapter, we will build on this foundation by introducing intelligent agents that can utilize tools for enhanced interactions. We will cover various tool integration strategies, structured tool output generation, and agent architectures such as ReACT. This will allow us to develop more capable AI systems that can dynamically interact with external resources.
Questions
- What are the key benefits of using vector embeddings in RAG?
- How does MMR improve document retrieval?
- Why is chunking necessary for effective document retrieval?
- What strategies can be used to mitigate hallucinations in RAG implementations?
- How do hybrid search techniques enhance the retrieval process?
- What are the key components of a chatbot utilizing RAG principles?
- Why is performance evaluation critical in RAG-based systems?
- What are the different retrieval methods in RAG systems?
- How does contextual compression refine retrieved information before LLM processing?
Chapter 5: Building Intelligent Agents
As generative AI adoption grows, we start using LLMs for more open and complex tasks that require knowledge about fresh events or interaction with the world. This is what is generally called agentic applications. We’ll define what an agent is later in this chapter, but you’ve likely seen the phrase circulating in the media: 2025 is the year of agentic AI. For example, in a recently introduced RE-Bench benchmark that consists of complex open-ended tasks, AI agents outperform humans in some settings (for example, with a thinking budget of 30 minutes) or on some specific class of tasks (like writing Triton kernels).
To understand how these agentic capabilities are built in practice, we’ll start by discussing tool calling with LLMs and how it is implemented on LangChain. We’ll look in detail at the ReACT pattern, and how LLMs can use tools to interact with the external environment and improve their performance on specific tasks. Then, we’ll touch on how tools are defined in LangChain, and which pre-built tools are available. We’ll also talk about developing your own custom tools, handling errors, and using advanced tool-calling capabilities. As a practical example, we’ll look at how to generate structured outputs with LLM using tools versus utilizing built-in capabilities offered by model providers.
Finally, we’ll talk about what agents are and look into more advanced patterns of building agents with LangGraph before we then develop our first ReACT agent with LangGraph—a research agent that follows a plan-and-solve design pattern and uses tools such as web search, arXiv, and Wikipedia.
In a nutshell, the following topics will be covered in this chapter:
What is a tool?
Defining built-in LangChain tools and custom tools
• Advanced tool-calling capabilities
Incorporating tools into workflows
What are agents?
You can find the code for this chapter in the chapter5/ directory of the book’s GitHub repository. Please visit https://github.com/benman1/generative\_ai\with\ langchain/tree/second\_edition for the latest updates.
See Chapter 2 for setup instructions. If you have any questions or encounter issues while running the code, please create an issue on GitHub or join the discussion on Discord at https://packt.link/lang.
Let’s begin with tools. Rather than diving straight into defining what an agent is, it’s more helpful to first explore how enhancing LLMs with tools actually works in practice. By walking through this step by step, you’ll see how these integrations unlock new capabilities. So, what exactly are tools, and how do they extend what LLMs can do?
What is a tool?
LLMs are trained on vast general corpus data (like web data and books), which gives them broad knowledge but limits their effectiveness in tasks that require domain-specific or up-to-date knowledge. However, because LLMs are good at reasoning, they can interact with the external environment through tools—APIs or interfaces that allow the model to interact with the external world. These tools enable LLMs to perform specific tasks and receive feedback from the external world.
When using tools, LLMs perform three specific generation tasks:
- Choose a tool to use by generating special tokens and the name of the tool.
- Generate a payload to be sent to the tool.
- Generate a response to a user based on the initial question and a history of interactions with tools (for this specific run).
Now it’s time to figure out how LLMs invoke tools and how we can make LLMs tool-aware. Consider a somewhat artificial but illustrative question: What is the square root of the current US president’s age multiplied by 132? This question presents two specific challenges:
• It references current information (as of March 2025) that likely falls outside the model’s training data.
• It requires a precise mathematical calculation that LLMs might not be able to answer correctly just by autoregressive token generation.
Rather than forcing an LLM to generate an answer solely based on its internal knowledge, we’ll give an LLM access to two tools: a search engine and a calculator. We expect the model to determine which tools it needs (if any) and how to use them.
For clarity, let’s start with a simpler question and mock our tools by creating dummy functions that always give the same response. Later in this chapter, we’ll implement fully functional tools and invoke them:
question = "how old is the US president?"
raw_prompt_template = (
 "You have access to search engine that provides you an "
 "information about fresh events and news given the query. "
 "Given the question, decide whether you need an additional "
 "information from the search engine (reply with 'SEARCH: "
 "<generated query>' or you know enough to answer the user "
 "then reply with 'RESPONSE <final response>').\n"
 "Now, act to answer a user question:\n{QUESTION}"
)
prompt_template = PromptTemplate.from_template(raw_prompt_template)
result = (prompt_template | llm).invoke(question)
print(result,response)
SEARCH: current age of US president
Let’s make sure that when the LLM has enough internal knowledge, it replies directly to the user:
question1 = "What is the capital of Germany?"
result = (prompt_template | llm).invoke(question1)
print(result,response)
RESPONSE: Berlin
Finally, let’s give the model output of a tool by incorporating it into a prompt:
query = "age of current US president"
search_result = (
 "Donald Trump ' Age 78 years June 14, 1946\n"
 "Donald Trump 45th and 47th U.S. President Donald John Trump is an
American "
 "politician, media personality, and businessman who has served as the
47th "
 "president of the United States since January 20, 2025. A member of the
"
 "Republican Party, he previously served as the 45th president from 2017
to 2021. Wikipedia"
)
raw_prompt_template = (
 "You have access to search engine that provides you an "
 "information about fresh events and news given the query. "
 "Given the question, decide whether you need an additional "
 "information from the search engine (reply with 'SEARCH: "
 "<generated query>' or you know enough to answer the user "
 "then reply with 'RESPONSE <final response>').\n"
 "Today is {date}."
 "Now, act to answer a user question and "
 "take into account your previous actions:\n"
 "HUMAN: {question}\n"
 "AI: SEARCH: {query}\n"
 "RESPONSE FROM SEARCH: {search_result}\n"
)
prompt_template = PromptTemplate.from_template(raw_prompt_template)
result = (prompt_template | llm).invoke(
 {"question": question, "query": query, "search_result": search_result,
 "date": "Feb 2025"})
print(result.content)
>> RESPONSE: The current US President, Donald Trump, is 78 years old.
As a last observation, if the search result is not successful, the LLM will try to refine the query:
query = "current US president"
search_result = (
 "Donald Trump 45th and 47th U.S."
)
result = (prompt_template | llm).invoke(
 {"question": question, "query": query,
 "search_result": search_result, "date": "Feb 2025"})
print(result.content)
>> SEARCH: Donald Trump age
With that, we have demonstrated how tool calling works. Please note that we’ve provided prompt examples for demonstration purposes only. Another foundational LLM might require some prompt engineering, and our prompts are just an illustration. And good news: using tools is easier than it seems from these examples!
As you can note, we described everything in our prompt, including a tool description and a tool-calling format. These days, most LLMs provide a better API for tool calling since modern LLMs are post-trained on datasets that help them excel in such tasks. The LLMs’ creators know how these datasets were constructed. That’s why, typically, you don’t incorporate a tool description yourself in the prompt; you just provide both a prompt and a tool description as separate arguments, and they are combined into a single prompt on the provider’s side. Some smaller open-source LLMs expect tool descriptions to be part of the raw prompt, but they would expect a well-defined format.
LangChain makes it easy to develop pipelines where an LLM invokes different tools and provides access to many helpful built-in tools. Let’s look at how tool handling works with LangChain.
Tools in LangChain
With most modern LLMs, to use tools, you can provide a list of tool descriptions as a separate argument. As always in LangChain, each particular integration implementation maps the interface to the provider’s API. For tools, this happens through LangChain’s tools argument to the invoke method (and some other useful methods such as bind_tools and others, as we will learn in this chapter).
When defining a tool, we need to specify its schema in OpenAPI format. We provide a title and a description of the tool and also specify its parameters (each parameter has a type, title, and description). We can inherit such a schema from various formats, which LangChain translates into OpenAPI format. As we go through the next few sections, we’ll illustrate how we can do this from functions, docstrings, Pydantic definitions, or by inheriting from a BaseTool class and providing descriptions directly. For an LLM, a tool is anything that has an OpenAPI specification—in other words, it can be called by some external mechanism.
The LLM itself doesn’t bother about this mechanism, it only produces instructions for when and how to call a tool. For LangChain, a tool is also something that can be called (and we will see later that tools are inherited from Runnables) when we execute our program.
The wording that you use in the title and description fields is extremely important, and you can treat it as a part of the prompt engineering exercise. Better wording helps LLMs make better decisions on when and how to call a specific tool. Please note that for more complex tools, writing a schema like this can become tedious, and we’ll see a simpler way to define tools later in this chapter:
search_tool = {
 "title": "google_search",
 "description": "Returns about fresh events and news from Google Search
engine based on a query",
 "type": "object",
 "properties": {
 "query": {
 "description": "Search query to be sent to the search engine",
 "title": "search_query",
 "type": "string"},
 },
 "required": ["query"]
}
result = llm.invoke(question, tools=[search_tool])
If we inspect the result.content field, it would be empty. That’s because the LLM has decided to call a tool, and the output message has a hint for that. What happens under the hood is that LangChain maps a specific output format of the model provider into a unified tool-calling format:
print(result.tool_calls)>> [{'name': 'google_search', 'args': {'query': 'age of Donald Trump'},
'id': '6ab0de4b-f350-4743-a4c1-d6f6fcce9d34', 'type': 'tool_call'}]Keep in mind that some model providers might return non-empty content even in the case of tool calling (for example, there might be reasoning traces on why the model decided to call a tool). You need to look at the model provider specification to understand how to treat such cases.
As we can see, an LLM returned an array of tool-calling dictionaries—each of them contains a unique identifier, the name of the tool to be called, and a dictionary with arguments to be provided to this tool. Let’s move to the next step and invoke the model again:
from langchain_core.messages import SystemMessage, HumanMessage,
ToolMessage
tool_result = ToolMessage(content="Donald Trump ' Age 78 years June 14,
1946\n", tool_call_id=step1.tool_calls[0]["id"])
step2 = llm.invoke([
 HumanMessage(content=question), step1, tool_result], tools=[search_
tool])
assert len(step2.tool_calls) == 0
print(step2.content)
>> Donald Trump is 78 years old.ToolMessage is a special message on LangChain that allows you to feed the output of a tool execution back to the model. The content field of such a message contains the tool’s output, and a special field tool_call_id maps it to the specific tool calling that was generated by the model. Now, we can send the whole sequence (consisting of the initial output, the step with tool calling, and the output) back to the model as a list of messages.
It might be odd to always pass a list of tools to the LLM (since, typically, such a list is fixed for a given workflow). For that reason, LangChain Runnables offer a bind method that memorizes arguments and adds them to every further invocation. Take a look at the following code:
llm_with_tools = llm.bind(tools=[search_tool])
llm_with_tools.invoke(question)
When we call llm.bind(tools=[search_tool]), LangChain creates a new object (assigned here to llm_with_tools) that automatically includes [search_tool] in every subsequent call to a copy of the initial llm one. Essentially, you no longer need to pass the tools argument with each invoke method. So, calling the preceding code is the same as doing:
llm.invoke(question, tools=[search_tool)This is because bind has “memorized” your tools list for all future invocations. It’s mainly a convenience feature—ideal if you want a fixed set of tools for repeated calls rather than specifying them every time. Now let’s see how we can utilize tool calling even more, and improve LLM reasoning!
ReACT
As you have probably thought already, LLMs can call multiple tools before generating the final reply to the user (and the next tool to be called or a payload sent to this tool might depend on the outcome from the previous tool calls). This was proposed by a ReACT approach introduced in 2022 by researchers from Princeton University and Google Research: Reasoning and ACT (https:// arxiv.org/abs/2210.03629). The idea is simple—we should give the LLM access to tools as a way to interact with an external environment, and let the LLM run in a loop:
- Reason: Generate a text output with observations about the current situation and a plan to solve the task.
- Act: Take an action based on the reasoning above (interact with the environment by calling a tool, or respond to the user).
It has been demonstrated that ReACT can help reduce hallucination rates compared to CoT prompting, which we discussed in Chapter 3.
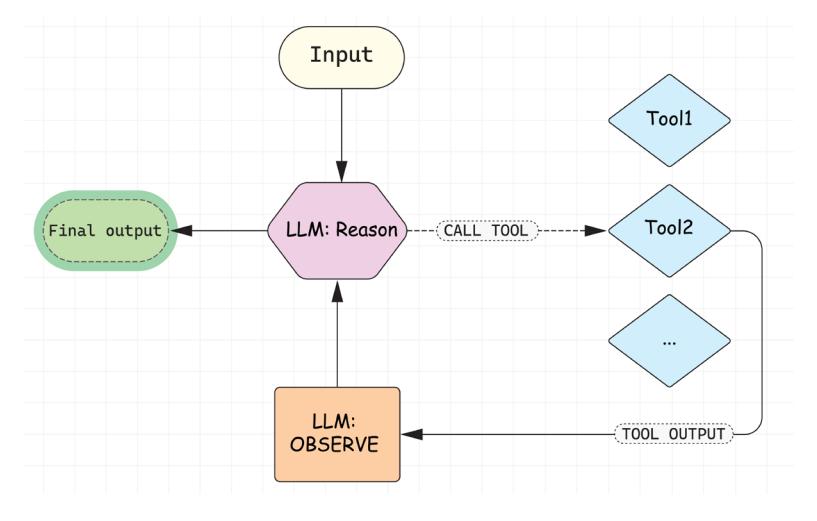
Figure 5.1: ReACT pattern
Let’s build a ReACT application ourselves. First, let’s create mocked search and calculator tools:
import math
def mocked_google_search(query: str) -> str:
 print(f"CALLED GOOGLE_SEARCH with query={query}")
 return "Donald Trump is a president of USA and he's 78 years old"
def mocked_calculator(expression: str) -> float:
print(f"CALLED CALCULATOR with expression={expression}")
if "sqrt" in expression:
return math.sqrt(78*132)
return 78*132In the next section, we’ll see how we can build actual tools. For now, let’s define a schema for the calculator tool and make the LLM aware of both tools it can use. We’ll also use building blocks that we’re already familiar with—ChatPromptTemplate and MessagesPlaceholder—to prepend a predetermined system message when we call our graph:
from langchain.prompts import ChatPromptTemplate, MessagesPlaceholder
calculator_tool = {
 "title": "calculator",
 "description": "Computes mathematical expressions",
 "type": "object",
 "properties": {
 "expression": {
 "description": "A mathematical expression to be evaluated by a
calculator",
 "title": "expression",
 "type": "string"},
 },
 "required": ["expression"]
}
prompt = ChatPromptTemplate.from_messages([
 ("system", "Always use a calculator for mathematical computations, and
use Google Search for information about fresh events and news."),
 MessagesPlaceholder(variable_name="messages"),
])
llm_with_tools = llm.bind(tools=[search_tool, calculator_tool]).
bind(prompt=prompt)
Now that we have an LLM that can call tools, let’s create the nodes we need. We need one function that calls an LLM, another function that invokes tools and returns tool-calling results (by appending ToolMessages to the list of messages in the state), and a function that will determine whether the orchestrator should continue calling tools or whether it can return the result to the user:
from typing import TypedDict
from langgraph.graph import MessagesState, StateGraph, START, END
def invoke_llm(state: MessagesState):
 return {"messages": [llm_with_tools.invoke(state["messages"])]}
def call_tools(state: MessagesState):
 last_message = state["messages"][-1]
 tool_calls = last_message.tool_calls
 new_messages = []
 for tool_call in tool_calls:
 if tool_call["name"] == "google_search":
 tool_result = mocked_google_search(**tool_call["args"])
 new_messages.append(ToolMessage(content=tool_result, tool_call_
id=tool_call["id"]))
 elif tool_call["name"] == "calculator":
 tool_result = mocked_calculator(**tool_call["args"])
 new_messages.append(ToolMessage(content=tool_result, tool_call_
id=tool_call["id"]))
 else:
 raise ValueError(f"Tool {tool_call['name']} is not defined!")
 return {"messages": new_messages}
def should_run_tools(state: MessagesState):
 last_message = state["messages"][-1]
 if last_message.tool_calls:
 return "call_tools"
 return END
Now let’s bring everything together in a LangGraph workflow:
builder = StateGraph(MessagesState)
builder.add_node("invoke_llm", invoke_llm)
builder.add_node("call_tools", call_tools)
builder.add_edge(START, "invoke_llm")
builder.add_conditional_edges("invoke_llm", should_run_tools)
builder.add_edge("call_tools", "invoke_llm")
graph = builder.compile()
question = "What is a square root of the current US president's age
multiplied by 132?"
result = graph.invoke({"messages": [HumanMessage(content=question)]})
print(result["messages"][-1].content)
>> CALLED GOOGLE_SEARCH with query=age of Donald Trump
CALLED CALCULATOR with expression=78 * 132
CALLED CALCULATOR with expression=sqrt(10296)
The square root of 78 multiplied by 132 (which is 10296) is approximately
101.47.
This demonstrates how the LLM made several calls to handle a complex question—first, to Google Search and then two calls to Calculator—and each time, it used the previously received information to adjust its actions. This is the ReACT pattern in action.
With that, we’ve learned how the ReACT pattern works in detail by building it ourselves. The good news is that LangGraph offers a pre-built implementation of a ReACT pattern, so you don’t need to implement it yourself:
from langgraph.prebuilt import create_react_agent
agent = create_react_agent(
 llm=llm,
 tools=[search_tool, calculator_tool],
 prompt=system_prompt)
In Chapter 6, we’ll see some additional adjustments you can use with the create_react_agent function.
Defining tools
So far, we have defined tools as OpenAPI schemas. But to run the workflow end to end, LangGraph should be able to call tools itself during the execution. Hence, in this section, let’s discuss how we define tools as Python functions or callables.
A LangChain tool has three essential components:
- Name: A unique identifier for the tool
- Description: Text that helps the LLM understand when and how to use the tool
- Payload schema: A structured definition of the inputs the tool accepts
It allows an LLM to decide when and how to call a tool. Another important distinction of a Lang-Chain tool is that it can be executed by an orchestrator, such as LangGraph. The base interface for a tool is BaseTool, which inherits from a RunnableSerializable itself. That means it can be invoked or batched as any Runnable, or serialized or deserialized as any Serializable.
Built-in LangChain tools
LangChain has many tools already available across various categories. Since tools are often provided by third-party vendors, some tools require paid API keys, some of them are completely free, and some of them have a free tier. Some tools are grouped together in toolkits—collections of tools that are supposed to be used together when working on a specific task. Let’s see some examples of using tools.
Tools give an LLM access to search engines, such as Bing, DuckDuckGo, Google, and Tavily. Let’s take a look at DuckDuckGoSearchRun as this search engine doesn’t require additional registration and an API key.
Please see Chapter 2 for setup instructions. If you have any questions or encounter issues while running the code, please create an issue on GitHub or join the discussion on Discord at https:// packt.link/lang.
As with any tool, this tool has a name, description, and schema for input arguments:
from langchain_community.tools import DuckDuckGoSearchRun
search = DuckDuckGoSearchRun()
print(f"Tool's name = {search.name}")
print(f"Tool's name = {search.description}")
print(f"Tool's arg schema = f{search.args_schema}")
>> Tool's name = fduckduckgo_search
Tool's name = fA wrapper around DuckDuckGo Search. Useful for when you
need to answer questions about current events. Input should be a search
query.
Tool's arg schema = class 'langchain_community.tools.ddg_search.tool.
DDGInput'
The argument schema, arg_schema, is a Pydantic model and we’ll see why it’s useful later in this chapter. We can explore its fields either programmatically or by going to the documentation page—it expects only one input field, a query:
from langchain_community.tools.ddg_search.tool import DDGInput
print(DDGInput.__fields__)
>> {'query': FieldInfo(annotation=str, required=True, description='search
query to look up')}Now we can invoke this tool and get a string output back (results from the search engine):
query = "What is the weather in Munich like tomorrow?"
search_input = DDGInput(query=query)
result = search.invoke(search_input.dict())
print(result)
We can also invoke the LLM with tools, and let’s make sure that the LLM invokes the search tool and does not answer directly:
result = llm.invoke(query, tools=[search])
print(result.tool_calls[0])
>> {'name': 'duckduckgo_search', 'args': {'query': 'weather in Munich
tomorrow'}, 'id': '222dc19c-956f-4264-bf0f-632655a6717d', 'type': 'tool_
call'}Our tool is now a callable that LangGraph can call programmatically. Let’s put everything together and create our first agent. When we stream our graph, we get updates to the state. In our case, these are only messages:
from langgraph.prebuilt import create_react_agent
agent = create_react_agent(model=llm, tools=[search])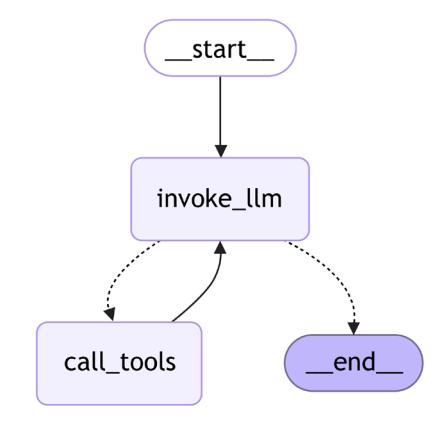
Figure 5.2: A pre-built ReACT workflow on LangGraph
That’s exactly what we saw earlier as well—an LLM is calling tools until it decides to stop and return the answer to the user. Let’s test it out!
When we stream LangGraph, we get new events that are updates to the graph’s state. We’re interested in the message field of the state. Let’s print out the new messages added:
for event in agent.stream({"messages": [("user", query)]}):
 update = event.get("agent", event.get("tools", {}))
 for message in update.get("messages", []):
 message.pretty_print()
>> ================================ Ai Message ===========================
=======
Tool Calls:
duckduckgo_search (a01a4012-bfc0-4eae-9c81-f11fd3ecb52c)
Call ID: a01a4012-bfc0-4eae-9c81-f11fd3ecb52c
Args:
query: weather in Munich tomorrow
================================= Tool Message ===========================
======
Name: duckduckgo_search
The temperature in Munich tomorrow in the early morning is 4 ° C…
<TRUNCATED>
================================== Ai Message ============================
======The weather in Munich tomorrow will be 5°C with a 0% chance of rain in the morning. The wind will blow at 11 km/h. Later in the day, the high will be 53°F (approximately 12°C). It will be clear in the early morning.
Our agent is represented by a list of messages since this is the input and output that the LLM expects. We’ll see that pattern again when we dive deeper into agentic architectures and discuss it in the next chapter. For now, let’s briefly mention other types of tools that are already available on LangChain:
- Tools that enhance the LLM’s knowledge besides using a search engine:
- Academic research: arXiv and PubMed
- Knowledge bases: Wikipedia and Wikidata
- Financial data: Alpha Vantage, Polygon, and Yahoo Finance
- Weather: OpenWeatherMap
- Computation: Wolfram Alpha
- Tools that enhance your productivity: You can interact with Gmail, Slack, Office 365, Google Calendar, Jira, Github, etc. For example, GmailToolkit gives you access to GmailCreateDraft, GmailSendMessage, GmailSearch, GmailGetMessage, and GmailGetThread tools that allow you to search, retrieve, create, and send messages with your Gmail account. As you can see, not only can you give the LLM additional context about the user but, with some of these tools, LLMs can take actions that actually influence the outside environment, such as creating a pull request on GitHub or sending a message on Slack!
- Tools that give an LLM access to a code interpreter: These tools give LLMs access to a code interpreter by remotely launching an isolated container and giving LLMs access to this container. These tools require an API key from a vendor providing the sandboxes. LLMs are especially good at coding, and it’s a widely used pattern to ask an LLM to solve some complex task by writing code that solves it instead of asking it to generate tokens that represent the solution of the task. Of course, you should execute code generated by LLMs with caution, and that’s why isolated sandboxes play a huge role. Some examples are:
- Code execution: Python REPL and Bash
- Cloud services: AWS Lambda
- API tools: GraphQL and Requests
- File operations: File System
- Tools that give an LLM access to databases by writing and executing SQL code: For example, SQLDatabase includes tools to get information about the database and its objects and execute SQL queries. You can also access Google Drive with GoogleDriveLoader or perform operations with usual file system tools from a FileManagementToolkit.
- Other tools: These comprise tools that integrate third-party systems and allow the LLM to gather additional information or act. There are also tools that can integrate data retrieval from Google Maps, NASA, and other platforms and organizations.
- Tools for using other AI systems or automation:
- Image generation: DALL-E and Imagen
- Speech synthesis: Google Cloud TTS and Eleven Labs
- Model access: Hugging Face Hub
- Workflow automation: Zapier and IFTTT
Any external system with an API can be wrapped as a tool if it enhances an LLM like this:
- Provides relevant domain knowledge to the user or the workflow
- Allows an LLM to take actions on the user’s behalf
When integrating such tools with LangChain, consider these key aspects:
- Authentication: Secure access to the external system
- Payload schema: Define proper data structures for input/output
- Error handling: Plan for failures and edge cases
- Safety considerations: For example, when developing a SQL-to-text agent, restrict access to read-only operations to prevent unintended modifications
Therefore, an important toolkit is the RequestsToolkit, which allows one to easily wrap any HTTP API:
from langchain_community.agent_toolkits.openapi.toolkit import
RequestsToolkit
from langchain_community.utilities.requests import TextRequestsWrapper
toolkit = RequestsToolkit(
 requests_wrapper=TextRequestsWrapper(headers={}),
 allow_dangerous_requests=True,
)
for tool in toolkit.get_tools():
  print(tool.name)
>> requests_get
requests_post
requests_patch
requests_put
requests_delete Let’s take a free open-source currency API (https://frankfurter.dev/). It’s a random free API we took from the Internet for illustrative purposes only, just to show you how you can wrap any existing API as a tool. First, we need to put together an API spec based on the OpenAPI format. We truncated the spec but you can find the full version on our GitHub:
api_spec = """
openapi: 3.0.0
info:
 title: Frankfurter Currency Exchange API
 version: v1
 description: API for retrieving currency exchange rates. Pay attention to
the base currency and change it if needed.
servers:
 - url: https://api.frankfurter.dev/v1
paths:
 /v1/latest:
 get:
 summary: Get the latest exchange rates.
 parameters:
 - in: query
 name: symbols
 schema:
 type: string
 description: Comma-separated list of currency symbols to retrieve
rates for. Example: CHF,GBP
 - in: query
 name: base
 schema:
 type: string
 description: The base currency for the exchange rates. If not
provided, EUR is used as a base currency. Example: USD
 /v1/{date}:
 ...
"""
Now let’s build and run our ReACT agent; we’ll see that the LLM can query the third-party API and provide fresh answers on currency exchange rates:
system_message = (
 "You're given the API spec:\n{api_spec}\n"
 "Use the API to answer users' queries if possible. "
)
agent = create_react_agent(llm, toolkit.get_tools(), state_
modifier=system_message.format(api_spec=api_spec))
query = "What is the swiss franc to US dollar exchange rate?"
events = agent.stream(
 {"messages": [("user", query)]},
 stream_mode="values",
)
for event in events:
 event["messages"][-1].pretty_print()
>> ============================== Human Message ==========================
=======
What is the swiss franc to US dollar exchange rate?
================================== Ai Message ============================
======
Tool Calls:
requests_get (541a9197-888d-4ffe-a354-c726804ad7ff)
Call ID: 541a9197-888d-4ffe-a354-c726804ad7ff
Args:
url: https://api.frankfurter.dev/v1/latest?symbols=CHF&base=USD
================================= Tool Message ===========================
======
Name: requests_get
{"amount":1.0,"base":"USD","date":"2025-01-31","rates":{"CHF":0.90917}}
================================== Ai Message ============================
======
The Swiss franc to US dollar exchange rate is 0.90917.Observe that, this time, we use a stream_mode=“values” option, and in this option, each time, we get a full current state from the graph.

There are over 50 tools already available. You can find a full list on the documentation page: https://python.langchain.com/docs/integrations/tools/.
Custom tools
We looked at the variety of built-in tools offered by LangGraph. Now it’s time to discuss how you can create your own custom tools, besides the example we looked at when we wrapped the third-party API with the RequestsToolkit by providing an API spec. Let’s get down to it!
Wrapping a Python function as a tool
Any Python function (or callable) can be wrapped as a tool. As we remember, a tool on LangChain should have a name, a description, and an argument schema. Let’s build our own calculator based on the Python numexr library—a fast numerical expression evaluator based on NumPy (https:// github.com/pydata/numexpr). We’re going to use a special @tool decorator that will wrap our function as a tool:
import math
from langchain_core.tools import tool
import numexpr as ne
@tool
def calculator(expression: str) -> str:
"""Calculates a single mathematical expression, incl. complex numbers.
Always add * to operations, examples:
73i -> 73*i
7pi**2 -> 7*pi**2
"""
math_constants = {"pi": math.pi, "i": 1j, "e": math.exp}
result = ne.evaluate(expression.strip(), local_dict=math_constants)
return str(result)Let’s explore the calculator object we have! Notice that LangChain auto-inherited the name, the description, and args schema from the docstring and type hints. Please note that we used a fewshot technique (discussed in Chapter 3) to teach LLMs how to prepare the payload for our tool by adding two examples in the docstring:
from langchain_core.tools import BaseTool
assert isinstance(calculator, BaseTool)
print(f"Tool schema: {calculator.args_schema.model_json_schema()}")>> Tool schema: {'description': 'Calculates a single mathematical
expression, incl. complex numbers.\n\nAlways add * to operations,
examples:\n 73i -> 73*i\n 7pi**2 -> 7*pi**2', 'properties':
{'expression': {'title': 'Expression', 'type': 'string'}}, 'required':
['expression'], 'title': 'calculator', 'type': 'object'}Let’s try out our new tool to evaluate an expression with complex numbers, which extend real numbers with a special imaginary unit i that has a property i**2=-1:
query = "How much is 2+3i squared?"
agent = create_react_agent(llm, [calculator])
for event in agent.stream({"messages": [("user", query)]}, stream_
mode="values"):
event["messages"][-1].pretty_print()>> ===============================Human Message ==========================
=======
How much is 2+3i squared?
================================== Ai Message ============================
======
Tool Calls:
calculator (9b06de35-a31c-41f3-a702-6e20698bf21b)
Call ID: 9b06de35-a31c-41f3-a702-6e20698bf21b
Args:
expression: (2+3*i)**2
================================= Tool Message ===========================
======
Name: calculator
(-5+12j)
================================== Ai Message ============================
======
(2+3i)² = -5+12i.With just a few lines of code, we’ve successfully extended our LLM’s capabilities to work with complex numbers. Now we can put together the example we started with:
question = "What is a square root of the current US president's age
multiplied by 132?"
system_hint = "Think step-by-step. Always use search to get the fresh
information about events or public facts that can change over time."
agent = create_react_agent(
llm, [calculator, search],
state_modifier=system_hint)
for event in agent.stream({"messages": [("user", question)]}, stream_
mode="values"):
event["messages"][-1].pretty_print()
print(event["messages"][-1].content)>> The square root of Donald Trump's age multiplied by 132 is
approximately 101.47.We haven’t provided the full output here in the book (you can find it on our GitHub), but if you run this snippet, you should see that the LLM was able to query tools step by step:
- It called the search engine with the query “current US president”.
- Then, it again called the search engine with the query “donald trump age”.
- As the last step, the LLM called the calculator tool with the expression “sqrt(78*132)”.
- Finally, it returned the correct answer to the user.
At every step, the LLM reasoned based on the previously collected information and then acted with an appropriate tool—that’s the essence of the ReACT approach.
Creating a tool from a Runnable
Sometimes, LangChain might not be able to derive a passing description or args schema from a function, or we might be using a complex callable that is difficult to wrap with a decorator. For example, we can use another LangChain chain or LangGraph graph as a tool. We can create a tool from any Runnable by explicitly specifying all needed descriptions. Let’s create a calculator tool from a function in an alternative fashion, and we will tune the retry behavior (in our case, we’re going to retry three times and add an exponential backoff between consecutive attempts):

Please note that we use the same function as above but we removed the @tool decorator.
from langchain_core.runnables import RunnableLambda, RunnableConfig
from langchain_core.tools import tool, convert_runnable_to_tool
def calculator(expression: str) -> str:
math_constants = {"pi": math.pi, "i": 1j, "e": math.exp}
result = ne.evaluate(expression.strip(), local_dict=math_constants)
return str(result)
calculator_with_retry = RunnableLambda(calculator).with_retry(
wait_exponential_jitter=True,
stop_after_attempt=3,
)
calculator_tool = convert_runnable_to_tool(
calculator_with_retry,
name="calculator",
description=(
"Calculates a single mathematical expression, incl. complex
numbers."
"'\nAlways add * to operations, examples:\n73i -> 73*i\n"
"7pi**2 -> 7*pi**2"
),
arg_types={"expression": "str"},
)Observe that we defined our function in a similar way to how we define LangGraph nodes—it takes a state (which now is a Pydantic model) and a config. Then, we wrapped this function as RunnableLambda and added retries. It might be useful if we want to keep our Python function as a function without wrapping it with a decorator, or if we want to wrap an external API (hence, description and arguments schema can’t be auto-inherited from the docstrings). We can use any Runnable (for example, a chain or a graph) to create a tool, and that allows us to build multi-agent systems since now one LLM-based workflow can invoke another LLM-based one. Let’s convert our Runnable to a tool:
calculator_tool = convert_runnable_to_tool(
calculator_with_retry,
name="calculator",
description=(
"Calculates a single mathematical expression, incl. complex
numbers."
"'\nAlways add * to operations, examples:\n73i -> 73*i\n"
"7pi**2 -> 7*pi**2"
),
arg_types={"expression": "str"},
)Let’s test our new calculator function with the LLM:
llm.invoke("How much is (2+3i)**2", tools=[calculator_tool]).tool_calls[0]>> {'name': 'calculator',
'args': {'__arg1': '(2+3*i)**2'},
'id': '46c7e71c-4092-4299-8749-1b24a010d6d6',
'type': 'tool_call'}As you can note, LangChain didn’t inherit the args schema fully; that’s why it created artificial names for arguments like __arg1. Let’s change our tool to accept a Pydantic model instead, in a similar fashion to how we define LangGraph nodes:
from pydantic import BaseModel, Field
from langchain_core.runnables import RunnableConfig
class CalculatorArgs(BaseModel):
expression: str = Field(description="Mathematical expression to be
evaluated")
def calculator(state: CalculatorArgs, config: RunnableConfig) -> str:
expression = state["expression"]
math_constants = config["configurable"].get("math_constants", {})
result = ne.evaluate(expression.strip(), local_dict=math_constants)
return str(result)Now the full schema is a proper one:
assert isinstance(calculator_tool, BaseTool)
print(f"Tool name: {calculator_tool.name}")
print(f"Tool description: {calculator_tool.description}")
print(f"Args schema: {calculator_tool.args_schema.model_json_schema()}")>> Tool name: calculator
Tool description: Calculates a single mathematical expression, incl.
complex numbers.'
Always add * to operations, examples:
73i -> 73*i
7pi**2 -> 7*pi**2
Args schema: {'properties': {'expression': {'title': 'Expression', 'type':
'string'}}, 'required': ['expression'], 'title': 'calculator', 'type':
'object'}Let’s test it together with an LLM:
tool_call = llm.invoke("How much is (2+3i)**2", tools=[calculator_tool]).
tool_calls[0]
print(tool_call)>> {'name': 'calculator', 'args': {'expression': '(2+3*i)**2'}, 'id':
'f8be9cbc-4bdc-4107-8cfb-fd84f5030299', 'type': 'tool_call'}We can call our calculator tool and pass it to the LangGraph configuration in runtime:
math_constants = {"pi": math.pi, "i": 1j, "e": math.exp}
config = {"configurable": {"math_constants": math_constants}}
calculator_tool.invoke(tool_call["args"], config=config)>> (-5+12j)With that, we have learned how we can easily convert any Runnable to a tool by providing additional details to LangChain to ensure an LLM can correctly handle this tool.
Subclass StructuredTool or BaseTool
Another method to define a tool is by creating a custom tool by subclassing the BaseTool class. As with other approaches, you must specify the tool’s name, description, and argument schema. You’ll also need to implement one or two abstract methods: _run for synchronous execution and, if necessary, _arun for asynchronous behavior (if it differs from simply wrapping the sync version). This option is particularly useful when your tool needs to be stateful (for example, to maintain long-lived connection clients) or when its logic is too complex to be implemented as a single function or Runnable.
If you want more flexibility than a @tool decorator gives you but don’t want to implement your own class, there’s an intermediate approach. You can also use the StructuredTool.from_function class method, which allows you to explicitly specify tools’ meta parameters such as description or args_schema with a few lines of code only:
from langchain_core.tools import StructuredTool
calculator_tool = StructuredTool.from_function(
name="calculator",
description=(
"Calculates a single mathematical expression, incl. complex
numbers."),
func=calculator,
args_schema=CalculatorArgs
)
tool_call = llm.invoke(
"How much is (2+3i)**2", tools=[calculator_tool]).tool_calls[0]One last note about synchronous and asynchronous implementations is necessary at this point. If an underlying function besides your tool is a synchronous function, LangChain will wrap it for the tool’s asynchronous implementation by launching it in a separate thread. In most cases, it doesn’t matter, but if you care about the additional overhead of creating a separate thread, you have two options—either subclass from the BaseClass and override async implementation, or create a separate async implementation of your function and pass it to the StructruredTool. from_function as a coroutine argument. You can also provide only async implementation, but then you won’t be able to invoke your workflows in a synchronous manner.
To conclude, let’s take another look at three options that we have to create a LangChain tool, and when to use each of them.
| Method to create a tool | When to use |
|---|---|
| @tool decorator | You have a function with clear docstrings and this function isn’t used anywhere in your code |
| convert_runnable_to_tool | You have an existing Runnable, or you need more detailed controlled on how arguments or tool descriptions are passed to an LLM (you wrap an existing function by a RunnableLambda in that case) |
| subclass from StructuredTool or BaseTool |
You need full control over tool description and logic (for example, you want to handle sync and async requests differently) |
Table 5.1: Options to create a LangChain tool
When an LLM generates payloads and calls tools, it might hallucinate or make other mistakes. Therefore, we need to carefully think about error handling.
Error handling
We already discussed error handling in Chapter 3, but it becomes even more important when you enhance an LLM with tools; you need logging, working with exceptions, and so on even more. One additional consideration is to think about whether you would like your workflow to continue and try to auto-recover if one of your tools fails. LangChain has a special ToolException that allows the workflow to continue its execution by handling the exception.
BaseTool has two special flags: handle_tool_error and handle_validation_error. Of course, since StructuredTool inherits from BaseTool, you can pass these flags to the StructuredTool. from_function class method. If this flag is set, LangChain would construct a string to return as a result of tools’ execution if either a ToolException or a Pydantic ValidationException (when validating input payload) happens.
To understand what happens, let’s take a look at the LangChain source code for the _handle_ tool_error function:
def _handle_tool_error(
e: ToolException,
*,
flag: Optional[Union[Literal[True], str, Callable[[ToolException],
str]]],
) -> str:
if isinstance(flag, bool):
content = e.args[0] if e.args else "Tool execution error"
elif isinstance(flag, str):
content = flag
elif callable(flag):
content = flag(e)
else:
msg = (
f"Got an unexpected type of `handle_tool_error`. Expected
bool, str "
f"or callable. Received: {flag}"
)
raise ValueError(msg) # noqa: TRY004
return contentAs we can see, we can set this flag to a Boolean, string, or callable (that converts a ToolException to a string). Based on this, LangChain would try to handle ToolException and pass a string to the next stage instead. We can incorporate this feedback into our workflow and add an auto-recover loop.
Let’s look at an example. We adjust our calculator function by removing a substitution i->j (a substitution from an imaginary unit in math to an imaginary unit in Python), and we also make StructuredTool auto-inherit descriptions and arg_schema from the docstring:
from langchain_core.tools import StructuredTool
def calculator(expression: str) -> str:
"""Calculates a single mathematical expression, incl. complex
numbers."""
return str(ne.evaluate(expression.strip(), local_dict={}))
calculator_tool = StructuredTool.from_function(
func=calculator,
handle_tool_error=True
)
agent = create_react_agent(
llm, [calculator_tool])
for event in agent.stream({"messages": [("user", "How much is
(2+3i)^2")]}, stream_mode="values"):
event["messages"][-1].pretty_print()>> ============================== Human Message ==========================
=======
How much is (2+3i)^2
================================== Ai Message ============================
======
Tool Calls:
calculator (8bfd3661-d2e1-4b8d-84f4-0be4892d517b)
Call ID: 8bfd3661-d2e1-4b8d-84f4-0be4892d517b
Args:
expression: (2+3i)^2
================================= Tool Message ===========================
======
Name: calculator
Error: SyntaxError('invalid decimal literal', ('<expr>', 1, 4, '(2+3i)^2',
1, 4))
Please fix your mistakes.
================================== Ai Message ============================
======
(2+3i)^2 is equal to -5 + 12i. I tried to use the calculator tool, but it
returned an error. I will calculate it manually for you.
(2+3i)^2 = (2+3i)*(2+3i) = 2*2 + 2*3i + 3i*2 + 3i*3i = 4 + 6i + 6i - 9 =
-5 + 12iAs we can see, now our execution of a calculator fails, but since the error description is not clear enough, the LLM decides to respond itself without using the tool. Depending on your use case, you might want to adjust the behavior; for example, provide more meaningful errors from the tool, force the workflow to try to adjust the payload for the tool, etc.
LangGraph also offers a built-in ValidationNode that takes the last messages (by inspecting the messages key in the graph’s state) and checks whether it has tool calls. If that’s the case, LangGraph validates the schema of the tool call, and if it doesn’t follow the expected schema, it raises a ToolMessage with the validation error (and a default command to fix it). You can add a conditional edge that cycles back to the LLM and then the LLM would regenerate the tool call, similar to the pattern we discussed in Chapter 3.
Now that we’ve learned what a tool is, how to create one, and how to use built-in LangChain tools, it’s time to take a look at additional instructions that you can pass to an LLM on how to use tools.
Advanced tool-calling capabilities
Many LLMs offer you some additional configuration options on tool calling. First, some models support parallel function calling—specifically, an LLM can call multiple tools at once. LangChain natively supports this since the tool_calls field of an AIMessage is a list. When you return ToolMessage objects as function call results, you should carefully match the tool_call_id field of a ToolMessage to the generated payload. This alignment is necessary so that LangChain and the underlying LLM can match them together when doing the next turn.
Another advanced capability is forcing an LLM to call a tool, or even to call a specific tool. Generally speaking, an LLM decides whether it should call a tool, and if it should, which tool to call from the list of provided tools. Typically, it’s handled by tool_choice and/or tool_config arguments passed to the invoke method, but implementation depends on the model’s provider. Anthropic, Google, OpenAI, and other major providers have slightly different APIs, and although LangChain tries to unify arguments, in such cases, you should double-check details by the model’s provider.
Typically, the following options are available:
- “auto”: An LLM can respond or call one or many tools.
- “any”: An LLM is forced to respond by calling one or many tools.
- “tool” or “any” with a provided list of tools: An LLM is forced to respond by calling a tool from the restricted list.
- “None”: An LLM is forced to respond without calling a tool.
Another important thing to keep in mind is that schemas might become pretty complex—i.e., they might have nullable fields or nested fields, include enums, or reference other schemas. Depending on the model’s provider, some definitions might not be supported (and you will see warning or compiling errors). Although LangChain aims to make switching across vendors seamless, for some complex workflows, this might not be the case, so pay attention to warnings in the error logs. Sometimes, compilations of a provided schema to a schema supported by the model’s provider are done on the best effort basis—for example, a field with a type of Union[str, int] is compiled to a str type if an underlying LLM doesn’t support Union types with tool calling. You’ll get a warning, but ignoring such a warning during a migration might change the behavior of your application unpredictably.
As a final note, it is worth mentioning that some providers (for example, OpenAI or Google) offer custom tools, such as a code interpreter or Google search, that can be invoked by the model itself, and the model will use the tool’s output to prepare a final generation. You can think of this as a ReACT agent on the provider’s side, where the model receives an enhanced response based on a tool it calls. This approach reduces latency and costs. In these cases, you typically supply the LangChain wrapper with a custom tool created using the provider’s SDK rather than one built with LangChain (i.e., a tool that doesn’t inherit from the BaseTool class), which means your code won’t be transferable across models.
Incorporating tools into workflows
Now that we know how to create and use tools, let’s discuss how we can incorporate the tool-calling paradigm deeper into the workflows we’re developing.
Controlled generation
In Chapter 3, we started to discuss a controlled generation, when you want an LLM to follow a specific schema. We can improve our parsing workflows not only by creating more sophisticated and reliable parsers but also by being more strict in forcing an LLM to adhere to a certain schema. Calling a tool requires controlled generation since the generated payload should follow a specific schema, but we can take a step back and substitute our expected schema with a forced tool calling that follows the expected schema. LangChain has a built-in mechanism to help with that—an LLM has the with_structured_output method that takes a schema as a Pydantic model, converts it to a tool, invokes the LLM with a given prompt by forcing it to call this tool, and parses the output by compiling to a corresponding Pydantic model instance.
Later in this chapter, we’ll discuss a plan-and-solve agent, so let’s start preparing a building block. Let’s ask our LLM to generate a plan for a given action, but instead of parsing the plan, let’s define it as a Pydantic model (a Plan is a list of Steps):
from pydantic import BaseModel, Field
class Step(BaseModel):
"""A step that is a part of the plan to solve the task."""
step: str = Field(description="Description of the step")
class Plan(BaseModel):
"""A plan to solve the task."""
steps: list[Step]Keep in mind that we use nested models (one field is referencing another), but LangChain will compile a unified schema for us. Let’s put together a simple workflow and run it:
prompt = PromptTemplate.from_template(
"Prepare a step-by-step plan to solve the given task.\n"
"TASK:\n{task}\n"
)
result = (prompt | llm.with_structured_output(Plan)).invoke(
"How to write a bestseller on Amazon about generative AI?")If we inspect the output, we’ll see that we got a Pydantic model as a result. We don’t need to parse the output anymore; we got a list of specific steps out of the box (and later, we’ll see how we can use it further):
assert isinstance(result, Plan)
print(f"Amount of steps: {len(result.steps)}")
for step in result.steps:
print(step.step)
break>> Amount of steps: 21
**1. Idea Generation and Validation:**Controlled generation provided by the vendor
Another way is vendor-dependent. Some foundational model providers offer additional API parameters that can instruct a model to generate a structured output (typically, a JSON or enum). You can force the model to use JSON generation the same way as above using with_structured_output, but provide another argument, method=“json_mode” (and double-check that the underlying model provider supports controlled generation as JSON):
plan_schema = {
"type": "ARRAY",
"items": {
"type": "OBJECT",
"properties": {
"step": {"type": "STRING"},
},
},
}
query = "How to write a bestseller on Amazon about generative AI?"
result = (prompt | llm.with_structured_output(schema=plan_schema,
method="json_mode")).invoke(query)Note that the JSON schema doesn’t contain descriptions of the fields, hence typically, your prompts should be more detailed and informative. But as an output, we get a full-qualified Python dictionary:
assert(isinstance(result, list))
print(f"Amount of steps: {len(result)}")
print(result[0])>> Amount of steps: 10
{'step': 'Step 1: Define your niche and target audience. Generative AI is
a broad topic. Focus on a specific area, like generative AI in marketing,
art, music, or writing. Identify your ideal reader (such as marketers,
artists, developers).'}You can instruct the LLM instance directly to follow controlled generation instructions. Note that specific arguments and functionality might vary from one model provider to another (for example, OpenAI models use a response_format argument). Let’s look at how to instruct Gemini to return JSON:
from langchain_core.output_parsers import JsonOutputParser
llm_json = ChatVertexAI(
model_name="gemini-1.5-pro-002", response_mime_type="application/json",
response_schema=plan_schema)
result = (prompt | llm_json | JsonOutputParser()).invoke(query)
assert(isinstance(result, list))We can also ask Gemini to return an enum—in other words, only one value from a set of values:
from langchain_core.output_parsers import StrOutputParser
response_schema = {"type": "STRING", "enum": ["positive", "negative",
"neutral"]}
prompt = PromptTemplate.from_template(
"Classify the tone of the following customer's review:"
"\n{review}\n"
)
review = "I like this movie!"
llm_enum = ChatVertexAI(model_name="gemini-1.5-pro-002", response_mime_
type="text/x.enum", response_schema=response_schema)
result = (prompt | llm_enum | StrOutputParser()).invoke(review)
print(result)
#>> positiveLangChain abstracts the details of the model provider’s implementation with the method=“json_ mode” parameter or by allowing custom kwargs to be passed to the model. Some of the controlled generation capabilities are model-specific. Check your model’s documentation for supported schema types, constraints, and arguments.
ToolNode
To simplify agent development, LangGraph has built-in capabilities such as ToolNode and tool_ conditions. The ToolNode checks the last message in messages (you can redefine the key name). If this message contains tool calls, it invokes the corresponding tools and updates the state. On the other hand, tool_conditions is a conditional edge that checks whether ToolNode should be called (or finishes otherwise).
Now we can build our ReACT engine in minutes:
from langgraph.prebuilt import ToolNode, tools_condition
def invoke_llm(state: MessagesState):
return {"messages": [llm_with_tools.invoke(state["messages"])]}
builder = StateGraph(MessagesState)
builder.add_node("invoke_llm", invoke_llm)
builder.add_node("tools", ToolNode([search, calculator]))
builder.add_edge(START, "invoke_llm")
builder.add_conditional_edges("invoke_llm", tools_condition)
builder.add_edge("tools", "invoke_llm")
graph = builder.compile()Tool-calling paradigm
Tool calling is a very powerful design paradigm that requires a change in how you develop your applications. In many cases, instead of performing rounds of prompt engineering and many attempts to improve your prompts, think whether you could ask the model to call a tool instead.
Let’s assume we’re working on an agent that deals with contract cancellations and it should follow certain business logic. First, we need to understand the contract starting date (and dealing with dates might be difficult!). If you try to come up with a prompt that can correctly handle cases like this, you’ll realize it might be quite difficult:
examples = [
"I signed my contract 2 years ago",
"I started the deal with your company in February last year",
"Our contract started on March 24th two years ago"
]Instead, force a model to call a tool (and maybe even through a ReACT agent!). For example, we have two very native tools in Python—date and timedelta:
from datetime import date, timedelta
@tool
def get_date(year: int, month: int = 1, day: int = 1) -> date:
"""Returns a date object given year, month and day.
Default month and day are 1 (January) and 1.
Examples in YYYY-MM-DD format:
2023-07-27 -> date(2023, 7, 27)
2022-12-15 -> date(2022, 12, 15)
March 2022 -> date(2022, 3)
2021 -> date(2021)
"""
return date(year, month, day).isoformat()
@tool
def time_difference(days: int = 0, weeks: int = 0, months: int = 0, years:
int = 0) -> date:
"""Returns a date given a difference in days, weeks, months and years
relative to the current date.
By default, days, weeks, months and years are 0.
Examples:
two weeks ago -> time_difference(weeks=2)
last year -> time_difference(years=1)
"""
dt = date.today() - timedelta(days=days, weeks=weeks)
new_year = dt.year+(dt.month-months) // 12 - years
new_month = (dt.month-months) % 12
return dt.replace(year=new_year, month=new_month)Now it works like a charm:
from langchain_google_vertexai import ChatVertexAI
llm = ChatVertexAI(model="gemini-1.5-pro-002")
agent = create_react_agent(
llm, [get_date, time_difference], prompt="Extract the starting date of
a contract. Current year is 2025.")
for example in examples:
result = agent.invoke({"messages": [("user", example)]})
print(example, result["messages"][-1].content)>> I signed my contract 2 years ago The contract started on 2023-02-07.
I started the deal with your company in February last year The contract
started on 2024-02-01.
Our contract started on March 24th two years ago The contract started on
2023-03-24We learned how to use tools, or function calls, to enhance LLMs’ performance on complex tasks. This is one of the fundamental architectural patterns behind agents—now it’s time to discuss what an agent is.
What are agents?
Agents are one of the hottest topics of generative AI these days. People talk about agents a lot, but there are many different definitions of what an agent is. LangChain itself defines an agent as “a system that uses an LLM to decide the control flow of an application.” While we feel it’s a great definition that is worth citing, it missed some aspects.
As Python developers, you might be familiar with duck typing to determine an object’s behavior by the so-called duck test: “If it walks like a duck and it quacks like a duck, then it must be a duck.” With that concept in mind, let’s describe some properties of an agent in the context of generative AI:
- Agents help a user solve complex non-deterministic tasks without being given an explicit algorithm on how to do it. Advanced agents can even act on behalf of a user.
- To solve a task, agents typically perform multiple steps and iterations. They reason (generate new information based on available context), act (interact with the external environment), observe (incorporate feedback from the external environment), and communicate (interact and/or work collaboratively with other agents or humans).
- Agents utilize LLMs for reasoning (and solving tasks).
- While agents have certain autonomy (and to a certain extent, they even figure out what is the best way to solve the task by thinking and learning from interacting with the environment), when running an agent, we’d still like to keep a certain degree of control of the execution flow.
Retaining control over an agent’s behavior—an agentic workflow—is a core concept behind LangGraph. While LangGraph provides developers with a rich set of building blocks (such as memory management, tool invocation, and cyclic graphs with recursion depth control), its primary design pattern focuses on managing the flow and level of autonomy that LLMs exercise in executing tasks. Let’s start with an example and develop our agent.
Plan-and-solve agent
What do we as humans typically do when we have a complex task ahead of us? We plan! In 2023, Lei Want et al. demonstrated that plan-and-solve prompting improves LLM reasoning. It has been also demonstrated by multiple studies that LLMs’ performance tends to deteriorate as the complexity (in particular, the length and the number of instructions) of the prompt increases.
Hence, the first design pattern to keep in mind is task decomposition—to decompose complex tasks into a sequence of smaller ones, keep your prompts simple and focused on a single task, and don’t hesitate to add examples to your prompts. In our case, we are going to develop a research assistant.
Faced with a complex task, let’s first ask the LLM to come up with a detailed plan to solve this task, and then use the same LLM to execute on every step. Remember, at the end of the day, LLMs autoregressively generate output tokens based on input tokens. Such simple patterns as ReACT or plan-and-solve help us to better use their implicit reasoning capabilities.
First, we need to define our planner. There’s nothing new here; we’re using building blocks that we have already discussed—chat prompt templates and controlled generation with a Pydantic model:
from pydantic import BaseModel, Field
from langchain_core.prompts import ChatPromptTemplate
class Plan(BaseModel):
"""Plan to follow in future"""
steps: list[str] = Field(
description="different steps to follow, should be in sorted order"
)
system_prompt_template = (
"For the given task, come up with a step by step plan.\n"
"This plan should involve individual tasks, that if executed correctly
will "
"yield the correct answer. Do not add any superfluous steps.\n"
"The result of the final step should be the final answer. Make sure
that each "
"step has all the information needed - do not skip steps."
)
planner_prompt = ChatPromptTemplate.from_messages(
[("system", system_prompt_template),
("user", "Prepare a plan how to solve the following task:\
n{task}\n")])
planner = planner_prompt | ChatVertexAI(
model_name="gemini-1.5-pro-002", temperature=1.0
).with_structured_output(Plan)For a step execution, let’s use a ReACT agent with built-in tools—DuckDuckGo search, retrievers from arXiv and Wikipedia, and our custom calculator tool we developed earlier in this chapter:
from langchain.agents import load_tools
tools = load_tools(
tool_names=["ddg-search", "arxiv", "wikipedia"],
llm=llm
) + [calculator_tool]Next, let’s define our workflow state. We need to keep track of the initial task and initially generated plan, and let’s add past_steps and final_response to the state:
class PlanState(TypedDict):
task: str
plan: Plan
past_steps: Annotated[list[str], operator.add]
final_response: str
past_steps: list[str]
def get_current_step(state: PlanState) -> int:
"""Returns the number of current step to be executed."""
return len(state.get("past_steps", []))
def get_full_plan(state: PlanState) -> str:
"""Returns formatted plan with step numbers and past results."""
full_plan = []
for i, step in enumerate(state["plan"]):
full_step = f"# {i+1}. Planned step: {step}\n"
if i < get_current_step(state):
full_step += f"Result: {state['past_steps'][i]}\n"
full_plan.append(full_step)
return "\n".join(full_plan)Now, it’s time to define our nodes and edges:
from typing import Literal
from langgraph.graph import StateGraph, START, END
final_prompt = PromptTemplate.from_template(
"You're a helpful assistant that has executed on a plan."
"Given the results of the execution, prepare the final response.\n"
"Don't assume anything\nTASK:\n{task}\n\nPLAN WITH RESUlTS:\n{plan}\n"
"FINAL RESPONSE:\n"
)
async def _build_initial_plan(state: PlanState) -> PlanState:
plan = await planner.ainvoke(state["task"])
return {"plan": plan}
async def _run_step(state: PlanState) -> PlanState:
plan = state["plan"]
current_step = get_current_step(state)
step = await execution_agent.ainvoke({"plan": get_full_plan(plan),
"step": plan.steps[current_step], "task": state["task"]})
return {"past_steps": [step["messages"][-1].content]}
async def _get_final_response(state: PlanState) -> PlanState:
final_response = await (final_prompt | llm).ainvoke({"task":
state["task"], "plan": get_full_plan(state)})
return {"final_response": final_response}
def _should_continue(state: PlanState) -> Literal["run", "response"]:
if get_current_step(plan) < len(state["plan"].steps):
return "run"
return "final_response"And put together the final graph:
builder = StateGraph(PlanState)
builder.add_node("initial_plan", _build_initial_plan)
builder.add_node("run", _run_step)
builder.add_node("response", _get_final_response)
builder.add_edge(START, "initial_plan")
builder.add_edge("initial_plan", "run")
builder.add_conditional_edges("run", _should_continue)
builder.add_edge("response", END)
graph = builder.compile()
from IPython.display import Image, display
display(Image(graph.get_graph().draw_mermaid_png()))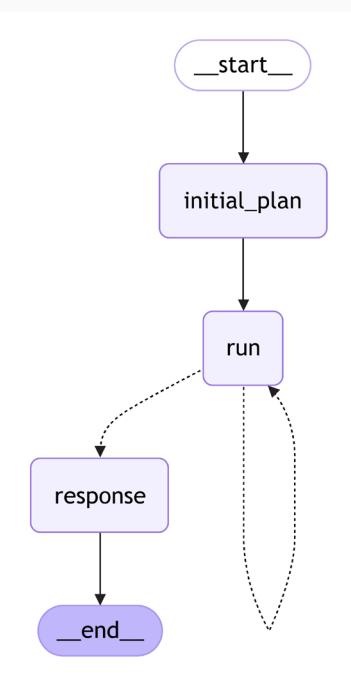
Figure 5.3: Plan-and-solve agentic workflow
Now we can run the workflow:
task = "Write a strategic one-pager of building an AI startup"
result = await graph.ainvoke({"task": task})You can see the full output on our GitHub, and we encourage you to play with it yourself. It might be especially interesting to investigate whether you like the result more compared to a single LLM prompt with a given task.
Summary
In this chapter, we explored how to enhance LLMs by integrating tools and design patterns for tool invocation, including the ReACT pattern. We started by building a ReACT agent from scratch and then demonstrated how to create a customized one with just one line of code using LangGraph.
Next, we delved into advanced techniques for controlled generation—showing how to force an LLM to call any tool or a specific one, and instructing it to return responses in structured formats (such as JSON, enums, or Pydantic models). In that context, we covered LangChain’s with_structured_output method, which transforms your data structure into a tool schema, prompts the model to call the tool, parses the output, and compiles it into a corresponding Pydantic instance.
Finally, we built our first plan-and-solve agent with LangGraph, applying all the concepts we’ve learned so far: tool calling, ReACT, structured outputs, and more. In the next chapter, we’ll continue discussing how to develop agents and look into more advanced architectural patterns.
Questions
- What are the key benefits of using tools with LLMs, and why are they important?
- How does LangChain’s ToolMessage class facilitate communication between the LLM and the external environment?
- Explain the ReACT pattern. What are its two main steps? How does it improve LLM performance?
- How would you define a generative AI agent? How does this relate to or differ from Lang-Chain’s definition?
- Explain some advantages and disadvantages of using the with_structured_output method compared to using a controlled generation directly.
- How can you programmatically define a custom tool in LangChain?
- Explain the purpose of the Runnable.bind() and bind_tools() methods in LangChain.
- How does LangChain handle errors that occur during tool execution? What options are available for configuring this behavior?